

About the Effect Controls panel
The Effect Controls panel lists all the effects that are applied to the currently selected clip. Fixed effects are included with every clip: the Motion and Opacity effects are listed in the Video Effects section and the Volume effect is listed in the Audio Effects section. The Volume effect is included only for audio clips or video clips with linked audio.
 You can quickly optimize the workspace for effects
editing by choosing Window > Workspace >
Effects.
You can quickly optimize the workspace for effects
editing by choosing Window > Workspace >
Effects.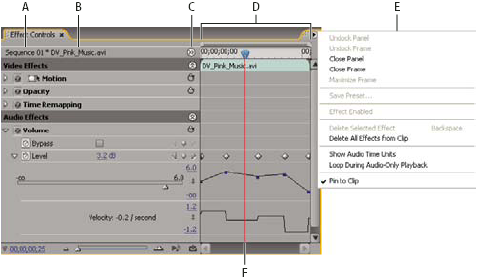
- A.
- Sequence name
- B.
- Clip name
- C.
- Show/Hide Timeline button
- D.
- Timeline view
- E.
- Effect Controls panel menu
- F.
- Current ‑time indicator
The Effect Controls panel includes a timeline, current‑time indicator,
zoom controls, and a navigator area similar to those found in the
Program Monitor and Timeline panel. By default, the Timeline view
is hidden, but you can show it by clicking the Show/Hide Timeline
View button  . You
may need to widen the Effect Controls panel in order to activate
this button.
. You
may need to widen the Effect Controls panel in order to activate
this button.
When you animate effect properties using keyframing, you can click the triangle to expand an effect property to display the Value (for properties) and Velocity (speed of the property changes) graphs for making precise adjustments to keyframes. You can fine‑tune the speed and smoothness of an effect’s animation by manipulating a keyframe’s Bezier handles to change the shape of the graph.
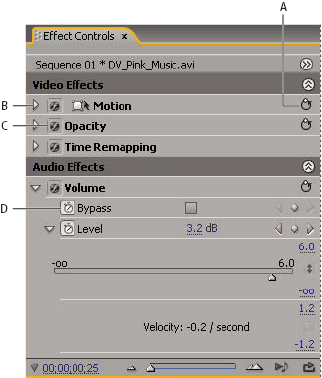
- A.
- Reset Effect button
- B.
- Show/Hide Effect parameters triangle
- C.
- Toggle The Effect On Or Off button
- D.
- Toggle Animation button
When a clip is selected in the Timeline panel, the Effect Controls panel automatically adjusts the zoom level of its Timeline view so that icons for the clip’s In and Out points are centered. You can view the rest of the Timeline panel by deselecting Pin To Clip in the Effect Controls panel menu. You don’t need to position the current‑time indicator over a clip to activate the Effect Controls panel. The Effect Controls panel also includes controls for playing and looping audio clips. Under the Effect Controls panel’s time ruler is the keyframe area, where you can set keyframes for the value for each effect property at a particular frame.
- A.
- Current time
- B.
- Zoom controls
- C.
- Play Only The Audio For This Clip
- D.
- Toggle Looping Audio Playback
- E.
- Effect values