

Add markers
Markers indicate important points in time and help you position and arrange clips. You could use a marker to identify an important action or sound in a sequence or clip. Markers are for reference only and do not alter the video.
You can also use sequence markers to specify cue points for Adobe Flash Video movies, or to specify a URL to send a user to a web page. Adobe Premiere Pro also provides Adobe Encore DVD markers that you can add to a sequence to specify scenes, or a menu structure for sequences that you export to Encore. (See Add Encore chapter markers.)
You can add markers to a sequence, to a source clip, or to an instance of a clip in a sequence. When you are marking editing points, whether you add markers to a clip or sequence depends on your workflow.
Each sequence and each clip can individually contain up to 100 numbered markers (labeled from 0 to 99) and as many unnumbered markers as you want.
Markers appear in the time ruler of the Source and Program monitors as small icons. Clip markers also become icons within the clip as it appears in the Timeline panel, and sequence markers appear in the sequence’s time ruler.
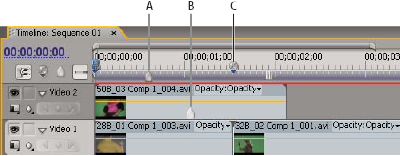
- A.
- Sequence marker
- B.
- Clip marker
- C.
- Encore chapter marker
When setting markers (as with In and Out points), make sure that you’re working with the version of the clip you want. Markers added to a source clip (opened from the Project panel) also appear in the clip when you add it to the sequence. Changing a source clip’s markers doesn’t affect individual instances of the clip already in a sequence, or vice versa. For a video on working with markers, see www.adobe.com/go/vid0255.
 Add an unnumbered clip marker
- Do one of the following:
-
To add a marker to a source clip, double‑click the clip in the Project panel to open it in the Source Monitor.
-
To add a marker to a clip in a sequence, double‑click the clip to open it in the Source Monitor.
-
- In the Source Monitor, move the current-time indicator
 to
the location where you want to set the marker, and click the Set
Unnumbered Marker button
to
the location where you want to set the marker, and click the Set
Unnumbered Marker button  .
.
Add an unnumbered sequence marker
- Click the Set Unnumbered Marker button in the Program
Monitor or
the Timeline panel
 . (Double‑click
the Set Unnumbered Marker button to open the Marker dialog box as
you set it.)
. (Double‑click
the Set Unnumbered Marker button to open the Marker dialog box as
you set it.)
You can also drag a marker from the Timeline panel’s marker button to any point in the time ruler.
 To
insert unnumbered markers while a clip or sequence plays, press
the asterisk key (*) on the numeric keypad whenever you want to
insert a marker.
To
insert unnumbered markers while a clip or sequence plays, press
the asterisk key (*) on the numeric keypad whenever you want to
insert a marker.