

Work with the speed graph
After you have set the shape of a motion path or created keyframes for a property, you can adjust the speed. Using the speed graph, you can adjust the rate of change of a value.
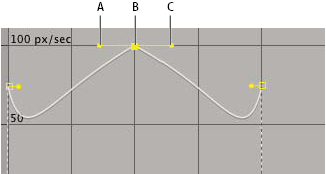
- A.
- Incoming direction handle
- B.
- Speed control
- C.
- Outgoing direction handle
 Adjust the rate of change with the speed graph
- Click the Graph Editor button and select Edit Speed Graph
from the Graph Options menu
 .
. - Do any of the following:
-
Drag a keyframe with joined direction handles up to accelerate or down to decelerate entering and leaving the keyframe.
-
Drag a split direction handle up to accelerate or down to decelerate the speed entering or leaving a keyframe.
-
To increase the influence of the keyframe, drag the direction handle away from the center of the keyframe. To decrease the influence, drag the direction handle toward the center of the keyframe.
Note: When you drag a direction handle beyond the top or bottom of the Graph Editor with Auto Zoom Graph Height on,
After Effects calculates a new minimum or maximum value based on
how far you dragged outside the graph, and it redraws the graph
so that all the values you specify for that layer property are visible
in the graph by default.
on,
After Effects calculates a new minimum or maximum value based on
how far you dragged outside the graph, and it redraws the graph
so that all the values you specify for that layer property are visible
in the graph by default. -
Create a bounce or peak
Use direction handles to simulate the type of acceleration seen in a bouncing ball. When you create this type of effect, the speed graph appears to rise quickly and peak.
- Drag the direction handles on either side of the keyframe
toward the center of the keyframe.
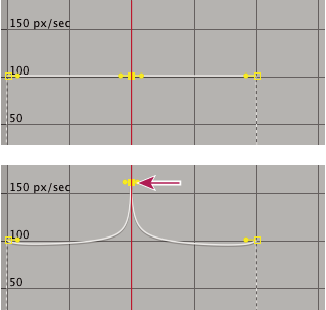 Dragging direction handle to create a peak
Start or stop change gradually
Direction handles can create gradual starts and stops, such as a boat slowing to a stop and then starting again. When you use this technique, the speed graph resembles a smooth U shape.
- Drag the direction handles on either side of the keyframe
away from the center of the keyframe.
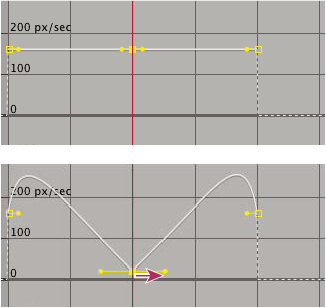 Dragging the direction handle to make a gradual change
Adjust influence of a direction handle on an adjacent keyframe
Along with controlling the level of acceleration and deceleration, you can also extend the influence of a keyframe outward or inward in relation to an adjacent keyframe. Influence determines how quickly the speed graph reaches the value you set at the keyframe, giving you an additional degree of control over the shape of the graph. The direction handle increases the influence of a keyframe value in relation to the neighboring keyframe when you drag it toward the neighboring keyframe, and it decreases the influence on the neighboring keyframe when you drag it toward the center of its own keyframe.
- In the Timeline panel, expand the outline for the keyframe you want to adjust.
- Click the Graph Editor button and display the speed graph for the property.
- Using the Selection tool, click a keyframe and drag the direction handle left or right.