| Create a disc image file |
Path and file names appear in the text box above the Browse button. |
The Save
Image project creates disc image files and saves them on your
hard drive. These files can be used to create new copies of your discs
whenever you wish using the Burn Image project.
To learn how to create a disc from a disc
image file, see Burn a disc image file. For
a more detailed discussion of disc image files and disc image file types,
see Understanding disc image files.
|
- By default, your disc image files will be saved in your
My Documents folder. If you choose a different location,
this new location will be remembered the next time you create a disc
image file.
- By default, your disc image files will be given the following
name: Image_[date]_[time].gi. You are free to select a different name
and different file type.
|
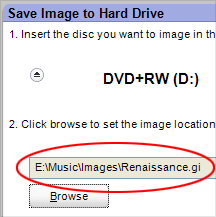
To create a disc image file:
- Click on the Copy tab in the project
list. A list of projects is displayed.
- Click on the Save Image project.
- In the project window, choose a drive from the drop-down list.
If your system has only one drive, its name will be automatically displayed.
- Insert the disc you wish to make an image from into your disc drive.
- Click on the Browse button. The Save As window opens.
- Select a destination for the disc image file and give
it a meaningful name. Select a file type from the Save as type
drop-down list.
- Click on the Save button on the Save
As window to confirm your selections.
- Click on the action button to begin recording.
|