

Work with tracks
The video and audio tracks in the Timeline panel are where you arrange clips, edit them, and add special effects. You can add or remove tracks as needed, rename them, and determine which can be affected by a procedure.
 Add tracks
New video tracks appear above existing video tracks, and new audio tracks appear below existing audio tracks. Deleting a track removes all clips in the track but does not affect source clips listed in the Project panel.
- Click OK.
Note: An audio track can accept only audio clips that use the matching channel type—mono, stereo, or 5.1. If you’re not sure what kind of audio your clips use, select the clip in the Project panel and read its information in the preview area.
 You can add a track as you add a clip to the sequence.
See Add a track while adding a clip.
You can add a track as you add a clip to the sequence.
See Add a track while adding a clip.
Delete tracks
- Click in the track header area to select the track you want to delete. You can target one video and one audio track at a time.
- With the Timeline panel active, choose Sequence > Delete Tracks.
- In the Delete Tracks dialog box, check the box for each type of track you want to delete.
- For each checked item, specify which tracks you want to delete in the pop‑up menu.
Rename a track
- Right-click (Windows) or Ctrl-click (Mac OS) the track's name and choose Rename.
- Type a new name for the track, and press Enter (Windows) or Return (Mac OS).
Lock and unlock tracks
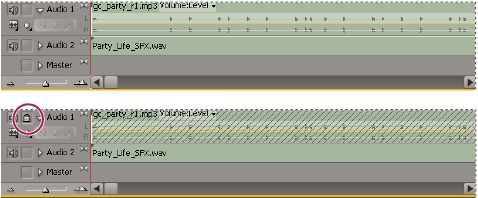
Locking an entire track is useful for preventing changes to any clips on that track while you work on other parts of the sequence. In the Timeline panel, a pattern of slashes appears over a locked track. Although clips in a locked track cannot be modified in any way, they are included when you preview or export the sequence. If you want to lock both a video track and a track with corresponding audio, lock each track separately. When you lock a target track, it is no longer the target; source clips cannot be added to the track until you unlock it and target it again.
You can lock a track to prevent
it from shifting when you perform insert edits. Click to display the Lock icon
  next
to the track name.
next
to the track name.
Exclude tracks in a sequence
You can exclude any track from previews and export. Clips in excluded video tracks do not appear in the Program Monitor. Clips in excluded audio tracks are not output to the Audio Mixer or to the speakers.
Click to hide the Eye icon  (for
video) or the Speaker icon
(for
video) or the Speaker icon  (for
audio) at the left edge of the track. (Each icon is a toggle switch.
Click its box again to display the icon and include the track.)
(for video)
or the Speaker icon (for
audio). This excludes all tracks of the same type. (Each icon is
a toggle switch. Shift‑click its box again to display all the icons
and include the tracks.)
(for
audio) at the left edge of the track. (Each icon is a toggle switch.
Click its box again to display the icon and include the track.)
(for video)
or the Speaker icon (for
audio). This excludes all tracks of the same type. (Each icon is
a toggle switch. Shift‑click its box again to display all the icons
and include the tracks.)