

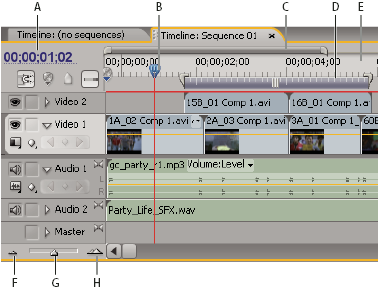
Navigate in the Timeline panel
- A.
- Current‑time display
- B.
- Current‑time indicator
- C.
- Viewing area bar
- D.
- Work area bar
- E.
- Time ruler
- F.
- Zoom out
- G.
- Zoom slider
- H.
- Zoom in
- Time ruler
- Measures sequence time horizontally, using the counting method specified in the project settings (although you may toggle to a counting method based on audio samples). Tick marks and numbers indicating the sequence time are displayed along the ruler and change according to the level of detail at which you view the sequence. The time ruler also displays icons for markers and the sequence In and Out points.
- Current‑time indicator (CTI)
- Indicates the current frame displayed in the Program Monitor. The current frame displays in the Program Monitor. The current‑time indicator is a light blue triangle in the ruler. A vertical line extends from the current‑time indicator to the bottom of the time ruler. You can change the current time by dragging the current‑time indicator.
- Current time display
- Shows the timecode for the current frame in the Timeline panel. To move to a different time, click in the time display and enter a new time, or place the pointer over the display and drag left or right. You can change the display between timecode and the simple frame count by Ctrl‑clicking (Windows) or Command-clicking (Mac OS) the current time in either a monitor or the Timeline panel.
- Viewing area bar
- Corresponds to the visible part of the sequence in the Timeline panel. You can change the size and position of the viewing area bar to quickly view different parts of the sequence. The viewing area bar is located just above the time ruler.
- Work area bar
- Specifies the area of the sequence that you want to preview or export. The work area bar is located in the lower portion of the time ruler.
- Zoom controls
- Change the scale of the time ruler to increase or decrease the number of frames visible within the current viewing area. The zoom controls are located at the bottom left of the Timeline panel.
 Position the current-time indicator in the Timeline panel
 Do any of the following:
-
In the time ruler, drag the current‑time indicator
 or click
where you want to position the current‑time indicator.
or click
where you want to position the current‑time indicator. -
Drag in the current time display.
-
Click in the current time display, type a valid time, and press Enter (Windows) or Return (Mac OS).
-
Use any playback control in the Program Monitor.
-
Press the Left or Right Arrow key to move the current‑time indicator
in
the direction you want. Press Shift while pressing the arrow keys
to move in increments of five frames.
Move the current‑time indicator using timecode
Click the timecode value, type
a new time, and press Enter (Windows) or Return (Mac OS). do not
use the number pad on Mac OS. You can use any of the following shortcuts
when entering timecode: - Omit leading zeros
- For example, 0;0;12;3 becomes 00;00;12;03.
- Omit semicolons (NTSC) or colons (PAL)
- For example, 1213 becomes 00;00;12;13 for NTSC projects, and 00:00:12:13 for PAL projects.
- Enter values that exceed the normal values
- For example, with 30 fps timecode, if the current‑time indicator is at 00;00;12;23, and you want to move 10 frames ahead, you can change the frame number to 00;00;12;33. The current‑time indicator moves to 00;00;13;03.
- Include a plus sign (+) or minus sign (–)
- A plus sign or minus sign before a number moves the current‑time indicator ahead or back a specified number of frames. For example, +55 moves the current‑time indicator ahead 55 frames.
- Add a period
- A period before a number specifies an exact frame number, rather than its timecode value. For example, .1213 moves the current‑time indicator to 00;00;40;13 in an NTSC project, and to 00:00:48:13 in a PAL project.
 You can also position the Selection
tool over the timecode value and drag to the left or right. The
farther you drag, the more quickly the timecode changes.
You can also position the Selection
tool over the timecode value and drag to the left or right. The
farther you drag, the more quickly the timecode changes.Snap to clip edges and markers
Zoom into or out of a sequence in the Timeline panel
Do one of the following:-
To zoom in, select the Zoom tool
 , and
then click or drag a marquee selection around the part of the sequence
you want to see in more detail. To zoom out, select the Zoom tool , and
then Alt-click (Windows) or Option-click (Mac OS) an area in the
Timeline panel.
, and
then click or drag a marquee selection around the part of the sequence
you want to see in more detail. To zoom out, select the Zoom tool , and
then Alt-click (Windows) or Option-click (Mac OS) an area in the
Timeline panel. -
To zoom in, drag the zoom slider to the right, or click the Zoom In button
 . To
zoom out, drag the zoom slider to the left, or click the Zoom Out
button
. To
zoom out, drag the zoom slider to the left, or click the Zoom Out
button .
. -
To zoom in, drag the ends of the viewing area bar closer together. To zoom out, drag them farther apart.