

Work with motion paths
When you animate spatial properties—including Position and Anchor Point properties, as well as effect control point properties—the motion is shown as a motion path. Position motion paths appear in the Composition panel; Anchor Point and effect control point motion paths appear in the Layer panel. A motion path appears as a sequence of dots, where each dot marks the position of the layer at each frame. A box in the path marks the position of a keyframe.
Motion paths are simply an alternative visual, spatial way of viewing and working with spatial properties and their keyframes, in addition to the ways that you work with properties in the Timeline panel. You can modify a motion path by changing an existing keyframe or adding a new keyframe. You can modify a motion path’s shape by changing the spatial interpolation methods for its keyframes.
Using the Pen tool or Selection tool to edit keyframes for a spatial property in the Composition or Layer panel is similar to modifying a Bezier path for a mask or for a shape on a shape layer. (See About paths.)
A motion path is less complex and generally easier to modify when you use fewer keyframes to describe the path. You can use The Smoother to remove extraneous keyframes from a motion path.
 Show motion path controls
- To show motion path controls in the Composition panel, choose Composition > View Options, and select Effect Controls, Keyframes, Motion Paths, and Motion Handles. To see a Position motion path in the Composition panel, the Position property must be selected.
- To show motion path controls in the Layer panel, choose the property or effect from the View menu at the bottom of the Layer panel.
- To specify how many keyframes to show for a motion path, choose Edit > Preferences > Display (Windows) or After Effects > Preferences > Display (Mac OS), and select an option in the Motion Path section.
Move motion path keyframes
- In the Composition panel or Layer panel, use the Selection
tool to drag a keyframe or its handles.
Note: The current-time indicator does not need to be located on a keyframe before you drag it.
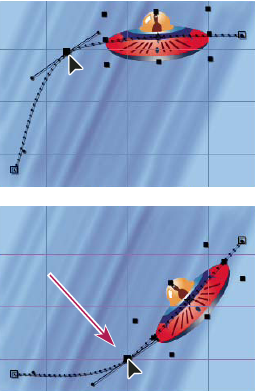 Drag a keyframe in the Composition panel to move one Position keyframe.
You can move multiple keyframes at one time by selecting them in the Timeline panel before you drag them in the Composition panel or Layer panel. To move the entire motion path, select all keyframes by clicking the property name in the Timeline panel before dragging a keyframe in the Composition panel.
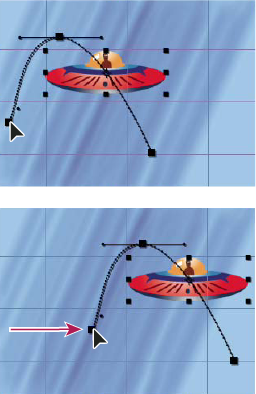 Dragging all keyframes on a motion path by one keyframe
 or
Add Vertex tool
or
Add Vertex tool  from
the Tools panel.
from
the Tools panel.