

Time-remap a layer
You can time-remap all or part of a layer. For example, you can time-remap a frame at the beginning or end of the layer, creating a freeze-frame result, or you can time-remap frames in the middle of the layer, creating a slow-motion result that only lasts for a few seconds.
 Freeze the first frame without changing the speed
- In a Composition or Timeline panel, select the layer you want to remap.
- Choose Layer > Time > Enable Time Remapping.
- Move the current-time indicator to where you want the movie to begin.
- Click the Time Remap property name to select the start and end keyframes.
- Drag the first keyframe to the current-time indicator, which moves the start and end keyframes. (If you are working in the Graph Editor, drag the bounding box—not the keyframe or a handle—so that both keyframes move.)
Remap time using the Graph Editor
 To switch between
Graph Editor mode and layer bar mode, press Shift+F3.
To switch between
Graph Editor mode and layer bar mode, press Shift+F3.- Move the current-time indicator to the time at which
to add a keyframe, and click the keyframe button
 in the
keyframe navigator to add a keyframe.
in the
keyframe navigator to add a keyframe. - In the Graph Editor, drag the keyframe marker up or down,
watching the Time Remap value as you drag. To snap to other keyframes,
Shift-drag.
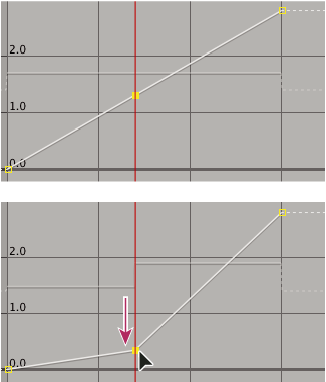 Dragging the keyframe down slows down the layer.
-
To slow the layer down, drag the keyframe down. (If the layer is playing in reverse, drag up.)
-
To speed the layer up, drag the keyframe up. (If the layer is playing in reverse, drag down.)
-
To play frames backward, drag the keyframe down to a value below the previous keyframe value.
-
To play frames forward, drag the keyframe up to a value above the previous keyframe value.
-
To freeze the previous keyframe, drag the current keyframe marker to a value equal to the previous keyframe value so that the graph line is flat. Another method is to select the keyframe and choose Animation > Toggle Hold Keyframe, and then add another keyframe where you want the motion to start again.
-
Before you move a time-remap keyframe,
it’s a good idea to select all subsequent time-remap keyframes in
the layer first. This will preserve the timing of the rest of the layer
when you remap time for the current keyframe.Remap time in a Layer panel
- On the upper time ruler, the remap-time marker indicates
the frame currently mapped to the time indicated on the
lower time ruler. To display a different frame at the time indicated
on the lower time ruler, move the remap-time marker accordingly.
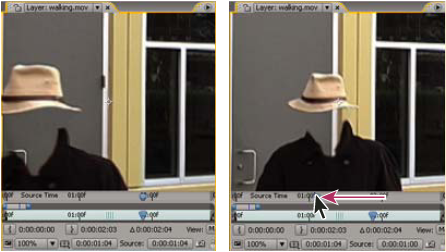 Drag the remap-time marker to replace the frame at the current time marker.