Model Tree panel overview
The Model Tree panel appears
in the navigation pane on the left side of the work area. You can
also open the Model Tree by clicking the Toggle Model Tree button  on
the 3D toolbar, or by right-clicking/Control-clicking the 3D model
and choosing Show Model Tree.
on
the 3D toolbar, or by right-clicking/Control-clicking the 3D model
and choosing Show Model Tree.
The Model Tree has three sections, each of which displays a specific type of information or controls.
- Upper section
-
Shows the tree structure of the 3D object. For example, a 3D object depicting a car may have separate groups of objects (called nodes) for the chassis, engine, and wheels. In the top section of the Model Tree, you can move through the hierarchy and select, isolate, or hide various parts.
- Middle section
-
Lists the defined views, which you can add to and edit. For example, after you isolate and rotate a part, you can save that particular view. After making other transformations, you can simply click the view you created to return the 3D model to the view that you saved earlier. See Set 3D views.
- Lower section
-
Displays metadata information, if any, about the part. You cannot edit this information for 3D objects in Acrobat.
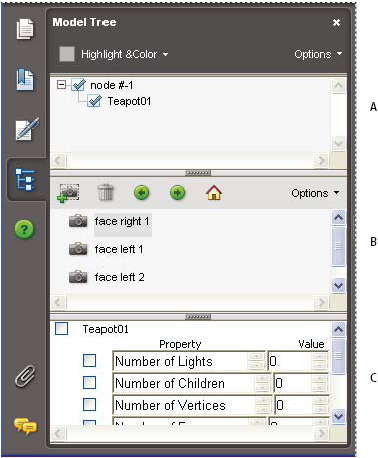
- A.
- 3D object’s hierarchy
- B.
- Saved views
- C.
- Part information
In some instances, the author of the PDF can set up a 3D model so that clicking it automatically displays the Model Tree.