Adding navigation and text to the specials screen

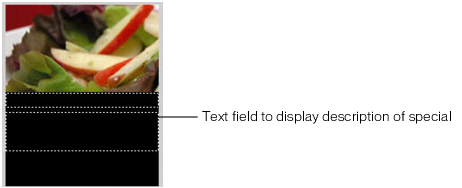
In this section, you'll add interactivity to the specials screen that lets the user control the transition between each animation. You'll also add dynamic text fields that display the name and description of each image.

To add text to display the names and descriptions of the specials:

  1. In Flash, open the file you completed in the previous section (see Creating the menu for the main screen).
  2. In the Timeline, select Frame 10 on the Text layer.
  3. In the Tools panel, select the Text tool and create a text field below the first masked specials image.

    This text field will display the name of the special whose image is currently being displayed.

  4. With the text field selected on the Stage, make the following changes in the Property inspector:
    • Select Dynamic Text from the Text Type pop-up menu.
    • Select Verdana from the Font pop-up menu.
    • Select the Italics text style option.
    • Set the font size to 10.
    • Select Bitmap (no anti-alias) from the Font Rendering Method pop-up menu.
    • Type title in the Var text box. This is the variable name assigned to the dynamic text field.
  5. Create another text field below the first one to display a short description of the specials being viewed by the user.
  6. Using the Selection tool, resize the text field so that it's about three times as tall as the other text field.

  7. With the text field selected on the Stage, make the following changes in the Property inspector:
    • Select Dynamic Text from the Text Type pop-up menu.
    • Select Multiline from the Line Type pop-up menu.
    • Select Verdana from the Font pop-up menu.
    • Set the font size to 10.
    • Select Bitmap (no anti-alias) from the Font Rendering Method pop-up menu.
    • Type description in the Var text box.
  8. In the Timeline, select the keyframe on Frame 10 on the Actions layer.
  9. Open the Actions panel and add the following code:
    title = "Summer salad";
    description = "Butter lettuce with apples, blood orange segments, gorgonzola, and raspberry vinaigrette.";
    fscommand2("SetSoftKeys", "Home", "Next");
    stop();
    

    This code displays the name and description of the special that the user is currently viewing, and stops the playhead. The SetSoftKeys command registers the device's soft keys that will let the user return to the home screen, as well as navigate between specials.

  10. On the Actions layer, select the keyframe on Frame 20 and enter the following code in the Actions panel:
    title = "Chinese Noodle Salad";
    description = "Rice noodles with garlic sauce, shitake mushrooms, scallions, and bok choy.";
    stop();
    
  11. On the Actions layer, select the keyframe on Frame 30 and enter the following code in the Actions panel:
    title = "Seared Salmon";
    description = "Filet of wild salmon with caramelized onions, new potatoes, and caper and tomato salsa.";
    stop();
    
  12. On the Actions layer, select the keyframe on Frame 40 and enter the following code in the Actions panel:
    title = "New York Cheesecake";
    description = "Creamy traditional cheesecake served with chocolate sauce and strawberries.";
    stop();
    
  13. On the Actions layer, select the keyframe on Frame 50 and enter the following code in the Actions panel:
    gotoAndStop("specials");
    

    This code returns the playhead to the beginning of the animation sequence. The first and last images in the animation sequence are the same, which creates the illusion of a continuous animation.

  14. Save your changes.

Next you'll add navigation to the specials screen that lets the user navigate between images and descriptions of each special.

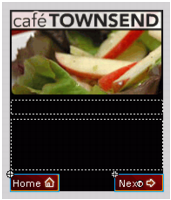
To add navigation to the specials screen:

  1. Open the file you completed in the previous section.
  2. In the Library panel (Window > Library), locate the symbol named Home and drag it to the lower-left corner of the Stage.
  3. In the Property inspector, set the Home graphic's x coordinate to 0 and its y coordinate to 188.
  4. Drag the symbol named Next from the Library to the lower-right corner of the Stage.
  5. In the Property inspector, set the graphic's x coordinate to 120 and its y coordinate to 188.

    The Stage in your application should look something like the following screen shot:

  6. In the Timeline, select the keyframe on Frame 10 on the layer named Key Catcher.
  7. From the Library, drag the Key Catcher button symbol and place it in the work area off the Stage.

    NOTE

    To view the work area, in Flash choose View > Work Area.

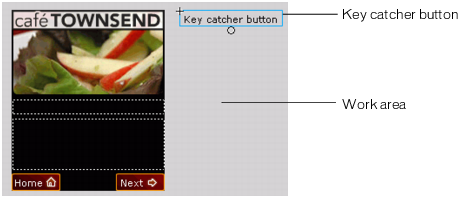
    The purpose of this button is to "catch" ActionScript keypress events initiated by the user, and then take the appropriate action. For more information about using key catcher buttons, see Creating a key catcher button in Developing Flash Lite 1.x Applications.

  8. Select the key catcher button, and in the Actions panel, enter the following code:
    // Handle right soft key event ("Next" button):
    on(keyPress "<PageDown>") {
        play();
    }
    // Handle left soft key event ("Home" button):
    on(keyPress "<PageUp>") {
        gotoAndStop("main");
    }
    

    The first on(keyPress) handler advances the image animation to the next image in the sequence; the second one sends the playhead to the main application screen.

  9. Choose Control > Test Movie to test the final application in the emulator.