

Vary change to clip speed
- In the Timeline panel, click on the
Clip Effect menu and choose Time Remapping > Speed. (The Clip
Effect menu appears next to the filename of every clip in a video
track. You might have to zoom in to make enough room in the clip to
display it.)
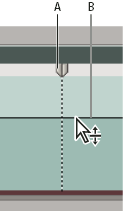
A horizontal rubberband that controls the speed of the clip appears across the center of the clip. The clip is shaded in contrasting colors above and below the 100% speed demarcation. A white speed-control track appears in the upper portion of the clip, just below the clip title bar.
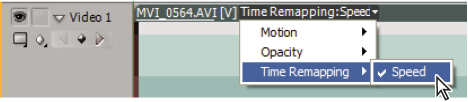 Choosing Time Remapping > Speed from a video effect control
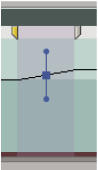
- Ctrl-click (Windows) or Command-click (Mac OS) at least
one point on the rubberband to set a keyframe. Speed keyframes appear
near the top of the clip, above the rubberband in the white speed-control
track. Speed keyframes can be split in half, acting as two keyframes
for marking the beginning and end of a speed-change transition.
Adjustment handles also appear on the rubberband, in the middle
of the speed-change transition.
 Moving a speed keyframe up or down. Note its separable halves.
- A.
- Speed keyframe
- B.
- Rubberband
- (Optional) To create a speed transition, drag the right
half of the speed keyframe to the right, or the left half to the
left.
A gray area appears between the halves of the speed keyframe, indicating the length of the speed transition. The rubberband forms a ramp between the two halves, indicating a gradual change in speed occurring between them. A blue curve control appears in the gray area.
 Blue curve control in gray area between halves of a speed keyframe
- (Optional) To change the acceleration or deceleration
of the speed change, drag either of the handles on the curve control.
The change of speed eases in or eases out according to the curvature of the speed ramp.
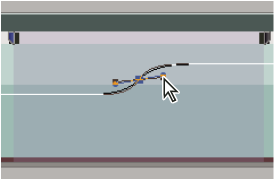 Dragging a curve control handle to ease in a speed change
Note: Speed and Velocity values for the Time Remapping
effect are shown in the Effect Controls panel for reference only.
You cannot edit these values directly there.