

View keyframes and graphs
Both the Effect Controls and the Timeline panels let you adjust the timing and values of keyframes, but each works in a different way. Whereas the Effect Controls panel displays all effect properties, keyframes, and interpolation methods at once, clips in the Timeline panel can show only one effect property at a time. In the Effect Controls panel, you have complete control over keyframe values. In the Timeline panel, you have limited control (for example, you can’t change values that use x, y coordinates, such as Position), however, you can make keyframe adjustments while editing without moving to the Effect Controls panel.
The graphs in the Timeline and Effect Controls panels display the values of each keyframe and the interpolated values between keyframes. When the graph of an effect property is level, the value of the property is unchanged between keyframes. When the graph goes up or down, the value of a property increases or decreases between keyframes. You can change the interpolation method and adjust Bezier curves in a graph to affect the speed and smoothness of the property changes from one keyframe to the next.
 View keyframes in the Effect Controls panel
If you’ve added keyframes
to a sequence clip, you can view them in the Effect Controls panel.
Any effect containing keyframed properties displays Summary Keyframe
icons  when
the effect is collapsed. Summary keyframes appear across
from the effect’s heading and correspond to all the individual property keyframes
contained in the effect. You cannot manipulate summary keyframes; they
appear for reference only.
when
the effect is collapsed. Summary keyframes appear across
from the effect’s heading and correspond to all the individual property keyframes
contained in the effect. You cannot manipulate summary keyframes; they
appear for reference only.
- If necessary, click the Show/Hide Timeline View button
 in
the Effect Controls panel to show the effects timeline. You may
need to widen the Effect Controls panel to make the Show/Hide Timeline
View button visible.
in
the Effect Controls panel to show the effects timeline. You may
need to widen the Effect Controls panel to make the Show/Hide Timeline
View button visible. - (Optional) If you want to view the Value and Velocity
graphs of an effect property’s settings, click the triangle next
to the Toggle Animation icon
 to expand
an effect property.
to expand
an effect property.
 Effect Controls
- A.
- Value graph
- B.
- Velocity graph
View keyframes and properties in the Timeline panel
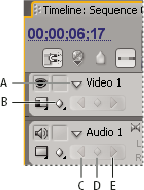
- A.
- Collapse/Expand Track triangle
- B.
- Show Keyframes (video)
- C.
- Previous Keyframe button
- D.
- Add Keyframe button
- E.
- Next Keyframe button
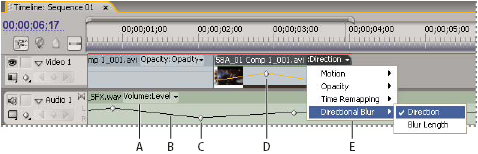
- A.
- Track effect properties
- B.
- Keyframe graph
- C.
- Audio track keyframes
- D.
- Video clip keyframes
- E.
- Clip effect properties
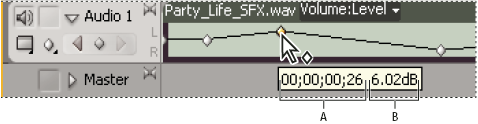
- A.
- Timecode
- B.
- Property value
- For a video track, click the Show Keyframes icon
 and
choose any of the following from the menu:
and
choose any of the following from the menu: - Show Keyframes
- Displays the graph and keyframes of any video effect applied to clips in the track. An effect menu appears next to the clip name so you can choose the effect you want to view.
- Show Opacity Handles
- Displays the graph and keyframes of the Opacity effect for each clips in the track.
- Hide Keyframes
- Hides the graphs and keyframes for all clips in the track.
- (Optional) Use the Zoom In control to magnify the clip
so that the effect pop‑up menu appears at the top of the track in
the Timeline panel. You can also drag the boundaries above and below
the track name to increase the track height.
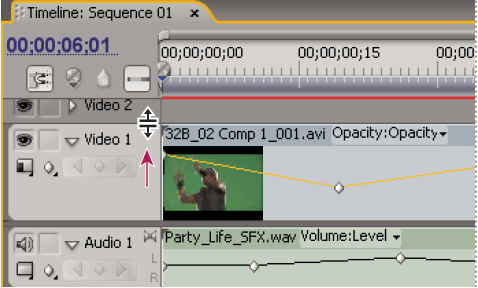 Dragging to increase the height of a track
- (Optional) If you chose Show Keyframes, Show Clip Keyframes,
or Show Track Keyframes in steps 2 and 3, click the effect menu
and choose the effect that contains keyframes.
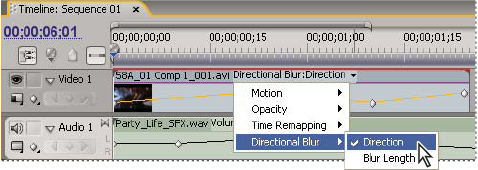 Choosing from the effects pop‑up menu
The tool tip displays the keyframe’s location, as well as the property and options you set for it in the Effect Controls panel. This information is useful for making precise keyframe placements, quickly noting the value you’ve set for a keyframe, and quickly comparing the location and change in value of two or more keyframes.