

Play a clip backward, then forward
- Ctrl-click (Windows) or Command-click (Mac OS) on the
rubberband to create a speed keyframe
 .
. - Ctrl-drag (Windows) or Command-drag (Mac OS) a speed
keyframe (both halves) to the place where you want the backward
motion to end. A tool tip shows the speed as a negative percentage
of the original speed. The Program monitor displays two panes: the
static frame where you initiated the drag, and a dynamically updating
frame that reverse playback will return to before switching to forward
speed. When you release the mouse button to end the drag, an additional
segment of the same duration as the segment you just created is added
for the forward playback portion, and an additional speed keyframe
is placed at this second segment’s end. Left-pointing angle brackets
 appear
in the speed-control track, indicating the section of the clip playing
in reverse.
The segment plays backward at full speed from the first keyframe to the second, then forward at full speed from the second to the third keyframe, returning to the frame at which the backward motion began. This is called a palindrome reverse.
appear
in the speed-control track, indicating the section of the clip playing
in reverse.
The segment plays backward at full speed from the first keyframe to the second, then forward at full speed from the second to the third keyframe, returning to the frame at which the backward motion began. This is called a palindrome reverse. To create a segment that plays in reverse and doesn't
return to forward playback, use the Razor tool to remove the segment
of the clip with the forward playback section, or remove it with
the Trim tool.
To create a segment that plays in reverse and doesn't
return to forward playback, use the Razor tool to remove the segment
of the clip with the forward playback section, or remove it with
the Trim tool.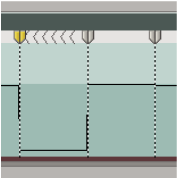 Keyframes, left-pointing angle brackets, and rubberband in a palindrome reverse
- (Optional) To create a speed transition for any part
of the change in direction, drag the right half of a speed keyframe
to the right, or the left half to the left.
A gray area appears between the halves of the speed keyframe, indicating the length of the speed transition. The rubberband forms a ramp between the two halves, indicating a gradual change in speed occurring between them. A blue curve control appears in the gray area.
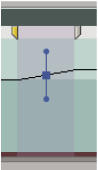 Blue curve control in gray area between the halves of a speed keyframe
- (Optional) To change the acceleration or deceleration
of any part of the directional change, drag either of the handles
on the curve control.
The change of speed eases in or eases out according to the curvature of the speed ramp.
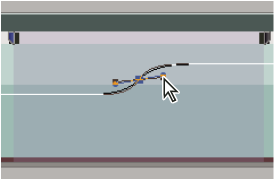 Dragging a curve control handle to ease in a speed change