

Create a light and change settings
A light layer can affect the colors of the 3D layers that it shines on, depending on the light’s settings and the Material Options properties of the 3D layers. Each light, by default, points to its point of interest.
Lights can be used to illuminate 3D layers and to cast shadows, either to match lighting conditions of the scene into which you are compositing or to create more interesting visual results such as the appearance of light streaming through a layer as if it were made of stained glass.
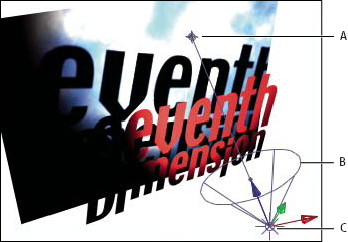
- A.
- Point of interest
- B.
- Spotlight cone
- C.
- Light
You can animate all of a light’s settings, except for Casts Shadows.
You can specify which 3D layers a light affects by designating the light as an adjustment layer—place the light in the Timeline panel above the layers on which you want it to shine. Layers that are above a light adjustment layer in the layer stacking order in the Timeline panel do not receive the light, regardless of the layers’ positions in the Composition panel.
 Create a light
 Choose Layer > New >
Light, or press Ctrl+Alt+Shift+L (Windows) or Command+Option+Shift+L
(Mac OS).
Choose Layer > New >
Light, or press Ctrl+Alt+Shift+L (Windows) or Command+Option+Shift+L
(Mac OS).
Change light settings
Double-click a light layer in
the Timeline panel or select the layer and choose Layer >
Light Settings.Light settings
- Light Type
- Parallel emits directional, unconstrained light from an infinitely distant source. Spot emits light from a source that is constrained by a cone, like the spotlight used in stage productions. Point emits unconstrained omnidirectional light, like the rays from a bare light bulb. Ambient creates light that has no source but rather contributes to the overall brightness of a scene and casts no shadows.
- Intensity
- The brightness of the light. Negative values create nonlight. Nonlight subtracts color from a layer. For example, if a layer is already lit, creating a directional light with negative values also pointing at that layer darkens an area on the layer.
- Cone Angle
- The angle of the cone surrounding the source of a light, which determines the width of the beam at a distance. This option is active only if Spot is selected for Light Type.
- Cone Feather
- The edge softness of a spotlight. This option is active only if Spot is selected for Light Type.
- Color
- The color of the light.
- Casts Shadows
-
Specifies whether the light source causes a layer to cast
a shadow. The Accepts Shadows material option must be On for a layer
to receive a shadow; this is the default. The Casts Shadows material
option must be On for a layer to cast shadows; this is not the default.
 Press Alt+Shift+C (Windows) or Option+Shift+C (Mac OS)
to toggle Casts Shadows for selected layers. Press AA to show Material
Options properties in the Timeline panel.
Press Alt+Shift+C (Windows) or Option+Shift+C (Mac OS)
to toggle Casts Shadows for selected layers. Press AA to show Material
Options properties in the Timeline panel. - Shadow Darkness
- Sets the darkness level of the shadow. This option is active only if Casts Shadows is selected.
- Shadow Diffusion
- Sets the softness of a shadow based on its apparent distance from the shadowing layer. Larger values create softer shadows. This option is active only if Casts Shadows is selected.