

Shatter effect
The Shatter effect explodes graphic images. Use the effect’s controls to set explosion points and adjust the strength and radius. Anything outside the radius doesn’t explode, leaving portions of the layer unaltered. You can choose from a variety of shapes for the shattered pieces and extrude the pieces to give them bulk and depth. You can even use a gradient layer to precisely control the order of an explosion. For example, if you import a logo, use Shatter to blow a logo-shaped hole in a layer.
This effect works with 8-bpc color.
 View controls
The View control specifies exactly how a scene appears in the Composition panel by using the following views:
- Rendered
- Displays the pieces with textures and lighting—as they will look at final output. Use this view when rendering the animation.
- Wireframe Front View
- Displays the layer from a full-screen, straight-on camera angle with no perspective. Use this view to adjust effect points and other parameters that are hard to see from an angle. In addition, the outlines of the shatter map are visible so you can precisely position, rotate, and scale the shatter pattern. It’s handy to toggle between this view and the perspective view you use for the scene.
- Wireframe
- Displays the correct perspective of the scene, so you can quickly set up the camera the way you like it and fine-tune the Extrusion Depth.
- Wireframe Front View + Forces
- Displays the wireframe front-view representation of the layer, plus a blue representation of each force sphere.
- Wireframe + Forces
- Displays the wireframe view, plus a blue representation of the force spheres. This view includes camera controls, so you can position everything precisely in 3D space.
Render control
The Render control renders the whole scene (the default), the unshattered layer, or the shattered pieces independently. For example, if you want to apply the Glow effect only to shattered pieces and not to the portions of the layer that remain intact, create the explosion and duplicate the layer. Next, for the back layer, choose Layer from the Render menu, and for the front layer, choose Pieces. Then apply the Glow effect to the front layer.
Shape controls
Shape controls specify the shape and appearance of the shattered pieces.
- Pattern
- Specifies the preset pattern to use for the exploded pieces.
- Custom Shatter Map
- Specifies the layer you want to use as the shape of the exploded pieces.
- White Tiles Fixed
-
Prevents pure white tiles in a custom shatter map from being exploded.
You can use this control to force certain parts of a layer to remain intact.
 Use this control when your shatter map uses images
or letters such as O: Set the portion you don’t want to blow out,
such as the centers of the O and the background, to pure white and
set the rest to another pure color.
Use this control when your shatter map uses images
or letters such as O: Set the portion you don’t want to blow out,
such as the centers of the O and the background, to pure white and
set the rest to another pure color. - Repetitions
- Specifies the scale of the tile pattern. This control works only in conjunction with the preset shatter maps, which all seamlessly tile. Increasing this value increases the number of pieces on the screen by scaling down the size of the shatter map. Consequently, the layer breaks into more and smaller pieces. Animating this control is not recommended, as it can cause sudden jumps in the number and size of shatter pieces.
- Direction
- Rotates the orientation of a preset shatter map, relative to the layer. As with Repetitions, animating this control results in sudden jumps in the animation and is not recommended.
- Origin
- Precisely positions a preset shatter map on the layer. This is useful if you want to line up portions of an image with specific shattered pieces. Animating this control results in sudden jumps in the animation and is not recommended.
- Extrusion Depth
- Adds a third dimension to the exploded pieces. The higher the value, the thicker the pieces. In Rendered view, this effect isn’t visible until you start the shatter or rotate the camera. As you set this control higher, the pieces may actually pass through each other. While this is generally not a problem in full-speed animations, it may become visible when the pieces grow very thick and move slower.
Force 1 and Force 2 controls
Force 1 and Force 2 controls define the blast areas by using two different Forces.
- Position
- Specifies the current center point of the blast in (x,y) space.
- Depth
- Specifies the current center point in z space, or how far in front of or behind the layer the blast point is. Adjust Depth to determine how much of the blast radius is applied to the layer. The blast radius is a sphere, and the layer is basically a plane; therefore, only a circular slice of the sphere intersects the plane. The farther away the layer is from the center of the blast, the smaller the circular slice. When pieces explode, they fly away from the force center. Depth determines which way the pieces fly: Positive values cause the pieces to explode forward, toward the camera (assuming the default camera settings of 0, 0, 0); negative values cause pieces to blow backward, away from the camera. To see the result of the Depth setting, use the Wireframe + Force Sphere view.
- Radius
-
Defines the size of the blast sphere. The radius is the distance
from the center of a circle (or sphere) to the edge. By adjusting
this value, you can fine-tune exactly which pieces explode. Changing
this value can vary the speed and completeness of the explosion.
Animating it from small to large generates an expanding, shockwave
explosion.
Note: To determine when the pieces shatter, animate the Radius control, not the Strength control. Pieces inside the force sphere are pulled off-screen by gravity even if Strength is set to 0.
- Strength
-
Specifies the speed at which the exploded pieces travel—how
hard they are blown away from or sucked back into the blast point.
A positive value blows the pieces away from the blast point; a negative
value sucks the pieces into the blast point. The greater the positive
value, the faster and farther they fly away from the center point.
The greater the negative value, the faster the pieces launch themselves
toward the center of the force sphere. Once the pieces are launched, however,
they are no longer affected by the force sphere; the Physics settings take
over. A negative Strength value does not suck the pieces into a
black hole; instead, the pieces fly through each other and back
out the other side of the sphere. Setting Strength very low causes
the pieces to break up into shapes, creating cracks in the layer,
but it doesn’t actually blow the pieces apart. If gravity is set
to anything other than 0, the pieces are pulled in the direction
of gravity after they break up.
Note: A shatter piece is made up of vertices (points or dots that define the corners of the shape), edges (lines that connect the dots), and planes (walls of the shape). Shatter determines when a shape has come in contact with a force sphere based on when a vertex comes in contact with the sphere.
Gradient controls
Gradient controls specify the gradient layer used to control the timing of an explosion and the pieces that are affected by the blast.
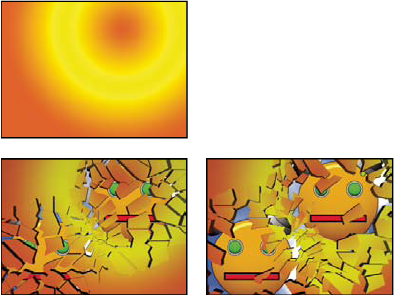
- Shatter Threshold
-
Specifies which pieces in the force sphere shatter according to
the corresponding luminance of the specified gradient layer. If
Shatter Threshold is set to 0%, no pieces in the force sphere shatter.
If it is set to 1%, only the pieces in the force sphere corresponding
to white (or very nearly white) areas on the gradient layer shatter.
If it is set to 50%, all the pieces in the force sphere corresponding
to white-to-50%-gray areas on the gradient layer shatter. If it
is set to 100%, all pieces in the force sphere shatter. Because
there are 256 shades of gray (including black and white), each percentage
point represents approximately 2.5 shades of gray.
Animating Shatter Threshold influences the timing of the explosion. If you leave it set to 0%, the layer never explodes. However, if you set a Shatter Threshold keyframe at 50%, the pieces of your layer in the force field that correspond to areas of your gradient layer that range from white to 50% gray explode. If you then animate Shatter Threshold up to 100%, the remaining pieces in the force sphere explode.
- Gradient Layer
-
Specifies the layer to use to determine when specific areas
of the target layer shatter. White areas shatter first; black areas
shatter last. Shatter determines which pixels correspond to which
pieces by subdividing the layer into pieces, each with a center
point or balance point. If you superimpose the shatter map over
the gradient layer, the gradient layer pixels that are precisely under
each balance point control the explosion.
Note: Some shapes have a balance point that falls outside the actual area of the shape—for example, the letters C and U. When designing a gradient layer in such a situation, avoid using grayscale versions of letters. Instead, use larger shapes that cover the balance point of each character.
- Invert Gradient
- Inverts the pixel values in the gradient. White becomes black, and black becomes white.
Physics controls
Physics controls specify the way the pieces move and fall through space.
- Rotation Speed
- Specifies the speed at which pieces rotate around the axis set by the Tumble Axis control, allowing you to simulate different rotation speeds for different materials. In nature, similarly shaped pieces spin at different speeds based on their mass and air friction. For example, a brick spins faster than Styrofoam.
- Tumble Axis
-
Specifies the axis that the pieces spin around. Free spins
the pieces in any direction. None eliminates all rotation. X, Y,
and Z spin the pieces only around the selected axis. XY, XZ, and
YZ spin the pieces only around the selected combination of axes.
Note: Any application of z-axis rotation appears only when a second force hits the layer. The pieces do not rotate from the first blast if only z-axis rotation is selected.
- Randomness
- Affects the initial velocities and spins generated by the force sphere. When this control is set to 0, pieces fly directly away from the center point of a blast (assuming a positive force). Since real explosions are rarely this orderly, Randomness allows you to vary things a little bit.
- Viscosity
- Specifies how fast pieces decelerate after being blown apart. The higher the Viscosity value, the more resistance the pieces encounter as they move and spin. If Viscosity is set high enough, the pieces quickly come to a stop. To replicate an explosion in water or sludge, set Viscosity to a high value. In air, set it to a medium value, and for an explosion in space, set it very low, or to 0.
- Mass Variance
- Specifies the theoretical weight of the pieces as they explode. For example, a large piece is heavier than a small piece and therefore does not fly as far or as fast when it encounters the blast. Mass Variance’s default setting of 30% gives a realistic approximation of this law of physics. Setting Mass Variance to 100% greatly exaggerates the difference between the behavior of large versus small pieces. Setting it to 0% makes all pieces behave the same, regardless of their size.
- Gravity
- Determines what happens to the pieces after they break up and blow apart. The higher the gravity setting, the faster the pieces are sucked in the direction set by Gravity Direction and Gravity Inclination.
- Gravity Direction
- Defines the direction in (x,y) space that the pieces travel when affected by gravity. The direction is relative to the layer. If Gravity Inclination is set to -90 or 90, Gravity Direction has no effect.
- Gravity Inclination
- Determines the direction in z space that the pieces travel once they explode. A value of 90 explodes the pieces forward, relative to the layer. A value of -90 explodes them backward, relative to the layer.
Textures controls
Textures controls specify the texture of the pieces.
- Color
- Specifies the color of the piece as defined by the Front Mode, Side Mode, and Back Mode menus. This color may or may not be visible depending on the Mode settings: When a Mode setting is Color, Tinted Layer, Color + Opacity, or Tinted Layer + Opacity, the selected color is factored into the appearance of the piece.
- Opacity
- Controls the opacity of the corresponding Mode setting. A Mode setting must be Color + Opacity, Layer + Opacity, or Tinted Layer + Opacity for the opacity to affect the appearance of the piece. You can use the Opacity control in conjunction with texture maps to create the look of semitransparent materials.
- Front Mode, Side Mode, Back Mode
-
Determine the appearance of the front, sides, and back of
the pieces. Color applies the selected color to the applicable side
of the piece. Layer takes the layer chosen in the corresponding
Layer menu and maps it to the applicable side of the piece. Tinted
Layer blends the chosen layer with the selected color; the effect
is similar to viewing the layer through a colored filter. Color
+ Opacity combines the selected color and the Opacity amount. With
Opacity at 1, the applicable side is given the selected color. With Opacity
at 0, the applicable side is transparent. Layer + Opacity combines
the chosen layer and the Opacity amount. With Opacity at 1, the
chosen layer is mapped to the applicable side. With Opacity at 0,
the applicable side is transparent. Tinted Layer + Opacity combines
the tinted chosen layer and the Opacity amount. With Opacity at
1, the tinted chosen layer is mapped to the applicable side. With
Opacity at 0, the applicable side is transparent.
Note: If you apply Shatter to a layer containing an alpha channel that you want to use for transparency, use the same texture (or at least another layer with an identical alpha channel) for the front, sides, and back of the pieces to make all sides transparent.
- Front Layer, Side Layer, Back Layer
-
Specify the layer to be mapped onto the corresponding side
of the piece. Front Layer maps the chosen layer to the front of
the piece. Back Layer maps the chosen layer backward to the layer.
If Layer is chosen for both Front Mode and Back Mode, and the same
layer is specified for each, each shattered piece has the same pixel
information on both sides. Side Layer maps an extrusion of the chosen
layer to the extruded sides of the piece, as if the chosen layer
is also mapped to the front and back, and the layer has been sliced
through.
Note: If you choose a layer with an effect applied, the effect does not show up in the texture unless you precompose the layer. However, if you select None, the layer to which you have applied Shatter, along with any effects that occur before Shatter, is used as the texture map, with no precomposing required.
Camera System and Camera Position controls
- Camera System
- Whether to use the effect’s Camera Position properties, the effect’s Corner Pins properties, or the default composition camera and light positions to render 3D images.
- X Rotation, Y Rotation, Z Rotation
- Rotate the camera around the corresponding axis. Use these controls to look at the cards from the top, side, back, or any other angle.
- X, Y Position
- Where the camera is positioned in (x,y) space.
- Z Position
- Where the camera is positioned along the z axis. Smaller numbers move the camera closer to the cards, and larger numbers move the camera away from the cards.
- Focal Length
- The zoom factor. Smaller numbers zoom in.
- Transform Order
- The order in which the camera rotates around its three axes, and whether the camera rotates before or after it is positioned using the other Camera Position controls.
Corner Pins controls
Corner pinning is an alternative camera control system. Use it as an aid for compositing the result of the effect into a scene on a flat surface that is tilted with respect to the frame.
- Upper Left Corner, Upper Right Corner, Lower Left Corner, Lower Right Corner
- Where to attach each of the corners of the layer.
- Auto Focal Length
- Controls the perspective of the effect during the animation. If this option is deselected, the focal length you specify is used to find a camera position and orientation that positions the corners of the layer at the corner pins, if possible. If not, the layer is replaced by its outline, drawn between the pins. If this option is selected, the focal length required to match the corner points is used, if possible. If not, the correct value is interpolated from nearby frames.
- Focal Length
- Overrides the other settings if the results you’ve obtained aren’t what you need. If you set the Focal Length to something that doesn’t correspond to what the focal length would be if the pins were actually in that configuration, the image may look unusual (strangely sheared, for example). But if you know the focal length that you are trying to match, this option is the easiest way to get correct results.
Creating a custom shatter map
All layers in After Effects are represented as an RGBA image, including black-and-white images. The Shatter effect calculates the luminance threshold of each channel to create a custom shatter map. Shatter calculates the 50% luminance threshold of each channel, creating an image composed of only eight colors: red, green, blue, yellow, magenta, cyan, white, and black. These eight colors become possible combinations of the channels set either all the way on (255) or all the way off (0). The shatter layer splits along the edges of these different colored sections.
When designing custom shatter maps, you can find it useful to manually set a threshold for each channel of the image at 50% (you can use the Curves effect to do so). When you set the threshold, you can see how the image will be broken into pieces. Alternatively, you can create custom shatter maps by drawing an image using only the eight colors listed above, with no intermediate shades or anti-aliasing.
The alpha channel determines whether or not a shattered piece exists. A white alpha channel value results in a shattered piece, and a black alpha channel value results in no piece. Using an alpha channel, you can make a tile map with holes in it or generate simple 3D models like extruded text.