

Work with strokes and fills for shapes
Strokes and fills for shapes are paint operations that add colored pixels to a path or to the area defined by a path. A stroke or a fill can consist of a solid color, or it can use a gradient of colors. Strokes can be continuous, or they can consist of a periodic series of dashes and gaps. Each stroke and fill has its own blending mode, which determines how it interacts with other paint operations in the same group.
By default, paint operations within a group are performed from the bottom to the top in the Timeline panel stacking order. This means, for example, that a stroke is rendered on top of (in front of) a stroke that appears after it in the Timeline panel. To override this default behavior for a specific fill or stroke, choose Above Previous In Same Group for the fill or stroke’s Composite property in the Timeline panel.
New shapes are created with fill and stroke properties depicted by the swatch buttons next to the underlined Fill and Stroke text controls in the Tools panel. You can also modify the fill colors, stroke colors, fill type, and stroke type for selected shapes using these controls. The Fill and Stroke controls are only visible in the Tools panel when a shape layer is selected or a drawing tool is active.
If multiple shapes are selected, with different fill or stroke properties, then the swatch button next to the Fill or Stroke control contains a question mark. You can still modify the fill and stroke properties using these controls, and the corresponding properties for all selected shapes are set to the same value.
Fills and strokes can be any of four types:
- None
- No paint operation is performed.
- Solid color
- The entire fill or stroke consists of one color.
- Linear gradient
- The fill or stroke consists of colors and opacity values defined by a linear gradient and then mapped onto the composition along a single axis from the Start Point to the End Point.
- Radial gradient
- The fill or stroke consists of colors and opacity values defined by a linear gradient, which are mapped onto the composition along a radius extending outward from the Start Point at the center to the End Point at the circumference of a circle. You can offset the starting point by modifying the Highlight Length and Highlight Angle values.
 You can animate and interpolate gradients by
adding keyframes to the Colors property and using the Color Picker
in Gradient Editor mode to add, modify, and remove color stops and
opacity stops. You can also save gradients as animation presets.
(See Save an animation preset.)
You can animate and interpolate gradients by
adding keyframes to the Colors property and using the Color Picker
in Gradient Editor mode to add, modify, and remove color stops and
opacity stops. You can also save gradients as animation presets.
(See Save an animation preset.)The colors of strokes and fills for shape layers are not rendered as high-dynamic range colors. Color values under 0.0 or over 1.0 are clipped to fall within the range of 0.0 to 1.0.
 Choose stroke or fill type and blending options
- To choose a fill type or stroke type for new shapes, or set the blending mode or opacity for a fill or stroke for new shapes, click the underlined Fill or Stroke text control in the Tools panel. To cycle through fill types or stroke types for existing shapes, select the shapes before using these controls.
- To cycle through fill types or stroke types for new shapes, Alt-click (Windows) or Option-click (Mac OS) the swatch button next to the underlined Fill or Stroke text control in the Tools panel. To choose a fill type or stroke type for existing shapes, select the shapes before using these controls.
Choose a solid color or edit a gradient for a stroke or fill
 To choose a solid color
or gradient for fills or strokes for new shapes, click the swatch
button next to the underlined Fill or Stroke text control in the
Tools panel. To choose a solid color or gradient for fills or strokes
for existing shapes, select the shapes before using the controls.
To choose a solid color
or gradient for fills or strokes for new shapes, click the swatch
button next to the underlined Fill or Stroke text control in the
Tools panel. To choose a solid color or gradient for fills or strokes
for existing shapes, select the shapes before using the controls.Modify a gradient’s color mapping
A gradient is a range of color and opacity values that you can customize in the Gradient Editor dialog box. You can also customize how those colors are applied to a stroke or fill by modifying the Start Point and End Point, which determine the direction and scale of the gradient. For example, you can modify these points to stretch the colors of a gradient out over a larger area, or orient a linear gradient so that colors fade from top to bottom instead of from left to right. For a radial gradient, you define the center of gradient, its radius, and the offset of a highlight.
By default, when you create a shape path by drawing with the Pen tool, the control points for the gradient are placed in the center of the layer. You can adjust these points after you finish drawing.
You can modify the Start Point, End Point, Highlight Angle, and Highlight Length properties in the Timeline panel. You can also modify these properties directly in the Composition panel.
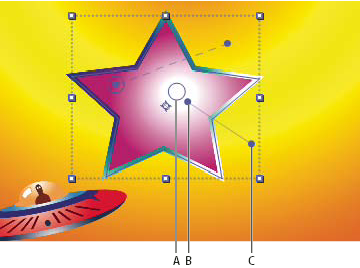
- A.
- Highlight control point
- B.
- Start Point
- C.
- End Point
- With the Selection tool active, drag the Start Point,
End Point, or Highlight controls in the Composition panel.
The Selection tool turns to a gradient control pointer
 or
or  when
placed over a gradient control.
when
placed over a gradient control.
Set stroke width
To set stroke width for
new shapes in pixels (px), drag the underlined Stroke Width control
(which is located to the right of the Stroke controls in the Tools panel),
or click the control and enter a value in the box. To set the stroke
width for existing shapes, select them before using the Stroke Width
control.Create a dashed stroke
You create a dashed stroke by adding any number of dashes and gaps to the Dashes property group for the stroke. The dashes and gaps in this property group are repeated as many times as necessary to cover the entire path. The Offset property determines at what point on the path the stroke begins.
Animate the Offset property to create a moving
trail of dashes, like the lights on a marquee.- Expand the stroke’s property group in the Timeline panel.
- Click the Add A Dash Or Gap
 button
to add a dash and gap to one cycle of the dashed-line pattern that
you want to create. You can add up to three dashes for each stroke
pattern.
button
to add a dash and gap to one cycle of the dashed-line pattern that
you want to create. You can add up to three dashes for each stroke
pattern. - Modify the Dash and Gap properties to make the dashes and gaps the lengths that you want.
Line Cap options for strokes
The Line Cap property for a dashed stroke determines the appearance of the ends of the stroke segments (dashes).
- Butt Cap
- The stroke ends at the end of the path.
- Round Cap
- The stroke extends beyond the end of the path for a number of pixels equal to the stroke’s width. The cap is a semicircle.
- Projecting Cap
- The stroke extends beyond the end of the path for a number of pixels equal to the stroke’s width. The end is squared off.
Line Join options for strokes
The Line Join property for a stroke determines the appearance of the stroke where the path suddenly changes direction (turns a corner).
- Miter Join
- A pointed connection. The Miter Limit value determines the conditions under which a beveled join is used instead of a miter join. If the miter limit is 4, then when the length of the point reaches four times the stroke weight, a bevel join is used instead. A miter limit of 1 causes a bevel join.
- Round Join
- A rounded connection.
- Bevel Join
- A squared-off connection.