Create the signature appearance
You can set the appearance of your digital signature by selecting options in the Security Preferences. For example, you can include an image of your handwritten signature, a company logo, or a photograph. You can also create alternate signature appearances that you use for different purposes. For some, you may want to provide a greater level of detail.
A signature appearance can also include information that helps others verify your signature, such as certificate revocation status, reasons for signing, contact information, and more. By selecting these preferences, you add options to the Sign Document dialog box that appears each time you sign a PDF.
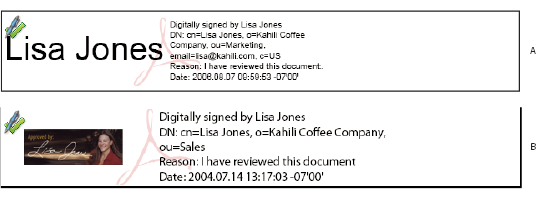
- A.
- Text signature
- B.
- Graphic signature
- Click Advanced Preferences, click the Creation tab, select
any of the following, click OK, and click OK again:
Option Description Include Signature’s Revocation Status When Signing Embeds information about whether your certificate is valid or has been revoked (required for signature validation). Selecting this option speeds the validation process by not having to go online to determine whether the certificate has been revoked.
Show Reasons When Signing Adds your reason for signing to the signature field. When you sign a PDF, a menu appears in the Sign Document dialog box from which you can select the option that best describes your reason for signing the PDF.
Show Location And Contact Information When Signing Adds your location information to the signature field. Contact information appears on the Signer tab of the Signature Properties dialog box. When you sign a PDF, text boxes appear in the Sign Document dialog box where you can type this information.
Enable Reviewing Of Document Warnings Analyzes documents in a signing workflow for content that might change the document appearance and then provides an option in the Sign Document dialog box to review this content. Specify Always, Never, or When Certifying A Document. Available options depend on the Prevent Signing Until Document Warning Are Reviewed setting.
Prevent Signing Until Document Warnings Are Reviewed Enable this option to require the signer to review document warnings before signing or certifying a document. Specify Always, Never, or When Certifying A Document.
 To
edit or delete a signature appearance, select it in the Appearance
box, and then click Edit or Delete.
To
edit or delete a signature appearance, select it in the Appearance
box, and then click Edit or Delete.