Trap preset options
You can change trap preset options whenever you create or edit a trap preset. The same trap preset options are available in Acrobat and InDesign. In Acrobat, you can view trap presets by choosing Tools > Print Production > Trap Presets. In InDesign, choose Window > Output > Trap Presets.
 Trap widths
Trap width is the amount of overlap for each trap. Differences in paper characteristics, screen rulings, and printing press conditions require different trap widths. To determine the appropriate trap widths for each job, consult your commercial printer.
- Default
-
Specifies the trap width in points for trapping all colors except those involving solid black. The default value is 0p0.25.
- Black
-
Indicates the distance that inks spread into solid black, or the holdback amount—the distance between black edges and underlying inks for trapping rich blacks. The default value is 0p0.5. This value is often set to be 1.5 to 2 times the value of the default trap width.
In InDesign, the value you set for Black Color determines the value for a solid black or a rich black, a process black (K) ink mixed with color inks for increased opacity and richer color.
Note: (InDesign) If you choose Application Built-In trapping, and you specify a Default trap width or Black trap width larger than 4 points, the resulting trap width is limited to 4 points. However, the value you specified will continue to be displayed, because if you switch to Adobe In-RIP Trapping, traps larger than 4 points are applied as you specified.
Trap appearance
A join is where two trap edges meet at a common endpoint. You can control the shape of the outside join of two trap segments and the intersection of three traps.
- Join Style
-
Controls the shape of the outside join of two trap segments. Choose from Miter, Round, and Bevel. The default is Miter, which matches earlier trapping results to retain compatibility with previous versions of the Adobe Trapping Engine.
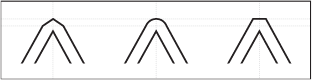 Trap join examples, left to right: miter join, round join, bevel join
- End Style
-
Controls the intersection of three-way traps. Miter (the default) shapes the end of the trap to keep it away from the intersecting object. Miter also matches earlier trapping results to retain compatibility with previous versions of the Adobe Trapping Engine. Overlap affects the shape of the trap generated by the lightest neutral density object that intersects with two or more darker objects. The end of the lightest trap is wrapped around the point where the three objects intersect.
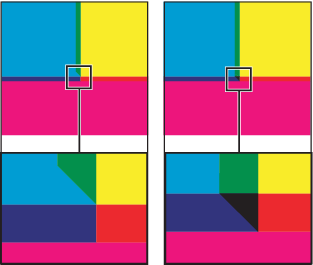 Close-up of trap end examples: miter (left) and overlap (right)
Trap thresholds
You can adjust trap thresholds, as recommended by your prepress service provider, to correspond to your printing conditions.
- Step
-
Specifies the color change threshold at which the trapping engine creates a trap. Some jobs need only the most extreme color changes trapped, while others require traps for more subtle color changes. The Step value indicates the degree to which components (such as CMYK values) of abutting colors must vary before trapping occurs.
To change how much the component inks in abutting colors can vary before causing those colors to trap, increase or decrease the value for Step. The lower the Step value, the more often traps are created between colors. The default is 10%. For best results, use a value from 8% to 20%. Lower percentages increase sensitivity to color differences and result in more traps.
- Black Color
-
Indicates the minimum amount of black ink required before the Black trap width setting is applied. The default value is 100%. For best results, use a value no lower than 70%.
- Black Density
-
Indicates the neutral density value at or above which InDesign considers an ink to be black. For example, if you want a dark spot ink to use the Black trap width setting, enter the neutral density value here. This value is typically set near the default of 1.6.
- Sliding Trap
-
Indicates the percentage difference (between the neutral densities of abutting colors) at which the trap is moved from the darker side of a color edge toward the centerline, to prevent abrupt shifts in trap placement and create a more elegant trap. During trapping, the trapping engine adjusts (slides) the trap position—from spreading the lighter color into the darker one, to straddling the centerline between them.
For example, setting the Sliding Trap value to 70% moves the point at which the trap begins to straddle the centerline to the location where the lighter color exceeds 70% of the darker color in neutral density (lighter color’s neutral density divided by darker color’s neutral density > 0.70). Colors of identical neutral density will always have their traps exactly straddle the centerline, unless the Sliding Trap is set to 100%.
- Trap Color Reduction
-
Indicates the degree to which components from abutting colors are used to reduce the trap color. This setting is useful for preventing certain abutting colors (such as pastels) from making an unsightly trap that is darker than either color. Specifying a Trap Color Reduction lower than 100% begins to lighten the color of the trap; a Trap Color Reduction value of 0% makes a trap with a neutral density equal to the neutral density of the darker color.
Trapping imported graphics
You can create a trap preset to control traps within images, and to control traps between bitmap images (such as photographs and those saved in raster PDF files) and vector objects (such as those from a drawing program and vector PDF files). Each trapping engine handles imported graphics differently. It’s important to be aware of these differences when setting trapping options.
- Trap Placement
-
Provides options for determining where the trap falls when you trap vector objects (including objects drawn in InDesign) to bitmap images. All options except Neutral Density create a visually consistent edge. Center creates a trap that straddles the edge between objects and images. Choke causes objects to overlap the abutting image. Neutral Density applies the same trapping rules as used elsewhere in the document. Trapping an object to a photograph with the Neutral Density setting can result in noticeably uneven edges as the trap moves from one side of the edge to another. Spread causes the bitmap image to overlap the abutting object.
- Trap Objects To Images
-
Ensures that vector objects (such as frames used as keylines) trap to images, using the Trap Placement settings. If vector objects don’t overlap images in a trapping page range, consider turning this option off to speed trapping of that page range.
- Trap Images To Images
-
Turns on trapping along the boundary of overlapping or abutting bitmap images. This feature is on by default.
- Trap Images Internally
-
Turns on trapping among colors within each individual bitmap image (not just where they touch vector artwork and text). Use this option only for page ranges containing simple, high-contrast images, such as screen shots or cartoons. Leave it unselected for continuous-tone and other complicated images, as it will create bad traps. Trapping is faster when this option is unselected.
- Trap 1-Bit Images
-
Ensures that 1-bit images trap to abutting objects. This option doesn’t use the Image Trap Placement settings, because 1-bit images use only one color. In most cases, leave this option selected. In some cases, such as with 1-bit images where pixels are widely spaced, selecting this option may darken the image and slow the trapping.