The Actor Studio is a tool for constructing project files for 3DS Max animations to convert those animations into a format that the Genesis3D engine can consume. Actor Studio makes use of 3D Studio Max to export data from your .MAX files, and then combines that data with additional information from you into Actors.
You must have the following tools for the exporters to work:
In addition, you must have the proper exporter plugins (nfoexp.dle and keyexp.dle)
installed as plugins for your 3DS Max installation. Refer to your 3DS Max documentation
for instructions on how to do this. The plugins in our root directory are for 2.5. The 3.0 plug-in files are in the R3 directory.
There are also 3rd party support tools available for using alternate modelling programs. Please check our web site.
When you build your meshes, you should try to keep in mind that the Actors will be built by tools that need to be aware of the locations of your texture maps. In addition, you may want to be able to take an individual Actor build tree and move it to another machine, or preserve it in version control. Finally, the Actor Studio enforces a single directory tree for the sources for its projects. Given these things, we recommend the following directory structure, or something close to it, to avoid difficulties managing your builds:
\MYACTOR
    \MAX
    \MAPS
    \BLDTMP
Under the MAX directory, place your .MAX files. Under the MAPS directory, place
all of your bitmaps for the texture maps for your mesh. The BLDTMP directory
is for use in the Actor Studio. It will be used to hold all of the temporary
files from the builds.
Warning! There is a problem with actor studio interfacing with 3DS Max - you can't have files or directories that begin with 'b','n','r',or 't'. This limitation is because 3DS Max interprets a slash followed by one of those characters as a control code rather than the letter.
When you build your animations in 3DS Max, you have to follow a few basic rules:
For most traditional applications, you will have multiple animations for each Actor. For example, you may have a walk, a run, and an idle animation for a biped character in a game. You will want to include all of these animations as individual animations within a single Actor file. To prepare for this, we suggest that you follow this procedure: Build a reference pose for your animation, and store that reference pose in a separate file with no animations. This will be referred to as your 'body' file. Construct each animation separately, and save them in separate .MAX files. For example, Walk.max, Run.max, Idle.max. Follow the directory structure above for storing your MAX files, and their texture maps.
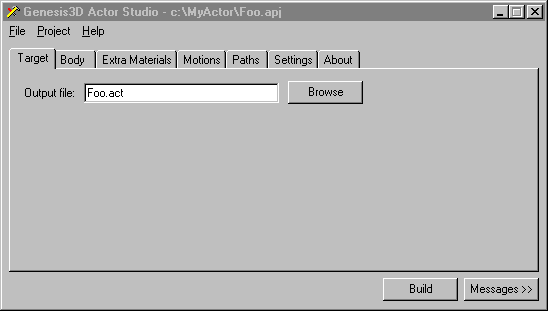
Once you've built a mesh, along with its animations, you have to build an Actor Studio project. If you have followed the directory structure above, you should create a new project by selecting File|New, and specify a project name in your \MYACTOR directory, for example c:\myactor\George. When you do this, you will be presented with the following dialog:
The output file is the filename, relative to the project directory (MYACTOR) that the Actor will be stored to. Fill in this field as you choose to set the output file. Make sure that you include the .ACT extension. Once you've done this, click on the 'Body' tab to proceed to this dialog:
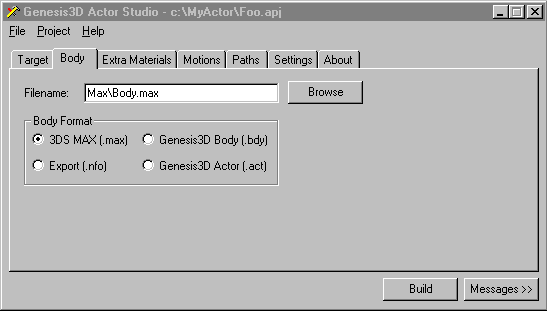
Fill in the filename field by clicking browse, and then selecting the 'body' file that you previously built.
For advanced users, you can select different input file types for you body file by using the radio buttons on the dialog. The .NFO files are generated by the NFO exporter that you installed to 3DS Max. The .BDY files are intermediate files generated by running Actor Studio on a project once. The .ACT files are the final Actor files generated by Actor Studio. You can use another Actor file as the body for a different Actor. Most users should just use the .MAX file option, which is the default.
Once you've selected a body, move to the Extra Materials tab:
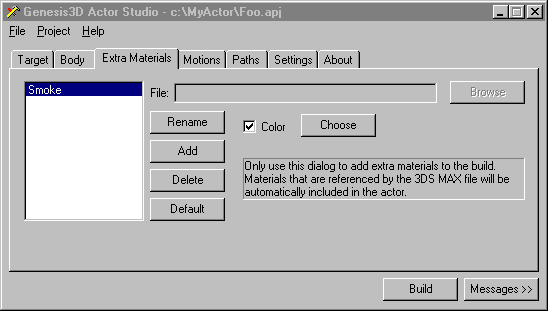
In general, you will not have to fill anything in on this tab. It is supplied to allow you to include in the Actor file materials that were not actually used in the texturing of the mesh in 3DS Max. It is sometimes useful to do this if your application will want to switch out materials on an Actor at runtime, and you want the alternate materials stored in the Actor. To add materials to the actor, just click on Add, and specify a name for the material. Then you can select a file for a bitmap for the material, with the Browse button, or you can select a single color to be used, by clicking on the Color checkbox, and then editing the color with the Choose button.
Actor Studio will automatically include any textures that were used to texture the mesh in 3DS Max, so you do not need to include those textures here.
Moving on to the Motions tab:
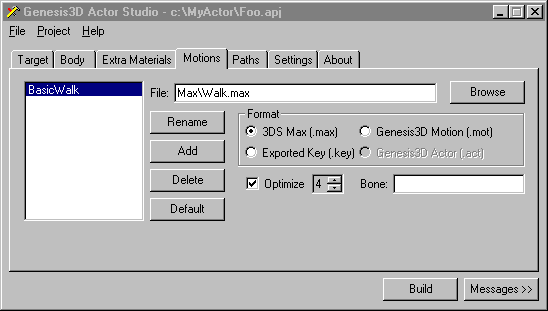
Here you will specify all the animations that you want to include in the Actor. Each animation is named, and has a corresponding .MAX file to obtain its data from. Click on Add, and name a motion, then select the .MAX file using the Browse button. Add all the motions that you want.
Each motion can be optimized by analysis of its key-frames for redundant key-frames, and for key-frames that, if removed, introduce a very small error into the animation. You can control the degree of error that is permitted, and hence the quality of the resulting animation by changing the optimization level with the Optimize spinner. The default optimization level is 4 for all animations. Most animations will suffer if you increase the animation level to 7. You have to trade of file size and memory usage against the quality of the animation. This will be application dependent, so you should play with the values, and observe the resulting animations in the Actor Viewer to make your decising regarding the best optimization level for your animations.
For advanced users, you can use other file types for the input parameter for your motions. .MOT files are intermediate files produced by Actor Studio when it builds a project. .KEY files are obtained by using the KEY exporter from 3DS Max.
Once you've set up the motions, go to the Paths tab:
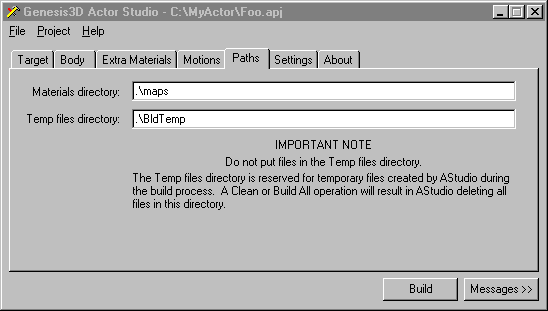
This dialog allows you to setup some basic paths that the Actor Studio requires. The Materials directory is the directory that will be searched for all materials that you used to texture your mesh with in 3DS Max. This should be set to the .\maps directory, if you have chosen the hiearchy that we layed out above.
The Temp files directory is the directory that Actor Studio will use for its intermediate files. Note that this directory will be completely wiped every time to rebuild the project completely using Project|Rebuild All. The directory that you name should be empty, and you should never store anything important there. Actor Studio will store .KEY, .BDY, .MOT and .NFO files in this directory. The .KEY files are the result of running the KEY exporter in 3DS Max. The NFO files are the result of running the NFO exporter in 3DS Max. The BDY file is the Actor Studio temporary version of the Body for your animations, and the MOT files contain the individual motions. Advanced users can copy these intermediate files from an Actor Studio build and use them for other Actor Studio projects. This can be useful if you want to build an Actor from files exported from 3DS Max on a machine that does not have 3DS Max installed.
The last job you need to do is to configure the Settings tab for the Actor Studio:
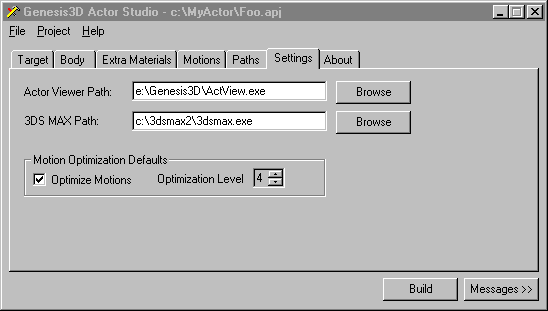
The Actor Viewer path is the path to the Actor View executable program. This is only necessary if you wish to do previews of the Actor using Actor Studio.
The 3DS MAX path is required if you are using 3DS MAX files as input parameters for the body or motions for your Actor. In this case, when you build your Actor, Actor Studio will need to run 3DS Max to export your animation data.
The Motion optimization defaults can be set to make it easy for you when adding motions to a new Actor. The settings here are carried over as the defaults for each animation in the Motions tab. Set the optimization level here, and new animations will default to this level. You can override this on the Motions page.
Finally, you should save the project. Select File|Save, and click OK, and your Actor Studio project is saved. You can open existing Actor Studio projects by selecting File|Open, and browsing for projects.
Now that you've built your project, you will want to build the actual Actor. There are two buttons at the bottom of the Actor Studio application. One is Build, and one is Messages. The Messages button causes the dialog to expand to include an output window describing the progress of the build, along with any error or warning messages. The Build button will cause Actor Studio to actually build your project. If you are using 3DS Max files as input (the default), Actor Studio will run 3DS Max on your machine, and export some files automatically. It will then process the resulting output files and combine them into a .ACT file which can be loaded by Genesis3D. If you want to view your Actor in the engine, use the Actor Viewer. See the documentation for the Actor View for more information on how to do this.
There are some limitations that you need to be aware of in the tool. Some of these are due to restrictions imposed by 3DS Max, while some are design limitations in the Genesis3D engine.
The Actor Builder is a command line tool for building existing Actor Studio project files (.APJ files). This tool was built, and is included, to support automated builds of Actors. The command line parameters to ActBuild are:
| /F<project file> | The Actor Studio project file to build (e.g. myactor.apj) |
| /M<Max path> | The complete path to the 3DS Max executable. For example, c:\3DSMax\3dsmax.exe |
When you run this tool, it will build the Actor Studio project as though you had opened the project in Actor Studio, and pressed the Build button.
The Actor viewer allows you to preview Actors that you have built with the Actor Studio, or with any external tool. It is able to preview motions, and test motion blending. The viewer has extensive online help. For information on how to use the viewer, please refer to the online help.
The texture packer is a drag and drop tool which allows you to build the texture libraries that the editor uses to build your levels.
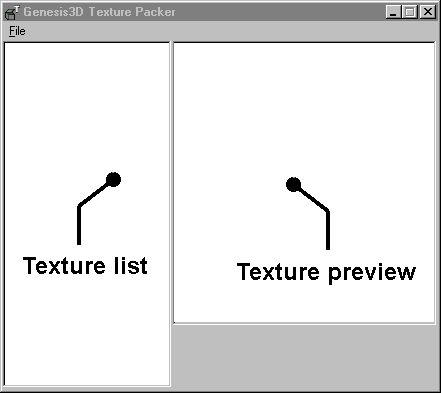
When you open the Texture Packer, you are presented with the simple interface above.
The texture preview pane is where the selected texture will be displayed. Textures will be stretched to fill this pane.
The texture list pane is the list of textures, by name, that are in the library. You add textures to a texture library by dragging BMP files from the explorer to the texture list box. If you want to delete a texture from the library, select it in the list box, and press the DEL key. Textures added to the texture packer must be power of 2, square bitmaps that are 8bit palletized.
Under the options menu is an option to extract all bitmaps from the texture library. When you do this, all of the bitmaps will be written as BMP files to the current working directory of the texture packer.
There are two sets of exporters, provided for 3DS Max versions 2.5 and 3.0. A set is made of the two files NFOEXP.DLE and KEYEXP.DLE. In order for you to be able to build Actors with the Actor Studio, these must be installed in the plugins directory of your installation of 3DS Max. Use the exporters in the root directory for 2.5, and the ones in R3 for 3.0. Once installed, you can either invoke them manually from 3DS Max from the export menu, or they will be invoked automatically for you by the Actor Studio if you have specified that your Actor Studio project use Max files as your source data.