User’s Guide (Includes Real-time version) |
User’s Guide (Includes Real-time version) |
h t t p : / / w w w . d i g i t a l - e a r . c o m /
Copyright © 2002 by Epinoisis Software . All Rights Reserved.
Table of Contents
- Engine Control
- MIDI Settings
- Settings WizardTM
- Managing your settings
- Quick Settings
- Associating Settings with Wave and Digital Ear files
- The startup.set file
- Auto correct
- Area correct tool
- Soft pitch quantize
- In-Tune Wizard
- Pitch-Tempo
- The Smart Attack Detector
Using the Voice Features Editor
- The Voice Features Display
- Getting a more detailed view
- Editing the Voice Features
- Correcting your errors (Undo)
Congratulations on your purchase of Digital Ear !
You have in your hands an advanced piece of musical software. Digital Ear can accurately recognize the pitch of a variety of real world sounds and instruments and convert it into MIDI events that can be sent to any synthesizer. And pitch recognition is only the beginning because Digital Ear can send complex volume envelope and harmonic content events to your MIDI synthesizer, achieving extreme levels of realism and musical expression. Think of Digital Ear as your ultimate MIDI controller.
If you want to test quickly the Digital Ear features, here are 4 simple steps to get started:
|
Well done! That is all you have to do to convert your wave file to MIDI.
![]() In order to take advantage of all the powerful
features of Digital Ear we strongly recommend you to read the entire
manual. We have tried to keep it as small as possible. It
is also a good idea to print it and use it for future reference.
In order to take advantage of all the powerful
features of Digital Ear we strongly recommend you to read the entire
manual. We have tried to keep it as small as possible. It
is also a good idea to print it and use it for future reference.
Each musical instrument's sound or human voice is unique. Digital Ear is flexible. It is not tailor-made for a specific sound (such as a guitar tuner). So, in order to accurately recognize the pitch of each instrument, Digital Ear needs to be customized. Here is how:
Activate the settings dialog box. Do this by either clicking on the Settings icon in the toolbar or by selecting the menu item Settings > Customize.
At any time you can change the settings and process your wave file again by clicking on the Start! icon.
Use the Apply Now! button to automatically apply any changes you made. OK button will not apply any changes until the next time you track (by pressing Start!) or save your file.
![]() An easy way to customize Digital Ear
engine is by using the Settings Wizard. Click HERE to find out more about this feature.
An easy way to customize Digital Ear
engine is by using the Settings Wizard. Click HERE to find out more about this feature.
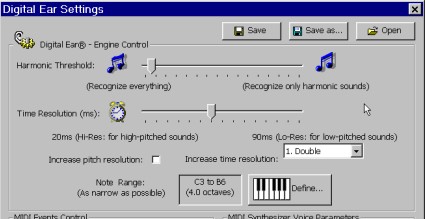 Natural sounds
frequently produce non-harmonic (noise-like) sounds. That usually happens in the
attack of a note (for example a consonant when singing, or the fret, bow, valve noise of
an instrument). Digital Ear’s internal engine is intelligent, and can successfully
discriminate between harmonic and non-harmonic sounds. In order to accomplish that, you
must carefully define that threshold.
Natural sounds
frequently produce non-harmonic (noise-like) sounds. That usually happens in the
attack of a note (for example a consonant when singing, or the fret, bow, valve noise of
an instrument). Digital Ear’s internal engine is intelligent, and can successfully
discriminate between harmonic and non-harmonic sounds. In order to accomplish that, you
must carefully define that threshold.
A very high threshold will have the effect of ignoring harmonic sounds (normal notes) and a very low threshold will erroneously convert noise into pitch.
![]() We suggest starting with the slider positioned at zero.
Progressively, move the slider to the right until most of the errors are
eliminated.
We suggest starting with the slider positioned at zero.
Progressively, move the slider to the right until most of the errors are
eliminated.
Digital Ear can send to your synthesizer the features of your voice (pitch, volume and brightness) up to 100 times per second! (i.e. every 10 milliseconds). This is user selectable. Have in mind that Digital Ear recognizes the voice features better and with fewer errors, if you decrease the time resolution. Resolution is decreased by moving the slider to the right.
![]() High-pitched voices can be tracked with more time
resolution than low-pitched ones.
High-pitched voices can be tracked with more time
resolution than low-pitched ones.
This is the best of two worlds. Using overlapping frames virtually increases your time resolution, but without the errors that would normally be introduced.
This will improve the pitch accuracy of Digital Ear especially in high frequency sounds (e.g. whistling). However, the recognition will be slightly slowed down.
Note Range
Here you define the note range of your instrument or voice. It is very important to narrow this as much as possible. You can define the range in two ways:
Method 1: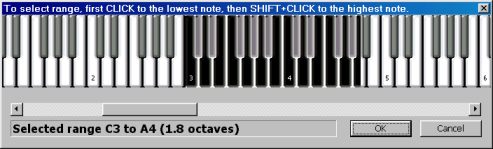
Method 2:
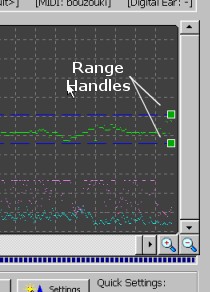
Alternatively you can set note range without going through the Digital Ear settings window.
You can do that directly inside the Voice Features Display, by dragging the range handles (see figure in right).
Try to move them into such a position, that the range is as "tight" as possible around your melody line.
![]() The Note Range setting is the most important parameter to be
set for getting correct results.
The Note Range setting is the most important parameter to be
set for getting correct results.
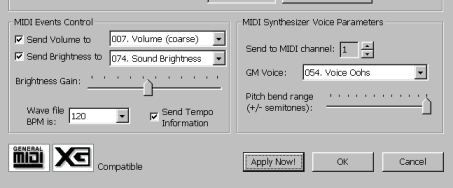 Check this option if you want
volume events to be send to your synthesizer. Digital Ear will send detailed
envelope events to your synthesizer accurately matching the characteristics of the
original waveform. See also the section “Essential Synthesizer settings”
Check this option if you want
volume events to be send to your synthesizer. Digital Ear will send detailed
envelope events to your synthesizer accurately matching the characteristics of the
original waveform. See also the section “Essential Synthesizer settings”
Digital Ear can send the volume events to any of the 128 MIDI controllers. On modern synthesizers this should be sent to controller #11 (expression) or controller #07 (volume). In some synthesizers, controller #11 also controls the brightness (see below) of a sound, so you may need to experiment to see which controller gives better results for you.
Check this option if you want brightness events to be sent to your synthesizer. Brightness events are generated by analyzing the harmonic content of your sound. Digital Ear estimates the human perceived “brightness” of the sound and sends MIDI events to your synthesizer. Correct use of this feature can produce life-like sounding results.
Use this slider to adjust the amplitude of the brightness events (depending upon the instrument's characteristics). Try to exploit the full dynamic range, avoiding clipping.
Digital Ear can send the brightness events to any of the 128 MIDI controllers. On modern synthesizers this should be send to controller #74 (brightness controller). Otherwise, send these events to a controller that controls the filter cutoff on your synthesizer. Creative users can send brightness information to control any other parameter of the synthesizer (e.g. the output level of an FM operator).
Select any of the 16 MIDI channels you want to send the events to.
Producing files with relative MIDI timecode
Just select one of the numeric BPM values frpm the dropdown list (you can directly type a value if you wish). This value must match exactly the BPM of your original recording (.wav file), especially if you plan to mix this track with other MIDI tracks.
Producing files with absolute SMPTE timecode
Selecting [ SMPTE ] will produce a MIDI file with accurate SMPTE timing. This mode produces MIDI files measuring exactly the same duration as your original PCM recording.
![]() Some sequencers do not support SMPTE timecode in MIDI files
resulting in erroneous playback.
Some sequencers do not support SMPTE timecode in MIDI files
resulting in erroneous playback.
Enabling this will force Digital Ear to include BPM information inside your MIDI file. If you do not enable it, your sequencer will select a default value (typically 120 BPM) and your sequence may be played slower or faster than the original.
This has no effect if [ SMPTE ] timecode is selected.
Here you can select any of the 128 GM (General MIDI) voices available. Digital Ear will use your selection for MIDI output. If your synthesizer is not GM compatible, then there will be a different correspondence between the program number and the instrument's name. In this case, consult your synthesizer’s manual.
Select [ None ] if you want to manually select a voice on your synthesizer.
This parameter is very important. If your synthesizer is GM (General MIDI) compatible, then you do not have to make any adjustment on this value (default is +/- 12 semitones). Digital Ear will adjust automatically the pitch-bend range of your synthesizer.
If your synthesizer is not GM compatible (including some cheap soundcards that claim to be GM compatible) then you have to adjust this value yourself both on your synthesizer and on Digital Ear. To do this, adjust the pitch bend controller range on your synthesizer to the maximum value (up to +/- 12 semitones) and then set Digital Ear to exactly the same value.
![]() Incorrect adjustment on this parameter can produce MIDI
files that sound totally wrong.
Incorrect adjustment on this parameter can produce MIDI
files that sound totally wrong.
Settings WizardTM allows you to find easily the optimal settings for a particular wave file. To use this feature follow these steps:
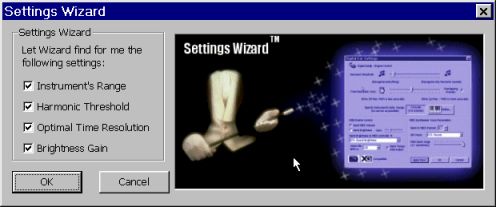
The Settings WizardTM will scan your wave file in order to estimate the parameters you have chosen.
In some cases, it may be necessary to modify the settings that the Settings WizardTM produced in order to produce better results. This is especially true for the range setting.
Digital Ear can save and load an infinite (limited only by the size of your hard disk) number of settings.
With these menu items, you can save your settings to disk. Use Settings > Save As... when you want to specify a filename for your settings. Otherwise, use Settings > Save to save your settings with the current filename.
Use this menu item to load settings previously stored to disk.
Load defaults will initialize Digital Ear with its standard settings (factory presets).
Quick Settings is a brand new feature of Digital Ear 4. It allows quick selection of common settings. (e.g. Male voice, or whistling). Do not use this feature to save some sequence-specific settings.
To create your own quick settings, just save them in the inside the special folder named "Quick Settings". Next time you open Digital Ear, it will appear in the drop down list.
Associating Settings with Wave and Digital Ear files
Keeping track of numerous settings corresponding to particular Wave files or (Digital Ear files, (see this section of the manual) can be difficult after a while. Digital Ear uses a simple method to keep things tidy. We suggest leaving the default filename that Digital Ear gives to your settings and in your wave (or Digital Ear) file (e.g. Soprano.set and Soprano.wav) and Digital Ear will automatically load the right settings each time you open your wave file.
There is a settings file that it is named startup.set
. This file contains settings that are loaded automatically during program startup. You
can save your settings over this file, so that Digital Ear is initialized
automatically with your own custom settings. Use this feature with caution as Digital Ear
can exhibit strange behavior with wrong settings. You can always choose Load defaults to
restore Digital Ear's original settings.
Wave files must be recordings of monophonic solo (one note at time, no chords) performances. Files must be relatively free of background noise. Your samples should be "dry" i.e. do not use any kind of effects such us reverb or echo as they can significantly degrade the quality of recognition.
The acceptable format of wave files is:
Loading a wave file into Digital Ear
To open a wave file use the menu item:
File > Open Wave file
To start the recognition engine click on the Start!
icon.
Digital Ear comes with a set of powerful tools to help you process your existing pitch data. These tools can be accessed using the toolbar or using the menu items under the title Tools.
This function attempts to correct most of the errors during the pitch recognition process. However, keep in mind that the corrections it makes are only estimates and not based on actually measured data.
This is a brand new feature of Digital Ear 4. It is an extremely useful and easy to use correction tool. Using this tool, you can easily correct areas which contain pitch errors with just a few clicks.
To use it first, click on the "Area Correct" icon. Notice that the pointer now has been transformed into a hand. Drag the mouse pointer approximately over the area where the correct pitch should exist. Digital Ear will analyze that area carefully and it will estimate instantly what the correct pitch should be. You will immediately see the corrected results on the screen!
This function will quantize the tracked notes into the nearest semitone values. Use this function if your track has an instrument that cannot do pitch bend effects (e.g. a piano).
Soft Quantization
If you do not want your sequence to sound artificial, you have a choice of "Soft
Quantizing" your melody. Choose the amount of quantization by moving the
corresponding control slider.
![]() Tip:
If you have played a melody without some reference tuning tone, use In-Tune Wizard first
(see below), then perform a pitch quantize. That will result a smarter quantization,
minimizing unwanted oscillations between successive semitones.
Tip:
If you have played a melody without some reference tuning tone, use In-Tune Wizard first
(see below), then perform a pitch quantize. That will result a smarter quantization,
minimizing unwanted oscillations between successive semitones.
Suppose that you have a melody that it is taken from an instrument tuned slightly higher or lower from the center. In-Tune Wizard will analyze your data and then will transpose the whole sequence, so that it is center tuned.
This function does not make any quantization to the notes.
With this tool you can precisely transpose and/or change the tempo of the whole melody
Transposer
This function will transpose your whole sequence by your desired amount of semitones
(up to +/- 12). You also have the option to fine-tune your melody by specifying the amount
of cents (1/100 of semitone.).
![]() If you need to transpose
your melody by more than one octave you can repeat this process as many times as you wish.
If you need to transpose
your melody by more than one octave you can repeat this process as many times as you wish.
Tempo
You can slow down the whole sequence by any percentage by moving the corresponding slider.
Enable/disable the Attack Detection by checking/unchecking the Smart Attack Detector checkbox.
If you enable this feature, Digital Ear will recognize a note's attack even if there is no silent part between successive notes. The vertical yellow lines in the display will show you the beginning ("Note On" MIDI event) of each note.
This feature is particularly effective for plucked instruments. Also using this feature will produce a MIDI file that will work better with notation software.
You can have on-the-fly real-time sensitivity adjustment and see the results on screen by using the slider named "Sensitivity". Increasing sensitivity will cause more "Note on" events to be triggered.
Digital Ear comes with an integrated high-quality MIDI/Wave file player. The MIDI file player is at the bottom of the window. This player will play the current Wave or MIDI file.
Select the appropriate file type (Wave or MIDI) by clicking in the dropdown box named: "Player type"
For the MIDI playback, be sure that you have selected the desired output device (e.g MIDI out, soundcard, or a Soft-Synth) by clicking on the button named "MIDI out".
Using the Voice Features Editor
Digital Ear includes a powerful Voice
Features Editor not found in other similar software packages. The Editor
allows you to have detailed access to the slightest voice feature quickly
and easily. There are no numbers to deal with, because the process is fully
graphical.
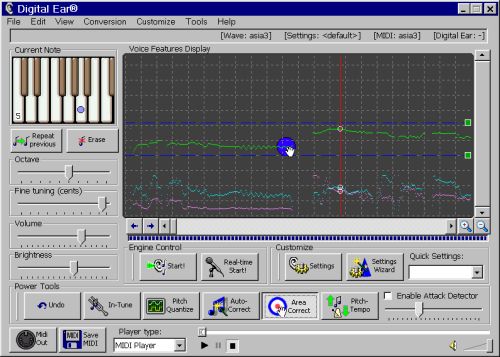
In the main window, you can see an oscilloscope-like display (chart) that shows you an overview of the voice features over the time. These are color coded as follows:
| Pitch (Green) |
| Volume (Cyan) |
| Brightness (Magenta) |
| Note Onsets (Yellow) |
You can selectively view/hide any of them by using the View menu item.
The chart is scaled as follows:
The two blue dotted lines show you your selected instrument's range (see: Engine Control)
Getting a more detailed view
You can not see all the detail in the diagram displayed. Its purpose is to give you an overview of the melodic line. In order to get more detailed information, click inside the Voice Features Display. The red vertical line is your cursor. To move the cursor slowly (a frame at time) click on the blue arrows located at the bottom left of the diagram, or use the arrow keys of your keyboard.
Now you can see an expanded version of the voice features at the cursor.
A single-octave keyboard marked with a dot that represents the current note where the cursor (red line) is. Note that the dot can move between the piano keys in order to show you the exact pitch bend (if any) of the note. The size of the dot represents to volume of the note. The color of the dot represents the brightness of the sound (the sound is brighter as the color becomes more white).
Use the Magnifying Glass icons to zoom in or zoom out the voice features. Note that only the vertical axis is scaled (pitch), while the horizontal axis (time) remains the same.
You can change the current note by clicking inside the keyboard and then adjusting the octave using the provided octave slider. Furthermore, you can “push” the pitch of this note higher by using the fine tuning slider. Similarly, you can change the current volume and brightness by using the respective sliders.
To delete the current note click on the button "Erase" or press the key "Delete". That will produce a silence at that point and trigger a new MIDI note on the next event. The "Delete" key will also advance the cursor one frame forward.
If you want to repeat the previous event (in order to correct an error) click on the icon "Repeat previous" or press the key "Insert" of your keyboard. The "Insert" key will also advance the cursor one frame forward.
Note that all the changes you make are immediately reflected on the Features View Display. For your viewing convenience the current features (pitch, volume and brightness) are surrounded with a small white circle.
Correcting your
errors (Undo)
If you make a mistake during editing or power tools processing, you can easily recover
from this by clicking the undo button.
You have two options. You can save your work as a MIDI file and/or as a Digital Ear file.
Saving your work as a MIDI file is done from the menu items:
File > Save MIDI file As
File > Save MIDI file
Note: You can not open a MIDI file in Digital Ear later for editing.
Saving your work as a Digital Ear file is done from the menu items:
File > Save Digital Ear file As...
File > Save Digital Ear file.
Unlike MIDI files, Digital Ear files can be opened later at any time, for further editing using the menu item:
File > Open Digital Ear file
![]() Digital Ear files (*.ear) always need the corresponding
settings (*.set) of the wave file in order to function properly.
Digital Ear files (*.ear) always need the corresponding
settings (*.set) of the wave file in order to function properly.
(Note: This section applies to Real-time version only)
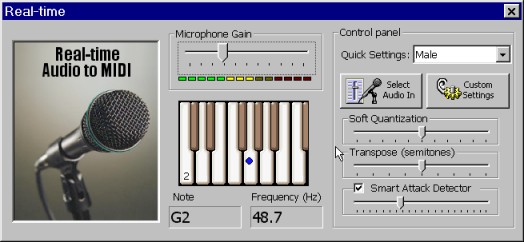
When Digital Ear is in Real-Time mode Audio will be converted almost immediately into MIDI events. The events are send to the selected MIDI output port.
It is best to use headphones, so that the output signal does not interfere with the input creating feedback effects. However it is still usable even without headphones.
You have access to a real-time display that shows you the current note in a keyboard. Also there is a digital display that shows you the instantaneous frequency in Hertz as well as the closest note.
Select audio in. It is important to select the appropriate audio recording device (your microphone) by clicking this icon. Also set up the correct input levels here. The microphone gain will give some additional amplification if your audio signal is weak.
Soft Quantization, Transpose, Smart Attack Detector:
These controls work in a way exactly analogous as the
corresponding non real-time power tools.
How to record Digital Ear's output using your favorite sequencer:
Since the software produces MIDI output, you have to redirect this output events back into the MIDI input so that they can be recorded by the sequencer.
There are several ways that you can accomplish this:
1. Using Hubi's lookback device (for Windows 95 or 98): This device allows you to take the output from Digital Ear and feed it into any other software (e.g. your sequencer). You can download this software for free HERE. Please refer to the manual of this software for more details.
2. Using MIDI OX: This is a similar to Hubi's loopback device compatible with all versions of windows. You can download this software for free HERE. Please refer to the manual of this software for more details.
Essential Synthesizer settings
In order to achieve the best sounding results please follow the following guidelines:
Make sure that your synthesizer is GM (General MIDI) compatible. If it is not, then you have to manually adjust the pitch bend controller range so that matches the settings on Digital Ear. See HERE the explanation of the pitch-bend settings on this manual.
If your synthesizer is not XG-compatible, then you have to adjust the vibrato depth to zero. If your synthesizer conforms to the XG standard, then Digital Ear will adjust your synthesizer automatically.
If you activate the “Send MIDI Volume” option then detailed volume envelope events are sent to your synthesizer. In this case it is best to use a flat envelope (i.e. organ-like) to your sounds, and Digital Ear will do the rest for you. If you do not use the Smart Attack Detector, avoid sounds that decay quickly (e.g. pizzicato style violin).
You do not have to make your voice velocity sensitive. Make your voice sound best at normal velocity (MIDI value 64) . Control of the dynamic response of the sound is done by using the brightness (usually filter cutoff) and/or the volume or expression controller.
If you could not find the answer to your problem by reading this guide, you may contact us. Usually we reply to all questions immediately. In busy periods you may get a answer within 48 hours. For a quick response, please address your requests to the appropriate department below:
Customer-only Priority Support:
(Please mention your customer code.)support@digital-ear.com General questions: info@digital-ear.com Purchase questions: sales@digital-ear.com Website problems: webmaster@digital-ear.com
»Fax: +1-(360)-237-6361
Information in this document is subject to change without notice and does not represent a commitment on the part of Epinoisis Software. The software described in this document is furnished under a license agreement or nondisclosure agreement. The software may be used or copied only in accordance with the terms of the agreement. It is against the law to copy this software on magnetic tape, disk, cd-rom, or any other medium for any purpose other than purchaser’s personal use.
Copyright 1999-2002 © by Epinoisis Software. All rights reserved.
Digital Ear® & Digital Ear Real-time® is a registered trademark of Epinoisis Software.
XG® is a registered trademark of Yamaha Corporation.
Document Version 4.0 [Last update: December 10, 2002]