Use the Stroke Color and Fill Color controls in the Property inspector

To change the stroke color, style, and weight for a selected object, use the Stroke Color control in the Property inspector. For stroke style, choose from styles that are preloaded with Flash, or create a custom style. To select a solid color fill, use the Fill Color control in the Property inspector.

Select a stroke color, style, and weight by using the Property inspector

  1. Select an object or objects on the Stage (for symbols, first double-click to enter symbol‑editing mode).
  2. Select Window > Properties > Properties.
  3. To select a stroke style, click the triangle next to the Style menu and select an option from the menu. To create a custom style, select Custom from the Property inspector, select options in the Stroke Style dialog box, and click OK.
    Note: Selecting a stroke style other than Solid can increase file size.
  4. To select a stroke weight, click the triangle next to the Weight menu and set the slider.
  5. Specify a stroke height by doing one of the following:
    • Select one of the preset values from the Height menu. Preset values appear in points.

    • Type a value from 0 to 200 in the height text field, and press Enter.

  6. To enable stroke hinting, select the Stroke Hinting check box. Stroke hinting adjusts line and curve anchors on full pixels, preventing blurry vertical or horizontal lines.
  7. To set the style for a path end, select a Cap option:
    None

    Is flush with the path’s end

    Round

    Adds a round cap that extends beyond the path end by half the stroke width

    Square

    Adds a square cap that extends beyond the path by half the stroke width

  8. (Optional) If you are drawing lines using the Pencil or Brush tools with the drawing mode set to Smooth, use the Smoothing slider to specify the degree to which Flash smooths the lines you draw.

    By default, the Smoothing value is set to 50, but you can specify a value from 0 to 100. The greater the smoothing value, the smoother the resulting line.

    Note: When the drawing mode is set to Straighten or Ink, the Smoothing slider is disabled.
  9. To define how two path segments meet, select a Join option. To change the corners in an open or closed path, select a path and select another join option.
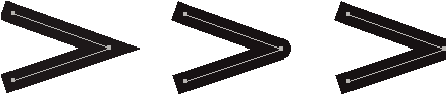
    Miter, round, and bevel joins

  10. To avoid beveling a Miter join, enter a Miter limit.

    Line lengths exceeding this value are squared instead of pointed. For example, a Miter limit of 2 for a 3-point stroke means that when the length of the point is twice the stroke weight, Flash removes the limit point.

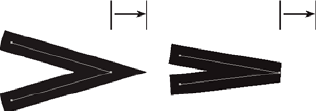
    Applying a Miter limit

Apply a solid color fill by using the Property inspector

  1. Select a closed object or objects on the Stage.
  2. Select Window > Properties > Properties.
  3. To select a color, click the triangle next to the Fill color control and do one of the following:
    • Select a color swatch from the palette.

    • Type a color’s hexadecimal value in the box.

  This page on the Web