Using ActionScript 2.0 Components ![]()
Using ActionScript 2.0 Components |
|
|
|
| Creating Components > Incorporating existing components within your component > Creating the LogIn Flash (FLA) file | |||
Start by creating a Flash (FLA) file that will hold our component symbol.
 To create the LogIn FLA file:
If the Linkage section of the Create New Symbol dialog isn't open, click the Advanced button to reveal it.
The default linkage identifier is LogIn. The rest of these steps assume you use the default value.
If you put the class in a package, enter the entire package name. For example, mx.controls.CheckBox denotes the CheckBox class in the mx.controls package.
Flash opens in symbol-editing mode.
This is the structure of the component movie clip: an Actions layer and an Assets layer. The Actions layer has 1 keyframe and the Assets layer has 2 keyframes.
stop() global function.
This prevents the movie clip from proceeding to Frame 2.
|
NOTE |
For information about folder locations, see "Configuration folders installed with Flash" in Using Flash. |
Asset dependencies for these components are automatically copied to your LogIn.fla library.
All the component assets are added to Frame 2 of the Assets layer. Because there is a stop() global function on Frame 1 of the Actions layer, the assets in Frame 2 will not be seen as they are arranged on the Stage.
You add assets to Frame 2 for two reasons:
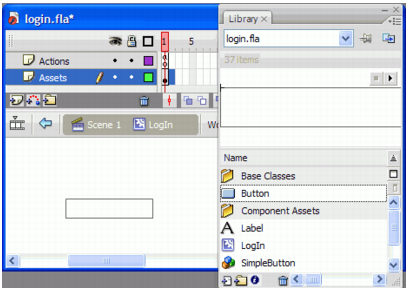
Dragging a Button component symbol from the library in StandardComponents.fla to Frame 2 of the Assets layer of LogIn.fla
The BoundingBox instance is used to create the component's live preview and allow the user to handle resize the component during authoring. You must set the size of the bounding box so that it can enclose all the graphical elements in your component.
|
NOTE |
If you are extending a component (including any version 2 component) you must keep instance names already in use by that component as its code will refer to those instance names. For example, if you include a version 2 component that is already using the instance name boundingBox_mc, do not rename it. For your own components, you can choose any instance name that is unique and that does not conflict with an existing name within the same scope. |
This value is the name of the ActionScript class. If the class is in a package, the value is the full package. For example, mx.controls.CheckBox denotes the CheckBox class in the mx.controls package.
|
|
|
|