Learning ActionScript 2.0 in Adobe Flash ![]()
Learning ActionScript 2.0 in Adobe Flash |
|
|
|
| Animation, Filters, and Drawings > Working with filters using ActionScript > About the gradient bevel filter | |||
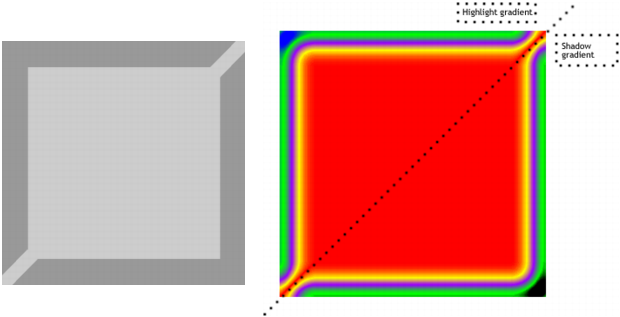
The gradient bevel filter is applied to an object as a rectangle, with the colors of the gradient distributed to three portions of the rectangle: two bevel edges (a highlight and a shadow) and an area we'll call the base fill. The following diagrams depicts the rectangle, with the bevel type set to inner. In the rectangle on the left, the dark gray areas are the bevel edges, and the light gray area is the base fill. In the rectangle on the right, a rainbow gradient bevel, with a four-color bevel on each edge, is applied.
The different properties of the gradient bevel filter control the way the filter is applied. The colors of the gradient bevel are set in the colors array. The actual distribution of colors in each portion of the rectangle is determined by the ratios array. The distance property determines the offset distance, or how many pixels away from the object the bevel edge is applied. The blurX and blurY properties control the sharpness of the colors in the bevel; higher values effectively make the bevel wider and softer, while lower values make the bevel thinner and sharper. The angle property is the theoretical light source falling on the object, thus causing a highlight and shadow effect on the object's edges. The strength property controls the spread of the colors: a lower strength value mutes the colors, as in the example; a higher strength value makes the outer numbers in the array stronger, forcing the middle colors in the array to be less prominent. Finally, knockout and type properties determine how and where the bevel filter is applied to the whole object: whether the filter knocks out the object and where it is placed.
One of the more complicated concepts to apply in the gradient bevel filter is the color distribution. To understand how the colors in a gradient bevel are distributed, think first of the colors you want in your gradient bevel. Because a simple bevel has the understood concepts of highlight color and shadow color, you can apply the same concepts to understand the gradient bevel filter: you have a highlight gradient and a shadow gradient. The highlight appears on the top left corner, and the shadow appears on the bottom right corner. There are four colors in the highlight and four in the shadow. However, you have to add another color (the base fill color), which appears where the edges of the highlight and shadow meet. There are nine colors for the colors array, which you can see in the previous diagram.
The number of colors in the colors array determine the number of elements in the alphas and ratios array. The first item in the colors array corresponds to the first item in the alphas array and in the ratios array, and so on. Because you have nine colors, you also have nine values in the alphas array and nine in the ratios array. The alpha values set the alpha transparency value of the colors.
The ratio values in the ratios array can range from 0 to 255 pixels. The middle value is 128; 128 is the base fill value. For most usages, to get the bevel effect you want, you should assign the ratio values as follows, using the example of nine colors:
If you think of a gradient as composed of stripes of various colors, blending into each other, each ratio value sets the number of pixels for the associated color, thus setting the width of the color stripe in the gradient. If you want an equal distribution of colors for each edge:
|
NOTE |
The angle value determines which edge is the highlight and which edge is the shadow. |
The angle value determines the angle at which the gradient colors are applied to the object; meaning, where the highlight and shadow appear on the object. The colors are applied in the same order as the array.
The following code takes a pink square (drawn with the Drawing API) and applies a rainbow gradient filter. The colors, in the order in which they are present in the array, are: blue, green, purple, and yellow (highlight); red (base fill); yellow, purple, green, black (shadow). To determine the ratios values, we assign four highlight colors values from 0 to 127, making them roughly equal, and shadow colors from 129 to 255. The colors on the outer edges, blue (16) and black (235).
var colors:Array = [0x0000FF, 0x00FF00, 0x9900FF, 0xFFFF00, 0xFF0000, 0xFFFF00, 0x9900FF, 0x00FF00,0x000000];
var alphas:Array = [1, 1, 1, 1, 1, 1, 1, 1, 1];
var ratios:Array = [16, 32, 64, 96, 128, 160, 192, 224, 235];
var gradientBevel:GradientBevelFilter = new GradientBevelFilter(8, 225, colors, alphas, ratios, 16, 16, 1.3, 2, "inner", false);
The following figure shows the gradient bevel filter created by the code above, a nine-color rainbow bevel applied to a red rectangle movie clip:
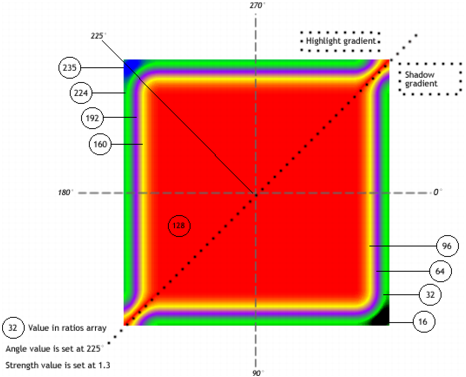
The dashed line shows how angles are determined. The figure shows how the angle of 225˚ is realized on the filter, and also shows each ratio value for each color. Setting the angle at 225˚ indicates that the first color in the array begins at 225˚, which is in the top left corner (the highlight). The dotted line shows where the highlight gradient is applied and where the shadow gradient is applied.
The original movie clip color is pink, but setting the 128 value to red means the 128-pixel value is the base fill and covers the original movie clip fill. However, when you set the filters property, the original object is not altered; by simply clearing the filters property, you can restore the original movie clip fill.
The properties of all filters affect each other, so if you adjust one property to change the effect that you're applying, you might need to adjust another property as well.
The full ActionScript code to create the previous figure is as follows:
import flash.filters.GradientBevelFilter;

// draws a filled square shape
this.createEmptyMovieClip("square_mc", this.getNextHighestDepth());
      square_mc.beginFill(0xFF99CC);
      square_mc.moveTo(40, 40);
      square_mc.lineTo(200, 40);
      square_mc.lineTo(200, 200);
      square_mc.lineTo(40, 200);
      square_mc.lineTo(40, 40);
      square_mc.endFill();

/* GradientBevelFilter(distance:Number, angle:Number, colors:Array, alphas:Array, ratios:Array, blurX:Number, blurY:Number, strength:Number, quality:Number, type:String, knockout:Boolean) */

// create colors, alphas, and ratios arrays
var colors:Array = [0x0000FF, 0x00FF00, 0x9900FF, 0xFFFF00, 0xFF0000, 0xFFFF00, 0x9900FF, 0x00FF00,0x000000];//blue, green, purple, yellow, red, yellow, purple, green, black
var alphas:Array = [1, 1, 1, 1, 1, 1, 1, 1, 1];
var ratios:Array = [16, 32, 64, 96, 128, 160, 192, 224, 235];

// create the filter object
var gradientBevel:GradientBevelFilter = new GradientBevelFilter(8, 225, colors, alphas, ratios, 16, 16, 1.3, 2, "inner", false);

// apply the filter to the square movie clip
square_mc.filters = [gradientBevel];
|
|
|
|