Learning Flash Lite 1.x ActionScript ![]()
Learning Flash Lite 1.x ActionScript |
|
|
|
| Flash 4 ActionScript Primer > Using the call() function to create functions | |||
You can't define or call custom functions in Flash Lite as you can in Flash Player 5 and later. However, you can use the call() ActionScript function to execute code that resides on an arbitrary frame in the timeline. This technique lets you encapsulate commonly used code in a single location, making it easier to maintain.
The call() function takes a frame number or frame label as a parameter. For example, the following ActionScript calls the code located on the frame labeled moveUp:
call("moveUp");
The call() function operates synchronously; any ActionScript that follows a call() function call won't execute until all of the ActionScript on the specified frame finishes executing.
 To call ActionScript on another frame:
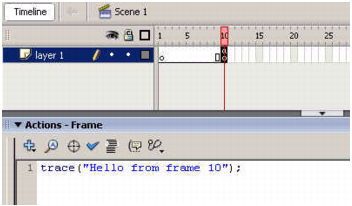
trace("Hello from frame 10");
stop();
call(10);
This code stops the playhead on Frame 1, and then calls the code on Frame 10.
You should see "Hello from frame 10" displayed in the emulator.
You can also call code that resides on another timeline, such as a movie clip's timeline. To execute the code, specify the movie clip instance name followed by a colon, and then the frame number or label. For example, the following ActionScript calls the code that resides on the frame labeled moveUp in the movie clip instance named callClip:
call("callClip:moveUp");
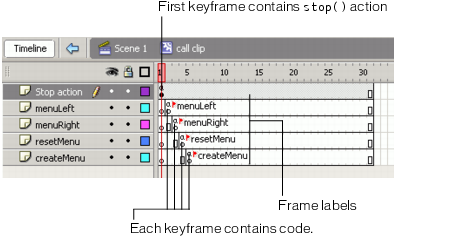
This technique is often used to create call clips or function clips--movie clips whose sole purpose is to encapsulate regularly used code. A call clip contains a keyframe for each function you want to create. You typically label each keyframe according to its purpose. Adobe also recommends that you create a new layer for each new keyframe, and that you give each layer the same name as the frame label you assign to the keyframe.
The following figure shows the Timeline of an example call clip. The first keyframe of a call clip always contains a stop() action, which ensures that the playhead doesn't continually loop over the frames in its Timeline. Subsequent keyframes contain code for each "function." Each function keyframe is labeled to identify what it does. To make editing and viewing the call clip easier, each function keyframe is typically inserted on a separate layer.
The following procedure explains how to create and use a call clip.
To create and use a call clip:The movie clip opens in editing mode.
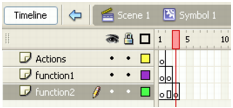
Name the top layer Actions, the second layer function1, and the third layer function2.
stop() action to the Actions panel.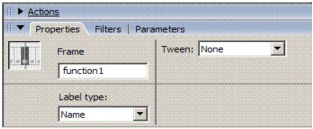
trace("function1 was called.");
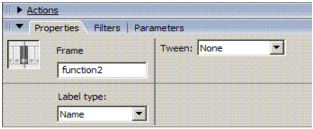
trace("function2 was called.");
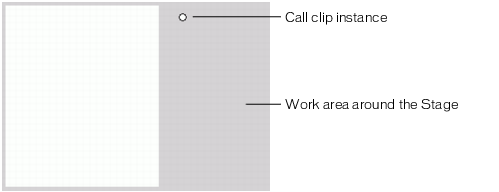
Because the call clip doesn't need to be visible to the user, you can place it in the work area.
The call clip doesn't contain any visual elements so it appears on the Stage as a small circle, representing the movie clip's registration point.
|
TIP |
To make your call clip more easily identifiable on the Stage, add some text or other visual element to the first keyframe in the call clip's Timeline. |
call("callClip:function1");
call("callClip:function2");
You should see the following text:
function1 was called.
function2 was called.
|
|
|
|