| Use Mini Mode |
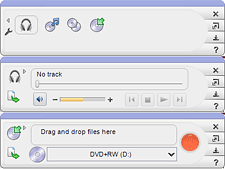
Three views of Mini Mode: Project
selection pane (top), audio playback (center), and Data Disc project (bottom). |
The application
window is available in two sizes: standard and mini. Many — but not
all — of the projects available in the standard application window
are available in Mini Mode.
The Help file offers more detail on how
to use Mini Mode with each compatible project.
Note:
Not all versions of the project launcher include Mini Mode.
|
- To start a new project in Mini Mode, click on one of
the project icons in the project selection pane.
- Some projects are available in both the full-size project
window and Mini Mode. In those cases, when you switch back and forth,
the current project is maintained in both windows.
- To add files to a project, drag them from a directory
window onto the miniature application window. When you see the cursor
change to a plus sign (+), release the mouse button.
- Mini Mode does not offer every project feature available
on the full-size project window. In some cases, you may need to switch
back and forth between Mini Mode and the full-size application window
to fine-tune your project.
|
To switch to Mini Mode:
- Click on the Switch button located on
the upper right-hand corner of the full-size application window. It
is circled in the illustration below.

To switch to the full-sized application window:
- Click on the Switch button located on
the right-hand side of the miniature application window. It is circled
in the illustration below.

|