| Using CD properties |
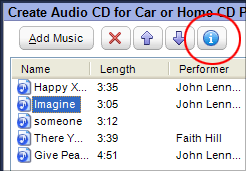
The CD Properties button (circled
above) is activated when a song in the project window is selected. Click
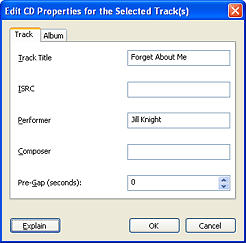
on the button to open the Edit CD Properties window (below). |
The Audio
CD project offers you the ability to input CD Text, add pre-gaps,
and enter UPC and ISRC identifiers.
What is CD Text?
You can store song information directly on the discs
you burn so it is always displayed correctly. This text is stored in
a special location and is called CD Text. Some disc drives will even
display CD Text about each song as it is played.
What is a pre-gap?
A pre-gap is the period of silence that usually separates songs on a disc.
What is ISRC?
ISRC stands for International Standard Recording Code. This 12-digit code
is used for identifying individual audio tracks to help ensure the proper
payment of royalties.
What is UPC?
UPC stands for Universal Product Code. This unique number is usually
found near the product bar code. One of its uses is to track the sales
of commercial audio CDs.
|
- Track titles can be edited directly in the project window
by single-clicking twice on a track title. Type the new track title
and press the Enter key.
- You can enter audio properties for several tracks at
once. Select more than one track in the project window and click on
the CD Properties button. Any changes you make in the
Edit CD Properties window will affect all of the selected tracks.
- If the Edit CD Properties window is opened when more
than one track is selected, some settings may display the phrase Multiple
Values. This means at least two of the selected tracks have
different values for the same setting. Click on a Multiple Values
entry only if you wish to enter a new setting for all the selected tracks.
|
To edit CD properties:
- Open a new or saved Audio CD project.
- Move the songs you wish to record to the project window,
and select one of them.
- Click on the CD Properties button. The Edit CD Properties
window opens.
Notice that it has tabs titled Track and Album.
The Album tab is used to enter properties that are
the same for the entire album. The Track tab is used
to enter properties that vary from track to track. Use this box to add
album and track information and to set pre-gaps.
- Select the Album tab. Enter properties
that are the same for the entire album. Performer, Composer, and UPC
settings can be quickly entered for every track on the album using this
tab.
- Click on the OK button.
- Double-click on the first track in the project window.
The CD Properties window opens with the Track tab selected.
- Enter any properties that are unique to this track, such
as Track Title.
- Click on the OK button.
- Repeat steps 6-8 for each track.
- When you have finished setting CD Properties and entering
CD Text, click on the action button to record the project or click on
the Save button to save the project.
|