| Make a bootable CD or DVD |
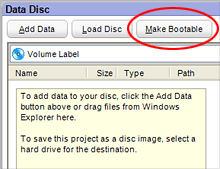
Select the Data Disc project, then
click on the Make Bootable button (circled). |
The Data Disc
project can be used to easily create bootable CDs or DVDs from a bootable
floppy disk or from a disc image file on your hard drive. A bootable CD
or DVD can be used to start your computer if your operating system becomes
damaged.
Bootable discs offer a level of flexibility
and customization not available from the recovery discs provided with
most computers.
|
- To create a bootable CD or DVD from a bootable floppy
disk, your computer must have a floppy disk drive.
- Test your boot floppy before using it to create a bootable
CD or DVD.
- 1.44 MB and 2.88 MB bootable floppy disks are supported.
- Most modern computers support bootable CDs or DVDs, but
many older computers do not.
- Your computer may need to be told to start from a CD
or DVD drive by changing the settings in the BIOS setup. Refer to your
computers operating instructions for more information.
|
To make a bootable disc:
- Insert a blank disc into your recorder. The disc must be blank.
- Click on the Data tab, and select the Data
Disc project.
- Click on the Make Bootable button in the data
disc toolbar. The Bootable Disc window appears.
- To create a bootable CD or DVD from a floppy disk, follow these steps:
- Insert a bootable floppy disk into your
floppy disk drive.
- Select Bootable floppy disk in drive
A:
- Click on the OK button.
An image file is created from the boot floppy and is added to the
file selection window.
- To create a bootable CD or DVD from an image on your hard drive, follow
these steps:
- Select Bootable image on hard drive.
- Click on the Browse button,
and navigate to the image file using the Select Image
window. When you have selected an image file, click on the Add
button.
- Click on the OK button
to add your selection to the file selection window.
- Click on the action button to begin recording.
|