

Adjust position, scale, and rotation
Use the Motion effect to position, scale, or rotate a clip within the video frame. To animate clips, you must set keyframes for Motion properties.
By default, each clip that you add to the Timeline panel has the Motion effect applied as a fixed effect. You can view and adjust the Motion effect properties in the Effect Controls panel by clicking the triangle next to the Motion name. Motion properties can be directly manipulated in the Program Monitor or using the controls in the Effect Controls panel. Motion properties can be controlled with Bezier handles.
By default, a clip appears at 100% of its original size in the center of the Program Monitor. Position, scale, and rotation values are calculated from the anchor point, which lies at the clip’s center.
 next
to the Motion effect in the Effect Controls panel, handles appear
on the clip in the Program Monitor that let you directly manipulate
the clip and adjust the Motion effect properties. Although the anchor
point also appears in the Program Monitor, it can be adjusted only
in the Effect Controls panel. However, the Program Monitor updates
any changes to the anchor point as you make them.
next
to the Motion effect in the Effect Controls panel, handles appear
on the clip in the Program Monitor that let you directly manipulate
the clip and adjust the Motion effect properties. Although the anchor
point also appears in the Program Monitor, it can be adjusted only
in the Effect Controls panel. However, the Program Monitor updates
any changes to the anchor point as you make them. 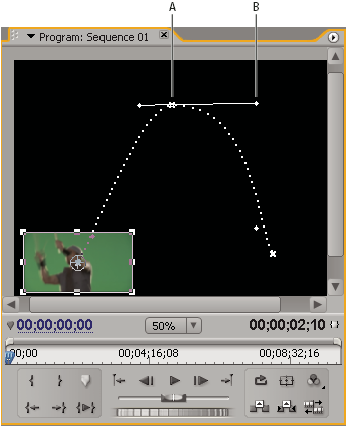
- A.
- Anchor point
- B.
- Handle
 Standard effects that allow direct manipulation
of clips in the Program Monitor include all the Generate effects,
Corner Pin, Crop, Garbage Matte, Lighting Effects, Mirror, Transform,
Twirl, and more. This capability is indicated by the Transform icon next
to the effect name in the Effect Controls panel.
Standard effects that allow direct manipulation
of clips in the Program Monitor include all the Generate effects,
Corner Pin, Crop, Garbage Matte, Lighting Effects, Mirror, Transform,
Twirl, and more. This capability is indicated by the Transform icon next
to the effect name in the Effect Controls panel.You can adjust the position, scale, and rotation of a clip and Lighting Effects lights by directly manipulating handles in the Program Monitor. You can also adjust the properties using the controls in the Effect Controls panel.
- Select a clip in the Timeline panel, and move
the current-time indicator
 to
a location of a frame within the clip.
to
a location of a frame within the clip. - Do one of the following:
-
(Lighting Effects only) Apply the Lighting Effects to the clip and then click the Transform icon
next
to Lighting Effects in the Effect Controls panel. -
(Motion effect only) Click the clip in the Program Monitor or click the Transform icon
next
to Motion in the Effect Controls panel.
The handles and anchor point appear in the Program Monitor.
-
- In the Program Monitor, do any of the following:
-
To position a clip or lighting effect, click in the clip or effect outline and drag to reposition it. Don’t drag a handle to reposition the clip or lighting effect.
-
To scale freely, drag a corner handle.
-
To scale one dimension only, drag a side (not a corner) handle.
-
To scale proportionally, Shift‑drag any handle.
Note: When using the Motion effect to scale a clip, scaling video and low‑resolution images over 100% can make them look blocky or pixelated. -
To rotate a clip or effect, position the pointer slightly outside any of the handles, so that the pointer changes into the Rotate icon
 and
drag. Shift‑drag constrains the rotations to 45° increments. For
the Motion effect, you can also drag in a circular motion until
the clip rotates the number of times you want to create multiple
rotations.
and
drag. Shift‑drag constrains the rotations to 45° increments. For
the Motion effect, you can also drag in a circular motion until
the clip rotates the number of times you want to create multiple
rotations. -
To update only the wireframe outline of the frame, Alt-drag (Windows) or Option-drag (Mac OS) any handle. This may give faster results for clips with large dimensions or for slow systems.
To animate the motion, scaling, or rotation
over time, set keyframes as you manipulate the clip or effect in
the Program Monitor. -