

Set capture format and preferences
Use the Capture panel (choose File > Capture) to capture digital or analog video and audio. This panel includes a preview, which displays video being captured, controls for recording with or without device control, a Settings pane for editing your capture settings, and a Logging pane for logging clips for batch capturing. For convenience, some options available in the Capture panel are also available in the Capture panel menu.
You can control certain source devices, such as camcorders and decks, directly from the Capture panel, provided your computer has an Adobe Premiere Pro‑compatible IEEE1394, RS‑232, or RS‑422 controller. If your source device lacks any of these interfaces, you still use the Capture panel, but you must cue, start, and stop your source device using its controls.
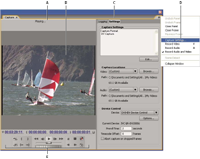
- A.
- Status area
- B.
- Preview
- C.
- Tabs
- D.
- Panel menu
- E.
- Transport controls
 Set the capture format
- With a project open, choose Project > Project Settings > Capture.
- From the Capture Format menu, choose the settings that match your source material.
Set capture preferences
- Choose Edit > Preferences > Capture (Windows) or Premiere Pro > Preferences > Capture (Mac OS).
- Specify whether you want to cancel capture on dropped frames, report dropped frames, or generate a batch log file.
- Select whether to use device control timecode. If a device controller is in use (for example, for RS‑422/232‑controlled devices), the last selection enables Adobe Premiere Pro to record the timecode supplied by the controller instead of attempting to record any timecode that might be written to the source tape.