

Work with Grain effects
Almost every digital image captured from the real world contains grain or visual noise caused by the recording, encoding, scanning, or reproduction processes and by the equipment used to create the image. Examples include the faint static of analog video, compression artifacts from digital cameras, halftone patterns from scanned prints, CCD noise from digital image sensors, and the characteristic speckle pattern of chemical photography, known as film grain.
Noise isn’t necessarily bad; it’s often added to images to create a mood or tie elements together, such as adding film grain to a computer-generated object to integrate it into a photographed scene. However, noise can be unwanted for aesthetic reasons. Archival footage or high-speed photography may appear unpleasantly grainy; digital compression artifacts or halftone patterns may mar an image; or noise may interfere with technical processes such as bluescreen compositing.
There are also technical reasons to reduce noise. For example, compression algorithms usually achieve smaller file sizes if the input material is less noisy, so noise reduction is a valuable preprocessing step for work such as DVD creation and video streaming.
The Add Grain, Match Grain, and Remove Grain effects allow you to manipulate grain that appears more or less evenly over an entire image. Grain effects can’t correct image problems that affect only a few pixels, such as dust, salt and pepper noise, or analog video dropouts.
The Add Grain effect generates new grain from nothing; it doesn’t take samples from existing grain. Instead, a number of parameters and presets for different types of film can be used to synthesize different types of grain.
The Remove Grain and Match Grain effects use a two-step process to manipulate grain without affecting the edges, sharpness, or highlights of an image. First, the grain is sampled, either automatically or manually; second, the grain is analyzed and portrayed by a mathematical model, which the effect uses to add, remove, or match the grain.
 Apply a grain effect
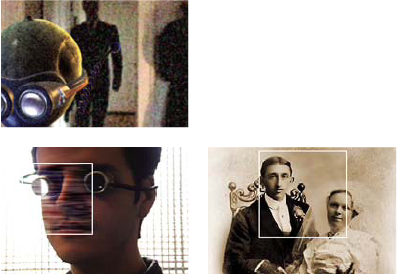
Each grain effect is applied with default settings and is displayed in Preview viewing mode, which has a preview region framed by a white border and centered on the image. The preview region displays the results of the grain effect on just a portion of your image, for speed and comparison purposes. The grain effects are almost fully automatic but also offer many controls to achieve precise results. You can also selectively apply the grain effects to portions of your image using the extensive Blend With Original features provided with each effect.
Apply a grain effect to a selected area
- Color Matching
- Excludes any area of the image that matches a selected color. By inverting the matte, you can also selectively process such an area.
- Masking Layer
- Uses any layer in the current composition as a mask to selectively process or exclude an area of the current layer or track.
When any grain effect is first applied, the Amount value of the Blend With Original controls group is set to 0%; this value determines the percentage of blending between the original image and the processed version. At 0%, no blending occurs and the selected effect is applied to the entire image at full strength; at 100%, white areas of the blending matte are unchanged from the original image.
Any mask or matte works in a similar way: The white pixels in it exclude that area of the original image from processing by the grain effect; the black pixels process normally. At 100% Amount, the white areas fully blend with the original so that they are completely excluded from the processing. This behavior remains true when the match is inverted. Regardless of the Amount value, the black areas of the matte or mask are always processed. The Amount slider affects only the areas under the white pixels in the matte or mask. It affects only how the white areas of the matte or mask are treated by each grain effect.
Generate a color-matching matte
When a grain effect is first applied, a neutral gray color is used to generate a default color-matching matte, so that in most images a visible matte appears. The Color Matching group of controls uses color matching to precisely define a matte. The matte isolates portions of the image where the layer that uses the grain effect is blended with the input.
- To select a color to exclude from or restrict to the
effect, do one of the following adjacent to the Matching Color control
in the Blend With Original and Color Matching controls groups:
-
Click the color swatch and select a color in the Color Picker dialog box.
-
Click the eyedropper
 and
click a color anywhere on-screen.
and
click a color anywhere on-screen.
-
Generate a layer matte
In some cases, you may want to use a different layer or track as a mask for the layer that uses a grain effect. This type of mask allows unlimited control over exactly which parts of an image are modified and by how much.
Change the preview region
You can use the Preview Region controls group to change the position or the size of a grain effect’s preview region.
Because adding or removing grain can affect sharpness of detail, you may want to preview an area of fine detail, such as a human face or some text. When you remove grain with the Remove Grain effect, a best practice is to preview an area where the grain is most clearly visible or most objectionable, such as a large expanse of solid color.
You’ll achieve the best results by experimenting, applying small increments to each of several controls in the Effect Controls panel, and viewing the results in the Composition panel after every adjustment.
- After applying a grain effect, click the Center
button
 in
the Preview Region group of controls in the Effect Controls panel.
in
the Preview Region group of controls in the Effect Controls panel.
A cross hair is centered in the Composition panel.
- View the results:
-
To view the fine detail of the noise structure, zoom into the preview region.
-
To examine the noise in each channel independently, click the corresponding color channel icon in the Composition panel.
-
To increase the effect’s interaction speed and RAM preview duration, use the Region Of Interest feature in the Composition panel to reduce the area that’s processed. (See Work with the region of interest.)
-
To retain an image of the current frame in its current state, click Take Snapshot
 in
the Composition panel. You can subsequently click and hold down
Show Last Snapshot
in
the Composition panel. You can subsequently click and hold down
Show Last Snapshot  to
view the most recent snapshot instead of the active composition,
and to toggle between the current and previous states of the preview
region. This technique is extremely useful for evaluating subtle adjustments.
(See Work with snapshots.)
to
view the most recent snapshot instead of the active composition,
and to toggle between the current and previous states of the preview
region. This technique is extremely useful for evaluating subtle adjustments.
(See Work with snapshots.) -
To compare the preview region with and without the grain effect, click the Effect switch (small f icon) next to the grain effect’s name in the Effect Controls panel to temporarily disable the effect. Click Take Snapshot
in
the Composition panel, click the Effect switch again to re-enable
the effect, and then click and hold down Show Last Snapshot to
display the snapshot of the image without the effect.
-