

Mesh Warp effect
The Mesh Warp effect applies a grid of Bezier patches over a layer, which you can manipulate to distort areas of an image. Each corner of a patch includes a vertex and two to four tangents (points that control the curvature of the line segment that makes up the edge of the patch). The number of tangents depends on whether the vertex is in a corner, on an edge, or inside the grid. By moving the vertices and tangents, you can manipulate the shape of the curved line segment. The finer the grid, the tighter the adjustments you can make to the area of the image inside the patch.
This effect works with 8-bpc and 16-bpc color.
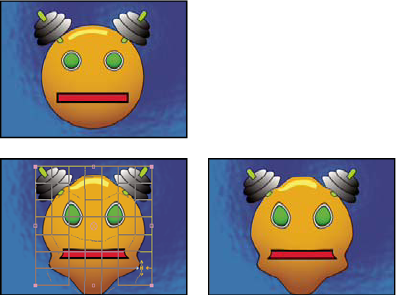
Original (top left), with distortion mesh (bottom left), and
with Mesh Warp applied (bottom right)
 To
select multiple vertices, Shift-click the vertices.
To
select multiple vertices, Shift-click the vertices.- Rows, Columns
- Specify up to 31 patches vertically (Rows) or horizontally (Columns). For broader distortion, use fewer patches. For finer control, use more. Drag the vertices and tangents to change the grid shape. The image follows the grid shape according to the elasticity setting and the boundary created by the adjacent patch.
- Quality
- Specifies how closely the image follows the shape defined by the curve. The higher the quality value, the more closely the image follows the shape. Higher quality settings require more rendering time.
- Distortion Mesh
-
Click the stopwatch to animate the distortion over time.
Note: Each patch becomes a boundary for the distortion. For example, when you stretch a patch, the area of the image in the patch stretches, squishing the area of the image in the adjacent patch. The boundary of the adjacent patch protects the image inside it from being squished to zero. In other words, you can’t push an image out of its patch.