MSP Tutorials
Sequencing Tutorial 1: Audio-Rate Sequencing
Introduction
This tutorial looks at how to generate timed events in Max using
MSP audio signals as the synchronization source. When designing timing-based
systems in Max, we're used to using metro, clocker, delay,
and other Max objects that run in the Max scheduler to generate events automatically.
However, when working with MSP, it's often beneficial to be able to synchronize
events directly off of an MSP signal. This technique not only allows
for more precise control of event timing (so-called sample accurate
sequencing), but also allows us to use a number of MSP objects that allow
for the synchronization of multiple event streams based on a single clock
signal. Our first tutorial looks at a few of these objects and how they work.
Providing a synchronization clock signal
Take a look at the tutorial patcher. Turn on audio in the patcher by clicking
on the ezdac~ object at the top of the patch. The scope~ objects,
as well as the multislider object in the middle of the patcher, should
all spring to life. In the area of the patcher labeled 1, click
the button object a few times at a steady speed. Notice how the
signal scopes change, and how the number box labeled BPM
adjusts itself.
The MSP object driving the behavior in our tutorial patcher is called sync~,
and outputs the same kind of signal as a phasor~ object, i.e. a linear
signal ramp going from 0. to 1. at a steady rate. Unlike
the phasor~ object, however, the object understands its speed not in
Hertz, but in beats-per-minute (BPM), a standard definition of
musical tempo used in most audio sequencing applications. Clicking
the button object at the top of the patcher sends bang messages
to the sync~ object, which simulates a tap tempo system used in
many sequencers. By clicking the button at a steady rate,
the sync~ object adjusts its speed to send out a single ramp for every
beat (interval) between the bang messages. The BPM of our bang messages
is calculated and sent out the second outlet of the sync~ object, which we
then use to set a number box that we can change to set the BPM manually.
In the number box at the top of the patcher, type 60. and press return.
The sync~ object now runs at 60 BPM, outputting a signal ramp once per second.
In the patcher area labeled 2 (colored green), turn up the
left gain~ slider and listen to the result.
The output of the sync~ object is a signal ramp, just like the output
of the phasor~ object. As such, we can use it as an envelope generator
directly, to control the volume of an audio signal going to the dac~ (in
this case, a rand~ noise generator). While this is certainly useful in
certain applications, the main advantage of using a signal to provide event
synchronization is in our ability to time-scale the signal and then generate
events from it.
Many rates at once
Notice that, throughout the tutorial patcher, each of the scope~ objects
seem to be drawing ramps at different speeds:
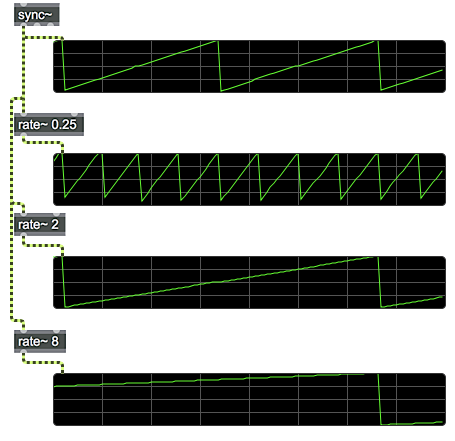 Different ramp time-scales generated by use of the sync~
and rate~ objects.
Different ramp time-scales generated by use of the sync~
and rate~ objects.
The rate~ object allows us to time-scale the ramp signals
generated by sync~ and phasor~ objects. The argument to
the object (or a new value provided in the right inlet) sets the scaling
factor, e.g. a rate~ object with a factor of 2.0 will
generate a ramp that takes twice as long to repeat as the input signal.
A rate~ of 0.5, by comparison, will go two times as fast as
the input. Using this system, we can have multiple areas of signal logic in
our MSP patcher running at different multiples of the original synchronization
signal yet staying perfectly in time.
Generating Max events from a synchronization signal
In patcher area 2, turn down the left gain~ slider and
turn up the right one. You should hear a regular metronomic 'click',
generated by the noise~ object with an envelope triggered by
the button object in that part of the patcher.
Two things are going on here of note. The first is that the 'click'
is happening not at the speed we've set in the sync~ object,
but at four times that speed. This is the doing of the rate~ object
in patcher area 2, which is set to a value of 0.25. This
means that our effective musical timing for one 'beat' in our patcher is
subdivided into four in this part of the MSP signal chain, allowing us
to trigger faster events.
The 'click' we hear is generated by sending a bang message (from
the button object to generate an envelope from the line~ object,
fading in and out the noise~ quickly to make a sharp ticking sound.
This logic is familiar to use from previous tutorials; the big question
here is, how is the button object being triggered?
The MSP delta~ object takes a signal input and outputs a signal,
the numbers of which report how much the incoming signal has changed
from sample to sample:
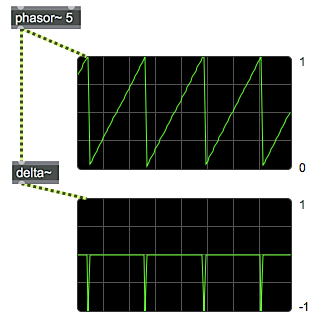 A phasor~ ramp (top) and its delta~ signal (bottom).
In the case of a ramp signal, the delta~ object reports a
more-or-less constant positive value as the signal rises; when the
ramp resets to 0., however, the delta~ object reports
a sudden, high, negative value that represents the sudden
drop in the ramp. This momentary negative signal value can be detected
by using a logical operator on the signal to test whether it goes negative.
The <~ object in the patcher does this, by outputting a signal
value of 1 when the input signal matches the condition specified
by the object's argument, and a 0 otherwise. In the present case,
the output of <~ will be a 1 whenever the input signal
is less than 0, i.e. only when the ramp coming out of
the rate~ object resets, causing the delta~ object to
output a negative value.
The edge~ object is an MSP object that takes input signals and
uses them to trigger Max bang messages. It does this by looking
at transition states from 0 to 1 (left outlet) or 1
to 0 (right outlet). When the rate~ object resets its ramp,
the left outlet of the edge~ object generates a bang in
response to the logical 0 to 1 (false to true) transition
coming out of the <~ object. This bang can trigger any
Max event, just as if it were fired from a metro object or
triggered by clicking a button manually.
Turn down the gain~ slider at the bottom of patcher
area 2 and take a look at patcher area 3.
Audio-rate sequencing using fixed timing intervals
In patcher area 3, click and draw in the two multislider objects
labeled 'Pitch' and 'Amplitude'. Turn up the gain~ slider
at the bottom of patcher area 3's logic. You should hear
a square wave repeating a melodic pattern that matches the shape
you drew in the multislider objects. Try drawing different
patterns for the sequence and listen to the results.
The repeating melody specified by our multislider objects
is being triggered by a sample-accurate sequencing object
called techno~. The techno~ object maintains
a certain number of steps of data points based on
its length parameter (set in our tutorial patcher with
the message length 16). Each step can have a pitch
and amplitude associated with it, which it then puts out
as signals from its outlets. These signals contain
all the information necessary to directly drive MSP oscillators
and amplifiers (in this case the rect~ and *~ objects).
Sequences are loaded into the techno~ object by
sending pitch and amplitude messages with the
step number and value as their arguments. The listfunnel objects
in our tutorial patcher create the appropriate messages for
this purpose, by taking the sixteen-member lists from
the multislider objects and translating them into sixteen
individual, numbered messages. By a similar token, other attributes
of the sequence process can be set, either for each step individually
or for the entire sequence.
At the bottom of patcher area 3, set the number box
labeled 'Attack' to 1.0. Notice how the notes change from
being short to long (or staccato to legato). Set
the number box labeled 'Decay' to 0.. Notice how the
envelope of the notes change to produce a different kind of note separation where the square wave fades in and ends abruptly. Set both the 'Attack' and 'Decay' values to 1. and change the number box labeled 'Curve' to 0.1. Hear how the pitches now slide into on another.
The attack, decay, and curve messages, like
the pitch and amplitude messages, allow us to fine-tune
the behavior of the internal sequencer of the techno~ object.
The attack values control the trajectory for the envelope coming
out of the middle outlet of the techno~ object as it rises at the
beginning of a note. A value of 0 causes the notes to snap on
instantaneously; a value of 1.0 causes the tones in the sequence
to take the entire beat to fade in from their previous value.
The decay values work on a similar principle, only with regards
to the end (or 'release' stage) of the note's envelope. A decay of
1.0 allows the notes to blend together; a value of 0 ensures that
each note falls to silence between steps of the sequencer. These two
values interact to create dynamic envelope shapes. the curve messages
control the amount of portamento (or gliding) applied to the signal
controlling the sequence's pitch. Curve values of 0 will
cause the pitches to 'snap' from note to note in the sequence. As we
raise the curve value, more and more of the beat will be taken
up by an interpolating pitch ramp, causing the sound to slide around
in frequency.
As with the pitch and amplitude, the attack,
decay, and curve parameters of the techno~ object
are provided on a step-by-step basis. Notice how we use the uzi object
to transmit the same value sixteen times to set every step of our sequence
to the same values.
Play around with the possibilities of sequencing with techno~. Once
you've gotten a grasp of how the controls work, turn down the gain~ slider
for patcher area 3 and take a look to the right, at patcher area 4.
Audio-rate sequencing of arbitrary data
Turn up the gain~ slider for patcher area 4. Using your
computer keyboard, type on the middle row of letter
keys (A, S, D, F, G, H, J, K, L, ;). You should hear different
notes being played from a simple sawtooth oscillator. If you like,
double-click the coll object named keys to see the
mapping from ASCII values to MIDI note numbers.
Click the 'r' key on your keyboard and play some notes on the middle row.
Notice that the toggle object attached to the record $1 message
becomes enabled. Click the 'r' key a second time, and click the 'p' key. Once
the sequence repeats, you should hear your notes played back.
The seq~ object works as an audio-rate sequencer of arbitrary numeric events.
The signal it receives in its input serves as a synchronization clock for the
object, allowing us to feed it with a signal ramp from a rate~ object
set to eight measures. When seq~ receives a record 1 message,
it listens to Max messages coming into the object and timestamps them
based on the input signal. When seq~ is in 'play' mode (through
a play 1 message), it uses the input signal to look up events based
on their timestamp, and outputs them in the correct order. Note that,
unlike the techno~ object, the seq~ object outputs Max events,
not signal values, and so it can be used to store arbitrary data.
Though beyond the scope of this tutorial, the seq~ object can store
multiple sequences simultaneously, can overdub multiple passes of data, and
can read and write files of data in a manner similar to the coll object.
Also, because it stores arbitrary, timestamped messages, it can be used to
sequence other Max commands besides MIDI with sample accuracy, e.g. lists of
drawing commands to an lcd object, or messages to a series of Jitter
objects, etc. Finally, the signal providing the timestamping for the seq~ object
can be at an arbitrary scale; it doesn't have to be in the range
of 0 to 1, nor do you have to send it a linear ramp. This
further expands the flexibility of the object.
Turn up the lower gain~ slider in patcher area 1 to give yourself a
click to work against. Hit the 'c' key to clear the sequence stored
in the seq~ object. Hit the 'r' key to record a new sequence. When the
sequence loop has wrapped around, disable recording and play your sequence.
Notice that the seq~ object can handle data with any timing interval,
unlike the techno~ object, which works in discrete steps.
Summary
MSP has a variety of tools for audio-rate sequencing. The sync~ and rate~ objects can be used to create simple timing ramps and regular intervals using beats-per-minute values to determine tempo. The delta~ and edge~ objects are useful in generating Max events from an MSP ramp signal. The techno~ object allows for sample-accurate sequencing of a finite number of steps for a single audio oscillator/amplifier pair; for more flexible sequencing, the seq~ object allows for audio-rate timestamping of arbitrary Max events which can be saved, edited, and replayed as sequences of instructions.
Synchronize MSP with an external source
Time-scale the output of a phasor~
Signal of sample differences
Detect logical signal transitions
Signal-driven step sequencer
Signal-driven event sequencer