In this tutorial patch, we'll look at how to use a wavetable other than a sine
wave to generate sound using the cycle~ object. Along the way, we'll
look at how to generate more complex curves using the line~ object, and
get a peek at how MSP stores audio data in computer memory using
the buffer~ object.
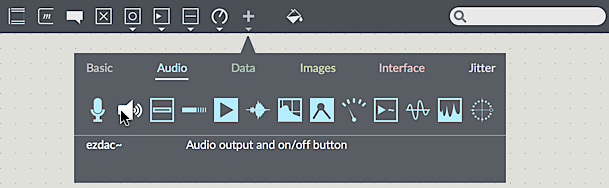
Audio on/off switch: ezdac~
In this tutorial patch, the dac~ object which was used in earlier
examples has been replaced by a button with a speaker icon. This is
the ezdac~ object, a user interface object available from the
Top Patcher Window Toolbar.
ezdac~ is an on/off button for audio, available from the
Top Patcher Window Toolbar
The ezdac~ works much like dac~, except that clicking on it
turns the audio on or off. It can also respond to start and stop messages
in its left inlet, like the dac~. Unlike dac~, however, it is
hard-wired to output channels 1 and 2 on your audio device, which might not
make it appropriate for working with multi-channel sound. For our tutorials,
however, it should be fine. The ezdac~ button is highlighted when audio is on.
A stored sound: buffer~
In the previous examples, the cycle~ object was used to read repeatedly
through 16K values describing a cycle of a cosine wave. As it happens, a cycle~ object
can read through any set of values, treating them as a single cycle of a waveform. These
numbers must be stored in our computer's memory, and can be loaded from a soundfile,
generated programmatically by an algorithm, or even drawn by hand. The MSP object
that maintains these pieces of memory is called buffer~.
The buffer~ object can be used easily; it requires a single argument:
a name to uniquely identify it. Any audio data stored in that buffer~ becomes
associated with that name. The name of the buffer~ is arbitrary and doesn't
have to match the name of the audio file loaded into it; the only requirement is
that it not conflict with other named items in open Max patches (such
as table objects or send/receive pairs). As you can see,
we've named the buffer~richtone.
Messages sent to the object allow you to load in audio files, resize, or
clear the memory of the buffer~. The trick is this: the buffer~ object
itself doesn't play back any audio; it simply holds onto the sample data
and associates a name with it that other MSP objects can use to get at the
data. A cycle~ object can be made to read from that buffer~ by
typing the same name in as its argument. The initial frequency value for the cycle~ object,
just before the buffer name, is optional.
To get the sound into the buffer~, send it a replace or read message, followed by the name of an audio file in the search path of the Max program. If you leave out the name of a file, Max will open an Open Document dialog box, allowing you to select an audio file to load. The replace or read message reads in an audio file and automatically sizes the buffer~ object's memory to match the length of the audio file.
Regardless of the length of the sound in the buffer~, the cycle~ object will default to use 512 samples from it for its waveform. (If you like, you can specify a starting point in the buffer~ for cycle~ to begin its waveform, either with an additional argument to cycle~ or with a buffer_ofset message to cycle~. You can also change the buffer_sizeinsamps attribute to set the size of the wave table.) In the example patch, we use an audio file that contains exactly 512 samples called gtr512.aiff.
Technical detail: In fact, cycle~ Chris uses 513 samples. The
513th sample is used only for interpolation from the 512th sample.
When cycle~ is being used to create a periodic waveform, as in this
example patch, the last sample should be the same as the 1st sample. If
the buffer~ contains only 512 samples, as in this example, cycle~ supplies
a 513th sample that is the same as the 1st sample.
In the tutorial patcher, click on the message box that says read gtr512.aiff.
This loads in the audio file into our buffer~ (named richtone).
Then click on the ezdac~ object to turn the audio on. Click on
the message box labeled A. You should hear a short burst of what
sounds like noise. Click on the message labeled B. You should hear a
rich oscillating tone fade in and out over a second. Click the other message boxes
in turn, listening the the result. Notice the different values in the lists being sent
to the line~ objects, as well as the different frequencies that
the cycle~ objects in the tutorial are set to.
There are several other objects that can use the data in a buffer~,
as you will see in later chapters.
Creating complex envelopes with line~
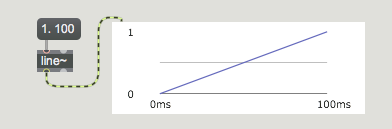
In the previous example patch, we used line~ to make a linearly
changing signal by sending it a list of two numbers. The first number in
the list was a target value and the second was the amount of time, in milliseconds,
for line~ to arrive at the target value.
line~ is given a target value (1.) and an amount of time to get there (100 ms)
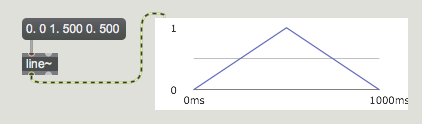
If we want to, we can send line~ a longer list containing many value-time
pairs of numbers (up to 64 pairs of numbers). In this way, we can make a line~ object
perform a more elaborate function composed of many adjoining line segments.
After completing the first line segment, line~ proceeds immediately
toward the next target value in the list, taking the specified amount of time
to get there. In this way, we can great function curves for synthesizers that
are commonly referred to as envelopes.
A function made up of line segments - a classic 'envelope'
Synthesizer users are familiar with using this type of function to generate
envelopes such as the ‘ADSR’ curves that control the attack, decay, sustain,
and release of a sound's amplitude independently. That is what we're doing in
this example patch, although we can choose how many line segments we wish to
use for the envelope.
Click on the message boxes again in sequence and decipher how the
lists for each line~ object affect the sound. Note that each message box
begins with a 0 followed by a comma, this sends an individual message
of 0 to the line~ object immediately followed by the subsequent list.
Sending a number by itelf to a line~ object causes it to change immediately to
a value. An equivalent notation would be to start our envelope lists with 0 0
(go to 0 in 0 milliseconds, i.e. right now).
Add signals to produce a composite sound
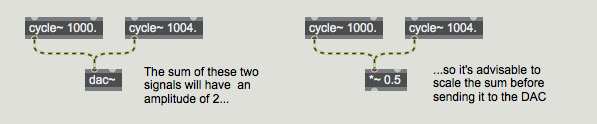
Any time two or more signals are connected to the same signal inlet, those
signals are added together and their sum is used by the receiving object.
Multiple signals are added (mixed) in a signal inlet
Addition of digital signals is equivalent to unity gain mixing in analog
audio. It is important to note that even if all your signals have
amplitude less than or equal to 1, the sum of such signals can easily
exceed 1. In MSP it's fine to have a signal with an amplitude that
exceeds 1 anywhere within the signal chain, but before sending the signal
to dac~ you must scale it (usually with a *~ object) to
keep its amplitude less than or equal to 1. A signal with amplitude greater
than 1 will be distorted by dac~.
In the example patch we're using three different cycle~ objects
that are oscillating the waveform stored in the buffer~ named richtone.
While up to now we're been playing them all one at a time, they could all
be mixed together to produce a composite instrument sound.
Set the volume of our tutorial patch to a maximum level of 0.3 to
prevent clipping (remember we're using three different sounds, each with a
hypothetical maximum output of 1). Click on the button at the top
of the patcher to play all three signals simultaneously.
Each of the three tones has a different amplitude envelope, causing
the timbre of the note to evolve over the course of its 1-second duration.
At the same time, even though all three tones are playing from the
same sample, they are set to different frequencies, creating a much
richer spectrum than exists in the original audio file being used for
the wavetable. As we'll see in the next tutorial, mixing wavetables of
different frequencies is a key technique in something called additive synthesis.
Summary
The ezdac~ object is a button for switching the audio on and
off. The buffer~ object stores a sound in the computer's
memory. You can load an audio file into buffer~ with
a replace message. If a cycle~ object has a typed-in
argument which gives it the same name as a buffer~ object,
the cycle~ will use 512 samples from that buffer~ as its
waveform instead of the default cosine wave.
Whenever you connect more than one signal to a given signal inlet,
the receiving object adds those signals together and uses the sum
as its input in that inlet. Exercise care when mixing (adding) audio
signals, to avoid distortion caused by sending a signal with amplitude
greater than 1 to the dac~.
The line~ object can receive a list in its left inlet that
consists of up to 64 pairs of numbers representing target values and
transition times. It will produce a signal that changes linearly from
one target value to another in the specified amounts of time. This
can be used to make a function of line segments describing any shape
desired, which is particularly useful as a control signal for amplitude
envelopes. You can achieve crossfades between signals by using different
amplitude envelopes from different line~ objects.