Frames of MSP signalsProcedural Texturing & ModelingJitter Tutorials
Tutorial 49: Colorspaces
Note: Some techniques described in this tutorial are outdated. Users are recommended to use jit.movie with output_texture enabled instead of uyvy colormode for efficiency of uploading movie frames to the GPU. See the GL Texture Output article for more information.
In order to generate and display matrices of video data in Jitter, we make some assumptions about how the digital image is represented. For many typical uses (as covered by earlier tutorials) we encode color images into 4-plane matrices of type char. These planes represent the alpha, red, green, and blue color channels of each cell in that matrix. This type of color representation (ARGB) is useful as it closely matches both the way we see color (through color receptors in our eyes tuned to red, green, and blue) and the way computer monitors, projectors, and televisions display it. Tutorial 5: ARGB Color examines the rationale behind this system and explains how you typically manipulate this data.
It's important to note, however, that ARGB is not the only way to represent color information in a digital form. This tutorial examines one of several different ways of representing color image information in Jitter matrices, along with a discussion of several alternatives available to us for different uses. Along the way we'll look at a simple, efficient way to texture video onto an OpenGL plane to take advantage of hardware accelerated post-processing of the video image.
Software Requirement: In order to use the uyvycolormode in Jitter under QuickTime version 6.5 and earlier, your media needs to be compressed with a codec that uses a YUV colorspace (discussed in depth below). QuickTime media compressed with codecs using an RGB colorspace (e.g. PICT files or Planar RGB video files) cannot be decompressed by jit.movie in the uyvycolormode used in this Tutorial. QuickTime version 7 and later will allow you to work in the uyvycolormode regardless of the colorspace in which your media is encoded.
Open the tutorial patch.
At first glance, this patch looks very similar to the one we used in Tutorial 12: Color Lookup Tables. It reads a file into a jit.movie object, sending the matrices out into a jit.charmap object, where we can alter the color mapping of the different planes in an arbitrary manner by creating a matrix (themap) that serves as a color lookup table. The processed matrix is then displayed.
Click the message box labeled read colorwheel.jpg. Click the toggle labeled Display connected the qmetro object at the top of the patch. You should see the colorwheel appear both in the jit.pwindow and in the window created by the jit.window object.
Though it isn't immediately obvious (yet), the image matrix in our patch is being generated and manipulated according to a different system of color than the ARGB mapping we're accustomed to. The jit.movie object in this patch is transmitting matrices using a colormode called uyvy. This means that are image processing chain is working with data in a different colorspace than we usually work in, called YUV 4:2:2. In addition to transmitting color according to a different coordinate system than we usually use (YUV instead of ARGB), this mode of transmission uses a technique called chroma subsampling to reduce (by half!) the amount of data transmitted for an image of a given size.
Color Lookup with a Twist
Try manipulating the multislider objects at the right of the patch. Notice that they have an effect on how color is mapped in the image. You may get the sense that the three multislider objects correspond to the mapping of green, red, and blue in the matrix, respectively. Try zeroing the leftmost (black-on-white) multislider (i.e. set all of its values to 0). Notice that the image disappears. Click on the button labeled normal to put everything back. Try zeroing the other two multisliders in turn, then setting them to straight horizontal lines across the middle of their range.Manipulating the color.
The YUV colorspace is a luminance/chrominance color system—it separates the luminosity of a given color from the chromatic information used to determine its hue. It stores the luminosity of a given pixel in a luminance channel (Y). The U channel is then created by subtracting the Y from the amount of blue in the color image. The V channel is created by subtracting the Y from the amount of red in the color image. The U and V channels (representing chrominance) are then scaled by different factors. As a result, low values of U and V will expose shades of green, while a constant medium value of both will give a grayscale image. One can convert color values from RGB to YUV using the following formula:
Y = 0.299R + 0.587G + 0.114B
U = 0.492(B - Y)
V = 0.877(R - Y)
Note that the U and V components in this color space are usually signed (i.e. they can be negative numbers if the luminosity exceeds the blue or red amount, as it does with hues such as orange, green, and cyan). Jitter matrices store unsigned char data, so the U and V values are represented in the range of 0-255, with 128 as the center point of the chromatic space.
The YUV color space with a constant midrange Y value.
The specific implementation of the YUV colorspace used in our Tutorial patch is called YUV 4:2:2. Jitter objects that need to interpret matrix data as video (e.g. jit.movie, jit.pwindow, etc.) can generate and display this colorspace when their colormode attribute is set to uyvy. This colormode uses something called chroma subsampling to store two adjacent color pixels into a single cell (referred to as a “macro-pixel”). Because our eyes are more attuned to fine gradations in luminosity than in color, this is an efficient way to perform data reduction on an image, in effect cutting in half the amount of information needed to convey the color with reasonable accuracy. In this system, each cell in a Jitter matrix contains four planes that represent two horizontally adjacent pixels: plane 0 contains the U value for both pixels; plane 1 contains the Y value for the first pixel; plane 2 contains the V value for both pixels; plane 3 contains the Y value for the second pixel. The ordering of the planes (uyvy) means that we can alter the luminosity of the image by adjusting planes 1 and 3 (for alternating pixel columns), but we can change the chrominance of pixels only in pairs (by adjusting planes 0 and 2).
Historical Note: Luminance-chrominance color encoding (where the luminosity of the image is transmitted separately from the hue or chrominance of the image) has its roots in the history of color television broadcasting. When color TV's were introduced in the United States in 1953, it was necessary to provide a means for television consumers with monochrome (black-and-white) TV sets to still be able to watch the programming. As a result, it was decided to simply add color information (in the form of a subcarrier) to the original broadcast signal, which already contained the luminosity of the image as grayscale. The result was called YIQ (for luminosity-intermodulation-quadrature), and is the colorspace used in broadcast NTSC color television. The equivalent on PAL television systems is the YUV colorspace under discussion here.
The following illustration shows how the conversion from ARGB to UYVY is handled in Jitter. Our jit.movie object performs this translation for us when necessary (see the box below), but the jit.argb2uyvy and jit.uyvy2argb objects will convert any matrix between colorspaces. Note that the alpha channel is lost in the conversion and that chromatic information is averaged across pairs of horizontal cells in the ARGB original, creating a slight loss in color information.
Because the UYVY color system uses a macro-pixel, each cell in the matrix actually represents two horizontally adjacent pixels in the image; for example, a 320x240 pixel image becomes a 160x240 cell matrix when output as UYVY. When processing these matrices, it's important to keep that in mind, as Jitter objects that process matrices based on spatial information (e.g. those that do scaling, rotation, convolution, etc.) will treat these pairs of pixels as a single unit. When working with these types of processes it may be easier to work in a colormode that uses a full resolution pixel, e.g. ARGB or AYUV (a full-resolution YUV colorspace also supported by Jitter).
(note that a new, empty alpha channel is also created).
A 4x4 grid of random values converted from ARGB to UYVY and back again.
Many commercial video codecs use YUV 4:2:2 (or similar chroma subsampling systems such as 4:1:1 and 4:2:0) as their native video format. As a result, jit.movie can decompress these files faster in the uyvy colormode than when outputting matrices in the normal ARGB format. The matrices thus generated are also half the size, giving a performance increase to any Jitter patches that can take advantage of this system. Codecs such as Photo-JPEG, DVCPRO, and NTSC DV all use some form of subsampled YUV codec as their native color format.
With this in mind, we can understand the processing going on in our patch. The jit.movie sends matrices in the uyvy 4-plane char format to the jit.charmap, which processes the data and sends it onwards. The jit.fpsgui tells us that the dim of the matrices being sent to it are 160x240, which makes sense now that we understand the macro-pixel data reduction that accompanies the switch in colormode. In addition, we can now see why the matrix themap has one jit.fill object feeding both planes 1 and 3; these correspond to the two Y values in the macro-pixel, which we want to share the same lookup table.
Color tinting and saturation
Set the multislider objects to their normal curve by clicking the button object labeled normal. Above the patcher objects labeled brco, adjust the number box controlling the contrast for the Y channel until it reads -1.Inverted Y color table.
Because the luminosity is separate from the chrominance in our new colorspace, it is a simple matter to invert the brightness of pixels without affecting their hue. This would be a more involved procedure if working in ARGB.
Normalize the multislider objects again, and adjust the number box objects for the U and V channels' contrast. Try setting them both to -1, then to 0. Normalize their contrast settings and set the brightness values both to -1.Different U and V settings.
By inverting the U and V channels' color lookup, we perform a 180-degree hue rotation on the image. Setting both of these channels to a constant value desaturates the image so that it appears at a constant chroma, or hue, according to the Cartesian space shown earlier in this tutorial. Values of 0 will desaturate the image to greyscale; values of -1 will make the entire image appear green.
Do some freehand drawing in the multislider objects. Try to get a feel for how different ranges of the char range results in different effects on different channels.
In addition to YUV 4:2:2 (colormode uyvy) and ARGB (colormode argb, the default for most objects), Jitter objects exist that generate matrices in a number of other colorspaces. Examples include grgb (a chroma subsampled RGB colorspace similar to uyvy), ayuv (a full-resolution YUV colorspace with an alpha channel), luma (a 1-plane char grayscale format), and ahsl (alpha, hue, saturation, luminosity). Conversion objects are typically named jit.x2y, e.g. jit.argb2uyvy. In addition, the jit.colorspace object supports translation to and from a variety of 4-plane char colorspaces (including approximations of floating-point colorspaces such as L*a*b*). A good place to begin for more information on colorspaces (and the numerical representation of color in general) is the Wikipedia article on the subject.
Videoplane
Notice that the output of the jit.pwindow in our patch doesn't go directly to a jit.window object. Instead, it goes to an object called jit.gl.videoplane. Click on the message box labeled read track1.mov. The processed image should switch to a movie. Normalize the color lookup tables on the right by clicking the button labeled normal.
The jit.gl.videoplane object textures the Jitter matrix sent into its inlet onto a plane in an OpenGL drawing context. Our drawing context (colorspace) is being driven by the jit.gl.render object at the top of the patch, and is viewable through the jit.window object's window. If you need to review the basics of OpenGL rendering in Jitter, a look at Tutorial 30: Drawing 3D text will fill you in on the basics of creating a rendering system. One thing of note is that the ortho attribute of jit.gl.render, when set to 2, renders our scene in an orthographic projection (i.e. there is no sense of depth). Also note that the jit.gl.videoplane object, not the jit.window, needs to be told to interpret texture matrices as uyvy through its colormode attribute. In our patch we really aren't using OpenGL for 3D modeling; but we are taking advantage of some features of hardware accelerated texture mapping.
Click on the message box containing the text dim 16 16 (next to the jit.pwindow object).
Notice that the jit.pwindow object shows a massively downsampled and pixelated image (It's actually processed as an 8x16 matrix since we're still in uyvy mode). The jit.window object, however, shows an image where the pixels are smoothly interpolated into one another (the effect is similar to upsampling in a jit.matrix object with the interp attribute set to 1).
Hardware interpolation of a small matrix applied as a texture.
This interpolation is occurring on the hardware Graphics Processing Unit (GPU), and is one of the many advantages to using OpenGL to display video, as it causes no performance penalty on the main CPU of our computer.
Click on the message box containing the text dim 320 240. This will set the size of the matrices back to the normal resolution we've been using: 320x240 pixels, output as 160x240 cells per matrix because of the colormode. One the right of the patch, click on the toggle attached to the message box labeled fullscreen $1 (alternately, hit the ESC key on your keyboard).
When you send a jit.window object into fullscreen mode, the jit.gl.videoplane upsamples the texture even further, giving you the smoothest possible interpolation for your display.
Hit the ESC key to trigger the toggle again, taking the jit.window out of fullscreen.
Videoplane Post-Processing
Adjust the red, green, and blue number box objects attached to the pak object connected to the jit.gl.videoplane object. Note than even though the applied texture is mapped in YUV colorspace, the jit.gl.videoplane responds to color attributes in floating-point RGBA. Manipulate the number box labeled rotate.Some examples of GPU processing on a videoplane.
We can see that the color and rotate attributes (as well as scale, blend_enable, etc.) of most OpenGL objects also apply to jit.gl.videoplane. As a result, jit.gl.videoplane is an incredibly useful object for video processing, as it allows us to apply processing to the image directly on the GPU.
Summary
The jit.movie object can output matrices in a number of colorspaces beyond ARGB. The YUV 4:2:2 colorspace can be used by setting the colormode attribute of the objects that support it (jit.movie, jit.pwindow and jit.window) to uyvy. The uyvycolormode has the advantage of using a macro-pixel chroma subsampling to cut the data rate in half, allowing for matrices to be processed faster in the Jitter matrix processing chain. Since the data output in this colorspace is still 4 planes of char information, standard objects such as jit.charmap can be used to manipulate the matrix, albeit with different results.
The jit.gl.videoplane object accepts matrices (including uyvy matrices) as textures that are then mapped onto a plane in the OpenGL drawing context named by the object. GPU accelerated processing of the image can therefore be done directly on the plane, including color tinting, blending, spatial transformation, etc. In Tutorial 41: Shaders we saw ways to apply entire processing algorithms to objects in the drawing context, further expanding the possibilities of using the GPU for processing in Jitter.
Converts ARGB to UYVY256 point input to output mapFill a matrix with a listEvaluates a procedural basis function graphRender Open GLGL accelerated video planeThe Jitter Matrix!Generate white noiseIn-Patcher WindowPlay or edit a movieConverts UYVY to ARGBMultiple slider and scrolling display
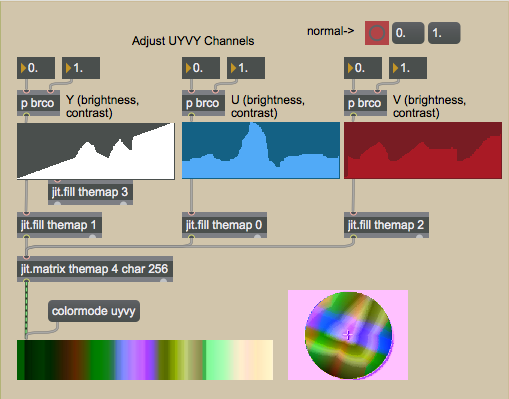 Manipulating the color.
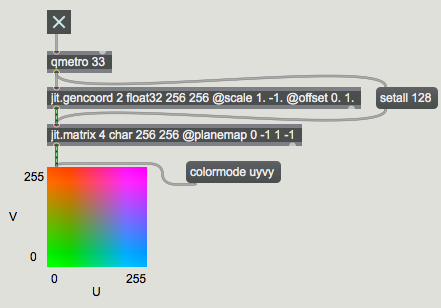 The YUV color space with a constant midrange Y value.
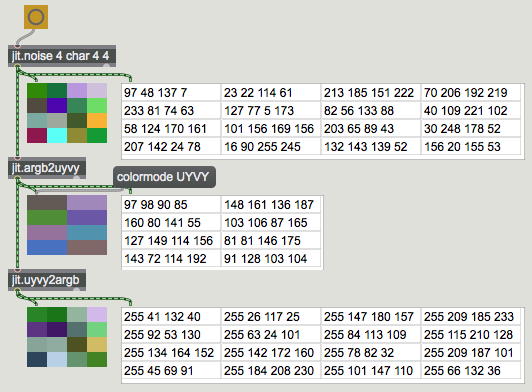 A 4x4 grid of random values converted from ARGB to UYVY and back again.
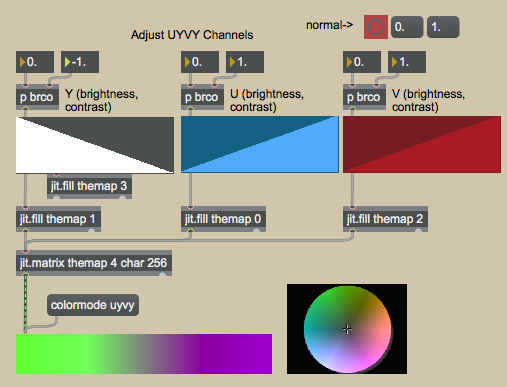 Inverted Y color table.
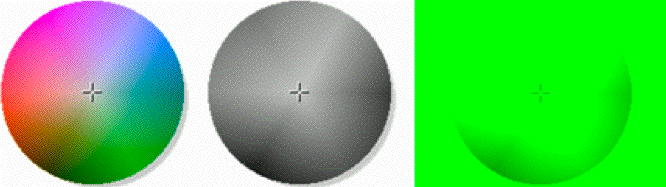 Different U and V settings.
 Hardware interpolation of a small matrix applied as a texture.
 Some examples of GPU processing on a videoplane.