QuickTime Effects
MIDI Control of Video
Jitter Tutorials
Tutorial 25: Tracking the Position of a Color in a Movie
Color Tracking
There are many ways to analyze the contents of a matrix. In this tutorial chapter we demonstrate one very simple way to look at the color content of an image. We'll consider the problem of how to find a particular color (or range of colors) in an image, and then how to track that color as its position changes from one video frame to the next. This is useful for obtaining information about the movement of a particular object in a video or for tracking a physical gesture. In a more general sense, this technique is useful for finding the location of a particular numerical value (or range of values) in any matrix of data.
jit.findbounds
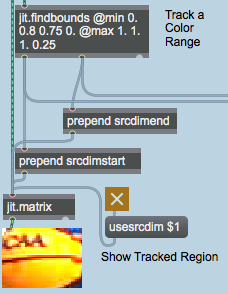
The object that we'll use to find a particular color in an image is called jit.findbounds. Since we're tracking color in a video, we'll be analyzing—as you might expect—a 4-plane 2-dimensional matrix of char data, but you can use jit.findbounds for matrices of any data type and any number of planes.
Here's how jit.findbounds works. You specify a minimum value and a maximum value you want to look for in each plane, using jit.findbounds's min and max attributes. When jit.findbounds receives a matrix, it looks through the entire matrix for values that fall within the range you specified for each plane. It sends out the cell indices that describe the region where it found the designated values. In effect, it sends out the indices of the bounding region within which the values appear. In the case of a 2D matrix, the bounding region will be a rectangle, so jit.findbounds will send out the indices for the left-top and bottom-right cells of the region in which it found the specified values.
In this example we use the jit.movie object to play a movie (actually an animation) of a red ball moving around. This is obviously a simpler situation than you will find in most videos, but it gives us a clear setting in which to see how jit.findbounds works. Notice that we've used typed-in arguments to initialize the min and max attributes of jit.findbounds.
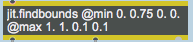 Minimum and maximum values specified for each of the four planes
There are four arguments for these attributes—one value for each of the four planes of the matrix that jit.findbounds will be receiving. The min attribute sets the minimum acceptable value for each plane, and the max attribute sets the maximum acceptable value. These arguments cause jit.findbounds to look for any value from 0 to 1 in the alpha plane, any value from 0.75 to 1 in the red plane, and any value from 0 to 0.1 in the green and blue planes. Since the data in the matrix will be of type char, we must specify the values we want to look for in terms of a decimal number from 0 to 1. (See Tutorials 5 and 6 for a discussion of how char values are used to represent colors.) We want to track the location of a red ball, so we ask jit.findbounds to look for cells that contain very high values in the red plane and very low values in the green and blue planes. (We'll accept any value in the alpha plane.)
Click on the toggle to start the metro. As the red ball moves around, jit.findbounds reports the cell indices of the ball's bounding rectangle. Stop the metro, and examine the numbers that came out of jit.findbounds. You'll see something like this:
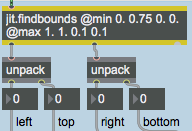 jit.findbounds reports the region where the specified color appears
The jit.findbounds object will report the region where it finds the desired values in all planes of the same cell. In this picture, the jit.findbounds object found the values we asked for somewhere in columns 120 through 159 and somewhere in rows 50 through 89 inclusive. This makes sense, since the red ball is exactly 40 pixels in diameter. Those cell indices describe the 40x40 square region of cells where the ball is located in this particular frame of the video.
Note that the output of jit.findbounds from its first two outlets is in the form of two lists. The first outlet reports the starting cell where the values were found in each dimension and the second outlet reports the ending cell of the region in each dimension. (Since it's a 2D matrix, there are only two values in each list, and we use the unpack objects to view them individually.)
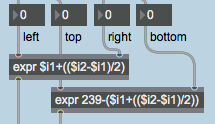
If we wanted to know a single point that describes the location of the ball in the video frame, we could take the center point of that rectangular region reported by jit.findbounds and call that the location of the ball. That's what we do with the expr objects. For each dimension, we take the difference between the starting cell and the ending cell, divide that in half to find the center between the two, and then add that to the starting cell index to get our single location point.
 Calculating the center point of the rectangle
Notice that for the vertical dimension we actually subtract the vertical location coordinate from 239. That's because the cell indices go from top to bottom, but we would like to think of the height of the object going from bottom to top. (That's also how the slider object behaves, so since we're going to display the vertical coordinate with the slider, we need to express the coordinate as increasing from bottom-to-top.)
We send the results of our location calculation to a pair of slider objects to demonstrate that we are successfully tracking the center of the ball, and we show the coordinates in the number boxes. We also scale the coordinates into the range 0 to 1, to show how easily the horizontal and vertical location of the ball could potentially be used to modify some activity or attribute elsewhere in a Max patch. For example, we could use the vertical location to control the volume of a video or an MSP sound, or we could use the horizontal coordinate to affect the rotation of an image.
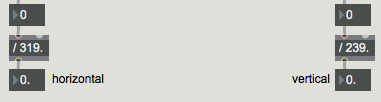 Scale the location coordinates into the range 0-1, for use elsewhere in the patch.
Tracking a Color in a Complex Image
Well, that all worked quite nicely for the simple example of a plain red ball on a plain white background. But tracking a single object in a real life video is a good deal tougher. We'll show some of the problems you might encounter, and some tricks for dealing with them.
Make sure the redball movie is stopped. Now double-click on the patcher bballtracking object to see A More Detailed Example. Click on the toggle labeled Start/Stop in the upper-left corner of the [bballtracking] subpatch to start the video.
This movie has objects with distinct colors: a red shirt, green pants, and a yellow-and-blue ball. Potentially it could be useful for color tracking. However, there are a few factors that make tracking this ball a bit harder than in the previous example.
First of all, the top few scan lines of the video (the top few rows of the matrix) contain some garbage that we really don't want to analyze. This garbage is an unfortunate artifact of the imperfect digitization of this particular video. Such imperfections are common, and can complicate the analysis process. Secondly, the image is not highly saturated with color, so the different colors are not as distinct as we might like. Thirdly, the ball actually leaves the frame entirely at the end of the four-second clip. (When jit.findbounds can't find any instance of the values being sought, it reports starting and ending cell indices of -1.) Fourthly, if we want to track the color yellow to find the location of the ball in the frame, we need to recognize that the ball is not all one shade of yellow. Because of the texture of the ball and the lighting, it actually shows up as a range of yellows, so we'll need to identify that range carefully to jit.findbounds.
Let's try to solve some of these problems. As we demonstrated in Tutorial 14, some Jitter objects allow us to designate a source rectangle of an image that we want to view that's different from the full matrix. In Tutorial 14 we demonstrated the srcdimstart, srcdimend, and usesrcrect attributes of jit.matrix, and we mentioned that jit.movie has comparable attributes called srcrect and usesrcrect. Let's use those attributes of jit.movie to crop the video image, getting rid of some parts we don't want to see.
Click on the message box labeled Crop Source Image. This sends to jit.movie the cell indices of a new source rectangle that we want to view, and tells jit.movie to use that source rectangle instead of the full matrix. Notice that by starting at row 4 (that is, starting with the fifth row of the matrix), we crop out the garbage at the top of the image. We also chop 20 pixels off of the left side of the source image, so that the first bounce of the ball occurs exactly in the lower-left corner. Now we've focused on the part of the video we want to analyze.
Next we'll deal with our other problems. Click on the small preset object labeled Setup in the lower-right corner of the window. This sets all the user interface objects to just the settings we desire.
This sets the loop attribute of jit.movie to 2 for back-and-forth playback, and it sets a loop endpoint at time 2160 (just at the moment when the 54th frame would occur) so that the movie now plays back and forth from frame 0 to frame 53 and back. The movie now plays just up to the moment of the first bounce of the ball on the pavement, then reverses direction.
We have also sent some values to the jit.brcosa object (discussed in detail in Tutorial 7) to set its brightness, contrast, and saturation attributes just the way we want them. This doesn't exactly result in the best-looking image, but it does make the different colors more distinctive, and compresses them into a smaller range of values, making them easier for jit.findbounds to track.
And we've turned on the usesrcdim attribute of the jit.matrix object (in the center of the patch) so that it is now using the output of jit.findbounds to determine its source rectangle. You can see the tracked region displayed in the jit.pwindow labeled Show Tracked Region.
 Using the output of jit.findbounds to set the srcdimstart and srcdimend attributes of jit.matrix
The basic yellow of the ball has nearly equal amounts of red and green in it, so we set the min and max attributes of jit.findbounds to look for cells containing high values in the red and green planes and a low value in the blue plane. You can see that with careful settings of jit.brcosa and careful settings of the min and max attributes of jit.findbounds, we've managed to get very reliable tracking of the yellow part of the ball.
Note: One fairly important detail that we haven't really discussed here is how to set the min and max attributes of jit.findbounds most effectively to track a particular color in a video. A certain amount of trial-and-error adjustment is needed, but you can get some pretty specific information about the color of a particular pixel by using the suckah object demonstrated in Tutorial 10. You can place the suckah object over the jit.pwindow of the video you want to analyze, click on the color you want to track, and use the output of suckah to get the RGB information of that cell. (The values from suckah are in the range 0-255, but you can divide them by 255.0 to bring them into the 0-1 range.)
Using the Location of an Object
So, at least in this particular situation, we've managed to overcome the difficulties of tracking a single object in a video. But now that we've accomplished that, what are we going to do with the information we've derived? We'll show a couple of ways to use object location to control sound: by playing MIDI notes or by playing MSP tones. Neither example is very sophisticated musically, but they should serve to demonstrate the basic issue of mapping location information to sound information.
We'll send the location data to two subpatches located in the part of the patch marked Use Tracking Info. We use a pack object to pack all of the output of jit.findbounds together into a single 4-item list, and then we use a gate object to route that information to the patcher playnotes subpatch (to play MIDI notes) or the patcher playtones subpatch (to play MSP tones) or neither (to produce no sound).
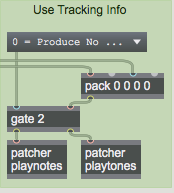 Send the location information to one of two subpatches
Playing Notes
In the umenu labeled Use Tracking Info, choose the menu item 1 = Play MIDI Notes. Double-click on the patcher playnotes object to see the contents of the [playnotes] subpatch. If you are not hearing any notes being played (and you've verified that the movie is still playing), try double-clicking on the noteout a object and choosing a different MIDI synthesizer in the device dialog box.
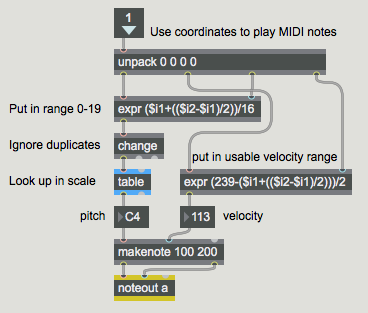 The contents of the [playnotes] subpatch
In the [playnotes] subpatch we use the same sort of mapping formulae as we used in the first example to calculate the location coordinates of the ball and place the information in a usable range. We calculate the horizontal location and divide by 16 to get numbers that will potentially range from 0 to 19. We use the change object to ignore duplicate numbers (i.e. repeated notes), and then we look up the note we want to play in the table.
Note: The basketball player's motion has no relationship to any particular musical scale, so taking the raw location data as MIDI key numbers would result in an atonal improvisation. (Not that there's anything wrong with that!) If we want to impart a tonal implication to the pitch choices, we can use the numbers generated by the horizontal motion of the ball as index numbers to look up notes of the scale in a lookup table. If you want to see (or even alter) the contents of the table, just double-click on the table object to open its graphic editing window.
We use the vertical location of the ball—which we've mapped into the range 0-119—to determine the velocity values. The makenote object assigns the duration (200ms) to the notes and takes care of providing the MIDI note-off messages. The underlying pulse of the music (20 pulses per second) is determined by the speed of the metro that's playing the movie, but because the change object suppresses repeated notes, not every pulse gets iterated as a MIDI note.
Close the [playnotes] subpatch window. Click on the message box labeled Crop and Flip Source Image. This sends a new source rectangle to jit.movie to flip the image horizontally, which reverses the high-low musical effect of the [playnotes] subpatch.
Playing Tones
In the umenu labeled Use Tracking Info, choose the menu item 2 = Play MSP Tones. Double-click on the patcher playtones object to see the contents of the [playtones] subpatch.
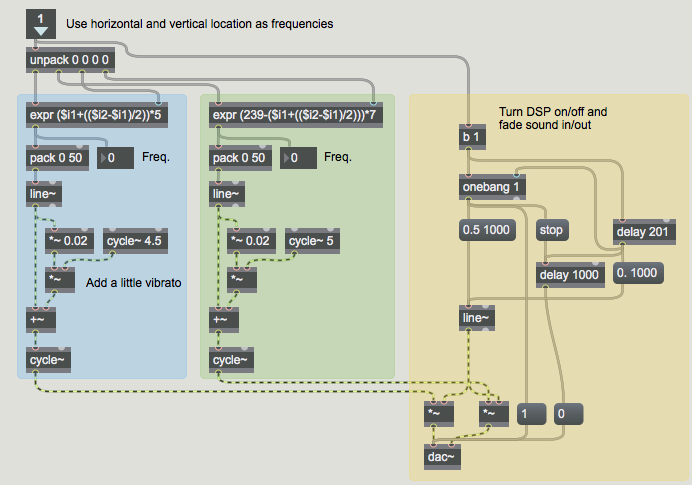 Use location of a color as frequency control information for MSP oscillators
Here we're using the horizontal and vertical location coordinates of the basketball as frequency values for MSP oscillators. The equations we use to calculate those values are somewhat arbitrary, but they've been devised so as to map both coordinates into similar frequency ranges. The horizontal coordinate is used to control the oscillator in the left audio channel, and the vertical coordinate controls the frequency of the oscillator in the right channel.
We use the presence of incoming messages to turn MSP audio on (and fade the sound up), and if the messages are absent for more than 200 ms, we fade the sound down and turn the audio off.
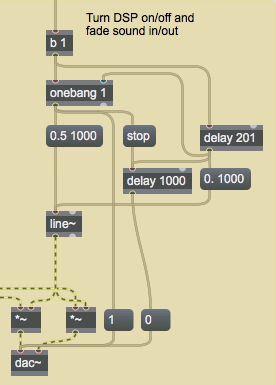 First message starts and fades in audio; lack of message for 201ms fades out and turns off audio.
Close the [playtones] subpatch window. Flip the video image horizontally by clicking on the message boxes labeled Crop Source Image and Crop and Flip Source Image to hear the difference in the effect on the MSP oscillators.
First message starts and fades in audio; lack of message for 201ms fades out and turns off audio.
Close the [playtones] subpatch window. Flip the video image horizontally by clicking on the message boxes labeled Crop Source Image and Crop and Flip Source Image to hear the difference in the effect on the MSP oscillators.
Deriving More Information
In this tutorial we've shown a pretty straightforward implementation in which we use the location coordinates of a color region directly to control parameters of sound synthesis or MIDI performance. With a little additional Max programming, we could potentially derive further information about the motion of an object.
For example, by comparing an object's location in one video frame with its location in the preceding frame, we could use the Pythagorean theorem to calculate the distance the object traveled from one frame to the next, and thus calculate its velocity. We could also calculate the slope of its movement (), and thus (with the arctangent trig function) figure out its angle of movement. By comparing one velocity value to the previous one, we can calculate acceleration, and so on. By comparing an object's apparent size from one frame to the next, we can even make some crude guesses about its movement toward or away from the camera in the "z axis" (depth).
Summary
The jit.findbounds object detects values within a certain range in each plane of a matrix, and it reports the region in the matrix where it finds values within the specified range of each plane. This is useful for finding the location of any range of numerical data in any type of matrix. In particular, it can be used to find the location of a particular color in a 4-plane matrix, and thus can be used to track the movement of an object in a video.
Cropping the video image with the srcrect attribute of jit.movie helps to focus on the desired part of the source image. The jit.brcosa object is useful for adjusting the color values in the source video, making it easier to isolate and detect a specific color or range of colors.
We can use the output of jit.findbounds to track the location of an object, and from that we can calculate other information about the object's motion such as its velocity, direction, etc. We can use the derived information to control parameters of a MIDI performance, MSP synthesis, or other Jitter objects.
Adjust image brightness/contrast/saturation
Calculate bounding dimensions for a range of values
The Jitter Matrix!
In-Patcher Window
Play or edit a movie