Working with Video Output ComponentsQuickTime EffectsJitter Tutorials
Tutorial 23: Controlling Your FireWire Camera
With Apple's withdrawal of support for quicktime, jit.avc is no longer available on Mac platforms.
This Tutorial describes how to use Jitter to control the transport of a FireWire-based DV camera or deck using the jit.avc object. This object provides a simple interface for communicating between Jitter and your DV device, and lets you control and automate your FireWire DV device using the Max interface.
AV/C (an abbreviation for Audio Video Control) is the official name for the protocol that communicates between a computer and an external device such as a DV camera. The exact specification used is called the AV/C Tape Recorder / Player Subunit. You can find a copy of the entire specification online at http://1394ta.org.
The specification breaks the different types of transport controls you can use into three main groups:
1. The WIND group is used to move the media forward and backward, without playing it. WIND group commands include stop, fast forward and rewind.
2. The PLAY group contains commands used to play media while moving forward or backward at various speeds. Examples include play, pause, slow forward and slow reverse.
3. The RECORD group is used to insert data on media.
These three groups are fully implemented in the jit.avc object. Additionally, the object supports a custom message, which lets you send any command to your hardware, even those not directly supported by the jit.avc object.
The patch examples in this Tutorial assume that you have a DV camera or deck attached to your computer’s FireWire port and powered on.
Plug and Play
The jit.avc object’s hardware connection has to be explicitly opened and closed, as is the case for the jit.grab and jit.qt.videoout objects we've used in the previous tutorials. Using the jit.avc object is a little simpler, though -- it communicates only with a single type of device.
Basics
Open the tutorial and double-click on the p example_1 subpatch to open it.
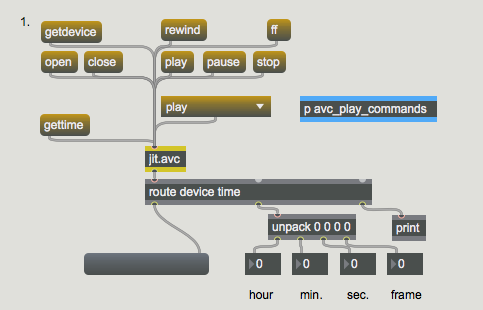
jit.avc and friendsClick the getdevicemessage box. This causes the jit.avc object to look for a compatible device attached to your computer. If it finds one, the object sends the device’s name from its outlet, preceded by the symbol device. With our Sony DV camera attached, jit.avc sends the message device Sony DV.In the patch, we’re using the route and prepend objects to set the contents of the blank message box to the name of the located device. If jit.avc cannot find any compatible devices, an error message will be posted to the Max Console.
If you receive an error message, double-check your cable connections between your camera/deck and computer, and make sure that the device is powered on.
Click the message box that says open. This causes jit.avc to open a connection to the device it found.
Technical note: We don't need to do any configuration prior to sending the open message to the jit.avc object. Unlike objects like jit.grab and jit.qt.videoout, which can switch between multiple input or output devices, jit.avc communicates with a single “device” -- the DV component -- which supports a single piece of hardware (this is a MacOS limitation).
PLAY and WIND groups (VTR mode)
This portion of the tutorial assumes that you have a DV cassette (with data already recorded on it) loaded in your device, and that you are in VTR mode.
Use the play, stop, pause, rewind and ffmessage boxes (one at a time) and observe the behavior of your FireWire device. It should be responding as if you’d pressed those buttons on the unit itself.Click on the umenu object to view a partial list of PLAY group messages. These messages consist of the word play followed by an additional symbol describing the specific type of PLAY group operation. Double-click on the p avc_play_commands subpatch to see brief descriptions of the messages we’ve placed in the umenu. A full list of supported messages can be found in the Object Reference entry for jit.avc. Use the umenu to send a few of these messages to jit.avc to check their effect.To check the current tape time, click the gettimemessage box. This causes the jit.avc object to send the current time from its outlet as a list of four integers preceded by the symbol time. We’re using route and unpack objects to display those integers in the number boxes at the bottom of the patch. The numbers represent hours, minutes, seconds and frames, respectively.Click the message box that says close to turn off the connection between jit.avc and your DV device.
Avez-vous le temps?
The following patch uses the gettime message to do something useful -- it causes an attached DV device to play the first minute of a loaded tape, and then rewinds and starts over. You might use a patch like this to automate a video installation, for example.
Open the tutorial and double-click on the p example_2 subpatch to open it.
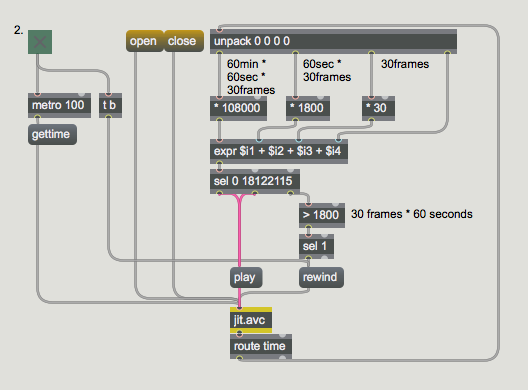
automating DV transport with jit.avcMake sure that you have at least 1 minute of recorded material on your loaded DV cassette. Otherwise, the patch won’t work properly. Modifying the patch to perform error checking would probably be an instructive exercise for the motivated reader.Click on the message box that says open to open the connection between the jit.avc object and your device.Click on the toggle attached to the metro object. This causes two things to happen: the trigger object causes a rewind message to be sent to your device, and the metro is turned on, sending a gettime message to jit.avc every 100ms.We’re using the route object to send jit.avc object’s response message (time [hour] [minute] [second] [frame]) to the unpack object at the top of the patch. The individual time values are unpacked, multiplied and added to determine the total number of frames that the current time represents.
Actually, our frame count is a little inaccurate. DV time has 29.97 frames per second, not 30. For simplicity, we’ve rounded up. For the purposes of this exercise, the math is close enough.
Next, we test the frame count against the numbers 0 and 18122115 using the select object. Why? When a DV device can’t find time code (which is the case when it’s fully rewound and stopped), it reports the current time as either 0 0 0 0 or 165 165 165 165, depending on the device model. Since (0 * 10800) + (0 * 1800) + (0 * 30) + 0 = 0, and (165 * 10800) + (165 * 1800) + (165 + 30) + 165 = 1812215, we can use these numbers to determine if the tape has been fully rewound. If our frame count does equal 0 or 1812215, then we send a bang to the playmessage box to start playback.
The jit.avc object also offers an advanced message called gettransport that reports the exact state of the device’s transport using hexadecimal numbers, which we might have used in preference to the method above. For our purposes, though, this is fine, and a little bit cleaner. For more information on gettransport, refer to the Object Reference entry and help file for jit.avc.
If our frame count does not equal 0 or 1812215, then we are either rewinding or playing. Now, we want to make sure that we stop playing after approximately one minute, or 1800 frames (60 seconds * 30 frames). We test the frame count against 1800 with the >1800 object and, if it sends out a 1, the sel 1 object will bang the rewindmessage box and start the process all over again -- that's all there is to it.When you’re ready, turn off the toggle. This will both disable the metro and send a final rewind message to your DV device, just for neatness. Click on the message box that says close to close the connection between jit.avc and your device.
Some FireWire DV devices support an additional message, time, which causes the device to wind to the specified location on a loaded tape (the location is described by four integers, in the same format as noted above). DV cameras do not support this message, generally speaking. Please refer to the help file for jit.avc for an example of building an auto-wind function in Max.
RECORD group
If your DV device is a camera, it likely has two modes of operation: VTR mode and Camera mode. VTR mode is used for tape playback and non-camera (line-level) recording. Camera mode is used for recording directly from the camera portion of the unit. In VTR mode, all of the PLAY and WIND group commands are available, plus the RECORD group. In Camera mode, only the RECORD group commands are available (since you can’t rewind while recording!). You can use either mode for this portion of the tutorial.
The RECORD group provides two primary messages: record and recpause. The record message starts recording, while the recpause message places the unit into record pause mode.
time-lapse with jit.avc
This simple little patch is all that’s necessary to set up time-lapse recording with jit.avc. It records 1 second of material every 30 seconds. Let’s go through it:
Open the tutorial and double-click on the p example_3 subpatch to open it.
Click the message box that says open to start the connection between jit.avc and your DV device.Before we turn it on, let’s examine the patch to see what’s going to happen. Every second, the metro object will send a bang to the counter. When the counter hits 0, the sel 0 object will output a bang, first to the record message, and then to the delay object. After the specified delay (we’ve chosen 1000 ms.), the recpause message will be sent to jit.avc. We’ve supplied some number boxes so that you can change the counter and delay values.Make sure that your DV device is receiving input (either from its built-in camera, or from a line-level source). Then, turn on the toggle attached to the metro, and watch your DV device for a few minutes -- time-lapse videography was never so easy!When you’re ready, turn off the toggle and click the message box that says close to close the connection between jit.avc and your DV device.
Summary
The jit.avc object provides a way to control and automate your FireWire DV device, such as a DV camera or deck, using the Max interface. It offers complete control over the WIND, PLAY and RECORD group commands.
 automating DV transport with
 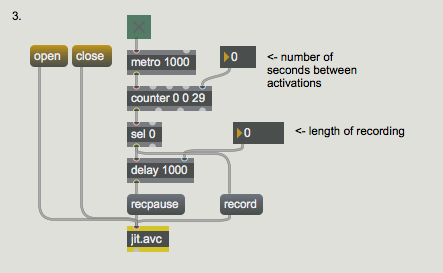 time-lapse with