Iterative Processes and Matrix Re-Sampling
Importing and Exporting Single Matrices
Jitter Tutorials
Tutorial 19: Recording movies
This tutorial shows how you can record a single matrix or a sequence of matrices to disk as a movie. We'll demonstrate the use of the jit.record object for recording in real time and non-real time. Along the way, we'll also show you how to adjust some of the settings of the output movie.
Like most Jitter objects, the jit.record object operates according to an event-driven model rather than a time-driven one -- frames sent to a record-enabled jit.record object are appended to the movie in progress as "the next frame" based on the timing characteristics of the output movie, without regard for the relative time between the arriving frames. This results in very smooth movies with consistent timing between frames, but it requires some preparation before recording.
The jit.record object also offers a time-driven (realtime) method of recording in addition to the default mode described in this tutorial. Although the realtime mode might seem simpler to use, the recorded output won't be as smooth because frames of the incoming movie will usually be dropped fairly regularly during recording. You can set the time-driven mode for the jit.record object by using the realtime message, but it is quite different from the realtime operation described in this tutorial.
Your mileage may vary
Each and every matrix that arrives at a recording jit.record object must be compressed before becoming part of your output movie. The speed of this compression depends on several factors: the speed of your processor and your disk drive, and -- most importantly -- the type of compression used (referred to as the codec, short for compression/decompression). The examples in this tutorial will use the Photo-JPEG codec. It should yield fairly consistent results from machine to machine without a lot of high CPU usage and disk access. On older or slower systems, it's possible that you'll notice some timing inaccuracy with the first set of examples for this tutorial. If you do, don't worry; the second part of this tutorial will show you how to achieve excellent results on even the most modest system by working in non-realtime mode.
Note: The codec and dimension recommendations in this tutorial are outdated. A good codec to balance file size, image quality, and cpu requirements is h264. For lossless recording, or to record an alpha channel use prores4444 on the Mac and animation on Windows.
On the clock
Open the Basic_recording subpatch.
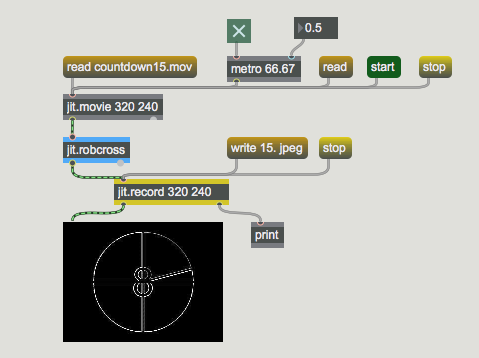
The first example shows a very basic recording setup. Notice that the jit.record object takes two arguments (320 and 240) that specify the width and height of any movies we record with this object.
 A simple recording patch
Click the message box that says read countdown15.mov to load a movie into the jit.movie object, and start the metro object by clicking on the toggle box connected to its inlet. If the preview attribute is set to 1, you will see the movie's image appear in the jit.pwindow object, since the jit.record object will then pass any matrices it receives out its left outlet. (The jit.robcross object in this patch is a simple edge detector that we're using to process the matrices passing through it).
Click the message box that says write 15. jpeg to start writing the movie (we'll look at the contents of the message box in more detail in a moment). A file Dialog Box will appear, prompting you for a file name. When you enter a valid name and click the Save button, recording begins to the filename you've chosen (For the purposes of example, let's assume you've named your movie myfilename.mov.). Click the stop message box to stop recording.
A simple recording patch
Click the message box that says read countdown15.mov to load a movie into the jit.movie object, and start the metro object by clicking on the toggle box connected to its inlet. If the preview attribute is set to 1, you will see the movie's image appear in the jit.pwindow object, since the jit.record object will then pass any matrices it receives out its left outlet. (The jit.robcross object in this patch is a simple edge detector that we're using to process the matrices passing through it).
Click the message box that says write 15. jpeg to start writing the movie (we'll look at the contents of the message box in more detail in a moment). A file Dialog Box will appear, prompting you for a file name. When you enter a valid name and click the Save button, recording begins to the filename you've chosen (For the purposes of example, let's assume you've named your movie myfilename.mov.). Click the stop message box to stop recording.
The jit.record object sends a message out its right outlet after a write operation to confirm that the movie was successfully written. Since we've connected that outlet to a print object in our patch , we can see the results by looking at the Max Console. If everything went as expected, you should see print: write myfilename.mov 1 in the Max Console. If there was a problem, the number after the filename will not be a 1.
Click the read message box in the main patch and read in the movie you just recorded. How does it look?
Let's examine the write message to the jit.record object for a moment. The write message puts jit.record into a record-enabled mode. The actual recording doesn't begin until the object receives a matrix in its inlet. The write message can take several optional arguments to specify a file name, frame rate, the codec type, the codec quality and the timescale for the output movie. In this example we're only using two arguments (15. and jpeg) to specify the frame rate (15. indicates 15 frames per second) and the codec type (jpeg indicates Photo-JPEG) of the output movie. For a full description of all the arguments for the write message, see the Object Reference entry for the jit.record object.
Note that we have the metro object set to send a bang message every 66.67 milliseconds. This is done to match the input movie's frame rate. If you change the metro object's rate and record a few more movies, you will see that a faster metro rate causes the movie to be longer and slower, while a slower metro rate results in a shorter, faster movie. This happens because of the event-driven model being used by jit.record.
More muscle
Open the Advanced_recording subpatch.
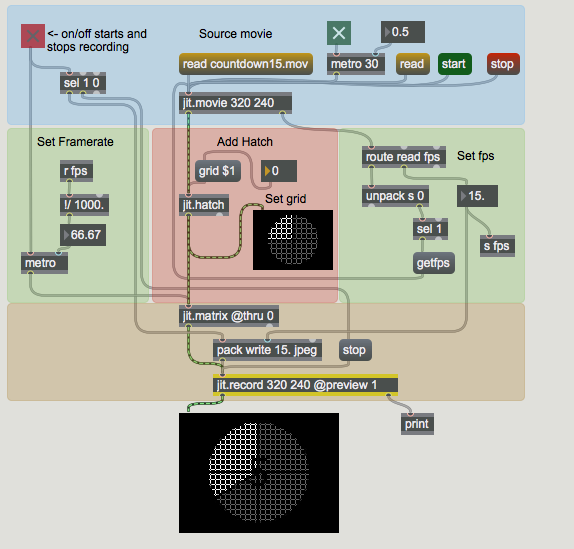
The second example patch is a little more complicated, but it has two important additions (and several minor ones).
 Same idea, different patch
First, we're automatically detecting the frame rate of the original movie (using the getfps message), and using it to set both the rate of the metro object driving jit.record and the output movie's frame rate, as well. Let's look at that portion of the patch in detail:
- When a movie is successfully loaded into jit.movie, the object sends the message read filename.mov 1 out its right outlet. (If the read operation is unsuccessful, the number will not be 1.) We're using the route object to retrieve this message.
- The unpack s 0 object breaks up the remaining elements of the message. We're not interested in the file name, only in the success or failure of the read operation, so we've attached nothing to the left outlet of unpack, and attached a select object, which tests for the integer 1, to the right outlet. If our read operation was successful, the select object will output a bang.
- The bang is used to send the message getfps to jit.movie, which will respond by sending the message fps [fps] out its right outlet. The [fps] message element is a floating-point number representing the movie's frame rate. This value is sent from the route object's middle outlet, and used to set the metro object's speed and the output movie's frame rate.
This patch includes a second improvement. Rather than locking the entire patch to the frame rate of the original movie, we've added a jit.matrix object with thru turned off to collect the output of the patch, and we're using a second metro to send it bang messages at the correct frame rate for jit.record. This permits the rest of our patch to operate independently, at as fast or slow a rate as we want, with only the very last part of the patch specifically timed to the recording process.
Finally, we've added a neat crosshatching filter (the jit.hatch object) with its own editing control (the number box and the grid $1 message box). You can use this to modify your movie while you're recording it and watch the effects on playback. You can substitute any kind of Jitter object or patch you want at this point in the recording patch and modify what you record in real time.
Off the clock
Open the Off-line_recording subpatch.
Both of the previous patches have a problem: under high processor loads, these patches will drop frames. In many cases, this is not a problem, and the patches we've looked at are well suited to recording in any context, including live performance.
But how can we record a sequence in which every frame in an original movie has a corresponding frame in the output movie? How do you render movies in Jitter so that, even under heavy processor or disk load, every processed frame is captured?
There is a way. The jit.movie object's framedump message offers a non-realtime playback mode that works perfectly with jit.record.
Scroll all the way down in the Patcher window to see the third example.
 Non-realtime recording with framedump
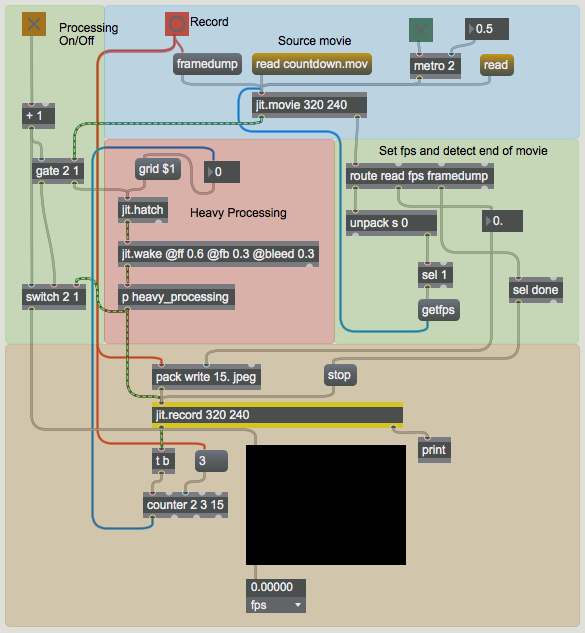
On first inspection, the third example patch may not seem a lot more complicated than the previous one. But don't be fooled -- this unassuming patch will bring even the speediest computer to its knees.
Click the message box countdown.mov to load a movie into the jit.movie object, start the metro object by clicking on the toggle box connected to its inlet and watch the jit.fpsgui object's framerate output display located at the bottom of the patch. If you get more than 10 fps, you have a much nicer computer than we do.
While this patch runs slowly in real time, it does a great job of creating a movie in non-realtime. Using the jit.movie object's framedump message and the jit.record object, the patch will capture every frame of the original movie, process it, and produce an output movie of identical length.
Here's how it works: the framedump message tells the jit.movie object to stop playing its movie, and then sends each frame out, one at a time. (N.B. You don't need to send a bang or outputmatrix message to the jit.movie object for the frames to be sent.) Because of the way the Max scheduler works, a new frame will not be sent until the previous frame has been fully processed and recorded. Let's try it out.
Click on the toggle box connected to the inlet of the metro object to turn it off. (Sending a bang to jit.movie during the framedump operation will cause an extra frame to be sent, which is not what we want.) We've connected the button on the top left corner of the patch to both the pack object that sends the write message, and the framedump message. Press the button, enter a file name when the File Dialog appears, and wait for the movie to render. When the framedump is finished, the jit.movie object sends the message framedump done from its right outlet. The example patch uses that message to trigger a stop message to jit.record.
The example patch also takes advantage of the fact that the jit.record object sends a matrix out its left outlet after recording a frame. We're using that frame to trigger a bang message to a counter object that is driving the grid attribute of the jit.hatch filter. This creates a repeatable sequence of processing changes that happen as the movie is captured.
Click on the "read" message box to open the movie you've just created. Turn on the metro to display the movie. Click on the toggle box connected to the gate object to see your new movie. This switches the jit.movie object's output directly to the jit.pwindow, instead of through the processing objects.
Technical Detail: This tutorial was written in the days of antiquity, when computers (and Max) were less efficient. Chances are, your computer will just shrug off the demands in the heavy_processing subpatch with out breaking a sweat. The point is, when you do reach that level of processing (and we all do eventually), the framedump message will get the job done.
Summary
The jit.record object provides event-driven ways to record Jitter matrices as movies. You can record the output of a Jitter patch in real time as you manipulate your patch, or out of real time, in render-like operation. You can use the jit.movie object's framedump message to process an entire movie file without dropping any frames. This method lets you record high quality movies regardless of the load being placed on your computer's processor.
Optimized blur/sharpen
Crosshatch filter
The Jitter Matrix!
In-Patcher Window
Play or edit a movie
Record a movie
Robert's Cross edge detection
Feedback with convolution stage