Matrix PositioningUsing Named Jitter MatricesJitter Tutorials
Tutorial 15: Image Rotation
Rotating and Zooming with jit.rota
Jitter provides an easy way to rotate and/or zoom an image with an object called jit.rota. Rotation and zoom are common and useful video effects, and by combining them in different ways you can also achieve a variety of kaleidoscopic effects. jit.rota takes a matrix of video data (or any other sort of image) in its inlet, and sends out a version that has been zoomed, rotated, and otherwise distorted based on the settings of the object's attributes.
Open the tutorial patch. The QuickTime video dishes.mov is read into the jit.movie object automatically by a bang from loadbang. To see the video, click on the Displaytoggle to start the metro.
The video is a three-second left-to-right camera pan over a set of dishes. However, the loop attribute of the jit.movie object has been initialized to 2, so the movie loops back and forth, giving the illusion of a back-and-forth pan.
Note: Many attributes of Jitter objects use only the arguments 1 and 0 to mean "on" and "off", so it's reasonable to assume that the loop attribute of jit.movie is the same. While it's true that loop 0 turns looping off and loop 1 turns it on, loop 2 causes the video to play forward and then play backward when it reaches the loopend point, rather than leaping to the loopstart point.
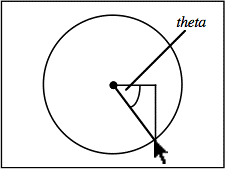
The theta attribute of jit.rota determines the angle of rotation around a central anchor point.
Drag on the Rotation Anglenumber box to rotate the video. Positive (or increasing) values cause counter-clockwise rotation, and negative (or decreasing) values cause clockwise rotation. The angle of rotation—a.k.a. the angle (theta)—is stated in radians. A value of 0—or any multiple of 2π (i.e., 6.283185)—is the normal upright positioning. A value of π (i.e. 3.141593)—or any odd multiple of π—is the fully upside-down position. Experiment until you understand the relationship between the theta values and the behavior of jit.rota.
Technical Detail: jit.rota does a lot of internal calculation using trigonometry to determine how to rotate the image. If you're not a trigonometry buff, you might not be used to thinking of angles in terms of radians. In everyday conversation we more commonly use degrees, with a full rotation being 360°. In trigonometry, it's more common to use radians, where a full rotation equals 2π radians. That's because a circle with a radius of 1 has a circumference of exactly 2π, so you can refer to an angle by referencing the point where it would intersect the unit circle. (For example if you started at a point on the unit circle and traveled a distance of exactly π/2 around the circumference, you would end up at a 90° angle—i.e. an angle of π/2 radians—from where you started, in reference to the circle's center.)
Also, in trigonometry we consider a positive change in angle to be a counter-clockwise rotation around the unit circle, whereas in everyday life you might more commonly think of a clockwise motion as being intuitively "positive" or "increasing" (like the passage of time).
So, to convert a clockwise rotation in degrees into the same rotation in radians, you would need to multiply the degree angle by 2π, then divide by -360.
Automated Rotation
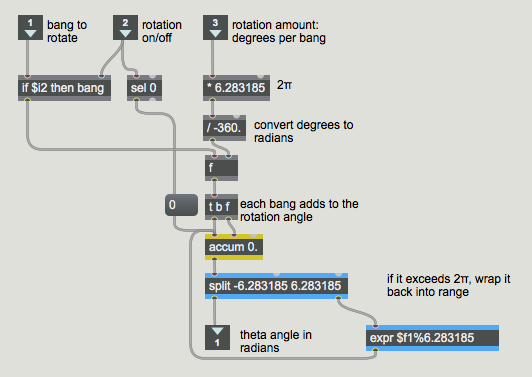
Besides rotating the image by hand, you can also write an automated process in Max that will supply continually changing rotation angles. In the previous chapter we wrote a subpatch called rotate that used the line object to increase the angle of hue rotation continually from 0° to 360°. In this chapter we do something similar, but this time we use the bang from the metro that's displaying the movie to increase the angle of rotation. To keep it "user-friendly" we show the user degrees of angle rotation rather than radians (we convert degrees to radians inside the subpatch), and we also display the rotation speed as "rotations per second."
In the number box labeled Degrees per bang, enter the number 6. This will cause the rotation angle to increase by 6 degrees with each bang from the metro. Since the metro sends out a bang 20 times per second (once every 50 ms), we know that we can calculate the number of rotations per second by the formula d*20/360—that is, d/18—where d is the degrees of angle increase per bang. Now click on the toggle marked On/Off to begin the automated rotation. Double click on the patcherrotate object to see the contents of the subpatch.Automated rotation in the [rotate] subpatch
We convert what the user specifies as degrees per bang into an amount in radians, by multiplying the degrees by 2π and dividing by –360. (See the Technical Detail sidebar above.) When a bang comes in the left inlet, if rotation is turned on then the bang gets passed through and it causes an increase of angle rotation to be added into the accum object. Note that a negative degrees per bang amount works fine, too, and causes a counter-clockwise rotation of the image. When the total rotation angle exceeds 2π (or -2π), a split sends the value to an expr that uses a modulo operation to bring it back into range (resetting the value in the accum object) before sending it to the outlet. When rotation gets turned off, we detect that fact with a sel 0 object, and reset the theta angle to 0.
Close the subpatch window. Click on the On/Offtoggle to stop the automated rotation.
Zoom In or Out
The other main feature of jit.rota is its zooming capability. The amount of zoom is determined by jit.rota's zoom_x and zoom_y attributes. These permit you to zoom in or out in the horizontal and vertical dimensions independently; or you can zoom both dimensions simultaneously by changing both attributes at once.
Drag on the number box labeled Zoom to zoom in and out. Values greater than 1 expand the image (zoom in), and values less than 1 shrink the image (zoom out). You can change the zoom of the x and y dimensions independently by entering values directly into the x and ynumber boxes. (Negative zoom values flip the image as well as resize it.)
When we zoom in on the image—say, with a zoom value of 2—we still retain reasonably good image quality because we've turned jit.rota's interp attribute on with an interp 1 message. If you turn interp off, you will get pixelation when you zoom in. When you're zooming out, interp has no appreciable effect, so it's pretty much a waste of the computer's time. (See Jitter Tutorial 14 for a discussion of pixelation and interpolation.) However, interpolation does improve the look of rotated images, even when they've been shrunk by zooming out.
Beyond the Edge
Set the zoom of both dimensions to some small value, such as 0.25.
When the image does not fill the entire display area because of shrinking or rotation, jit.rota has to decide what to do with the rest of the matrix that lies outside the image area. At present jit.rota is setting all the cell values outside the image area to 0, making them all black. The way that jit.rota handles the cells that lie outside the image boundaries is determined by its boundmode attribute. The different available boundmode settings are presented in the popup menu labeled Space outside the image in the upper-right corner of the patch. We initialized the boundmode value to 1, which instructs jit.rota to clear all the outlying cells. Here is the meaning of each of the boundmode settings:
0Ignore: Leave all outlying cells unchanged from their previous values.
1Clear: Set all outlying cell values to 0.
2Wrap: Begin the image again, as many times as necessary to fill the matrix.
3Clip: For all the outlying cells, continue to use the values of the boundary cells of the image.
4Fold: Repeat the image, flipped back in the opposite direction.
For special effects when the image is zoomed out, try setting the boundmode attribute to 2 (wrap) for a "Warhol" duplicate image effect, or 4 (fold) for a kaleidoscope effect.Now try turning the automated rotation back on, to combine rotation and zoom, and modify the different parameters (Degrees per bang, Zoom, and Space outside the image).When you have finished experimenting, turn off the automated rotation and return the zoom attributes (zoom_x and zoom_y) to 1.
Some Adjustments—Anchor Point and Offset
Up to now we've been using the center of the image as the anchor point of the rotation. However, you can choose any point for this. The center of rotation is set with the anchor_x and anchor_y attributes. Right now those attributes are set to 160 and 120 (half of the image dimensions), but you can change them in the number boxes labeled Anchor point.
Try different anchor points, and drag on the Rotation Anglenumber box to see the effect. Some anchor point settings you might want to try are 0,0 or 40,30 or 160,–120 or 320,240. You might want to set the boundmode attribute to 1 so that you can see the effects of different rotations more clearly. Note that the anchor_x and anchor_y values are specified relative to the upper-left corner of the matrix, but they may exceed the bounds of the matrix's dimensions.
In addition, you can move the image to a different location in the output matrix after zooming and rotation take place, using the offset_x and offset_y attributes.
To see this most effectively, first click on the message box above the pvar object in the lower right corner of the patch. This will set the rotation angle, boundary mode, zoom, and anchor points back to the settings we used at the outset of this chapter. (We have given names to the relevant user interface objects so that we can communicate with them via pvar.) Now set the Zoom number box to some value between 0 and 1, to zoom out on the image. Use the Location offsetnumber boxes to move the image around by changing the offset_x and offset_y values. Try this in conjunction with boundmode 4, to see its utility in the "kaleidoscope" mode.When you have finished, reset the Location offset values to 0.
Mouse control of rotation
We've devised one more way for you to rotate the image.
Click in the jit.pwindow display object and, with the mouse button held down, drag in a small circular motion around the center of the object.
jit.pwindow tracks your mouse movements and, as long the mouse button is down, it sends coordinate information (and other mouse information) out its right outlet in the form of mouse messages. The first two arguments of the mouse message are the x and y coordinates of the mouse, relative to the upper left corner of jit.pwindow. We use those coordinates to calculate the angle of the mouse relative to the center of the jit.pwindow, and we send that angle to jit.rota as the argument to the theta attribute.
You can use the mouse location in jit.pwindow as control information
Technical Detail: Do you really want to know how we did that calculation? If so, read on.
If we think of the center point of the jit.pwindow as the origin point 0,0, and we think of the current mouse location relative to that as being a point along a circle around the origin, then we can describe a right triangle based on those two points. By taking the arctangent of the mouse's coordinates y/x, we get the angle of the mouse relative to the center of jit.pwindow.
So we take the incoming x and y coordinates, and the first thing we do is convert them so that they're relative to the center of the jit.pwindow. We do that by subtracting 160 from the x dimension coordinate (so the x values will now go from -160 to 160) and multiplying the y coordinate by –1 (so values will increase as we go up, instead of down) then adding 119.5 to it. (If we added exactly 120, then every time we had a y coordinate of 120 from jit.pwindow we'd be trying to divide by 0 in expr, which is an undefined mathematical operation.) Once we have converted the x and y coordinates, we take the arctangent of y/x to get the angle in radians, then multiply that angle value by -1 to make clockwise rotation of the mouse cause clockwise rotation of the image.
This method only works within a 180° span, because the arctangent function can't tell the difference between a mouse location and its opposite point on the circle. (The calculation of y/x will be the same for both points.) So, every time the y coordinate of the mouse goes into the bottom half of the jit.pwindow, we add an offset of -π to the theta angle to distinguish those locations from their counterparts on the opposite side. (That's the last part of the expression.)
Note that this expression only works relative to the point 160,120 in the jit.pwindow. If we wanted to make an expression that works for the central point of any size jit.pwindow, we'd need to get the jit.pwindow's dimensions with a getsize message, and use the size values as variables in our expression. As the math books say, "We'll leave that as an exercise for the reader."
Summary
The jit.rota object provides an easy way to rotate an image with its theta attribute, specifying an angle of rotation, in radians. It also provides an easy way to zoom in and out on an image with its zoom_x and zoom_y attributes. You can change the central point of the rotation with the anchor_x and anchor_y attributes, and you can move the resulting image in the output matrix with the offset_x and offset_y attributes. You can change the way that jit.rota treats the matrix cells that lie outside of the resulting image with the boundmode attribute. Using all of these capabilities in combination, you can get image-duplication and kaleidoscope effects in addition to simple zoom and rotation.
Zooming and rotation involve some rather intensive internal calculation by jit.rota, so these operations make substantial demands on the computer's processor. There are additional attributes, not covered in this tutorial, that give you access to virtually every coefficient in the rotation formula, presenting you even more possibilities for distorting and rotating the image. These are shown in jit.rota reference.
To manage the control of so many attributes at once, you can devise automated Max processes to generate attribute values, and/or interactive controls to change the values with gestures.
Store, add to, and multiply a numberEvaluate a mathematical expressionConditional statement in if/then/else formIn-Patcher WindowPlay or edit a movieScale/rotate in 2DLook for a range of numbers
 Automated rotation in the [rotate] subpatch
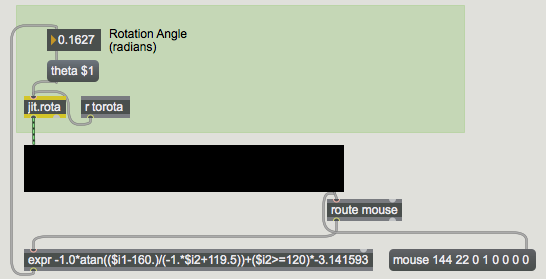 You can use the mouse location in