In this tutorial we discuss some ways to take a portion of one matrix and place it in some different location in another matrix. There are various reasons you might want to reposition the location of data. We'll be focusing especially on visual effects, but the techniques we show here are useful for any sort of task that involves moving matrix data around.
We'll show how to isolate a region of a matrix, place it at a particular position in another matrix, resize it (which can be useful for visual effects such as stretching, pixelation, and blurring), and move it around dynamically.
jit.window
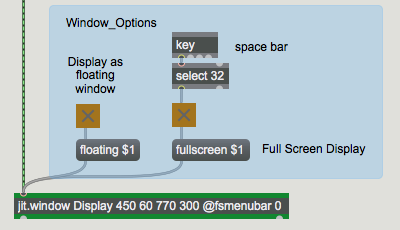
Open the Window_options subpatch
In the bottom-left corner of the patch there is a jit.window object. We introduced this object in Tutorial 1; it creates a separate window for displaying the contents of a matrix. In most of the other tutorial chapters we have used the jit.pwindow object instead.
jit.window and jit.pwindow are pretty similar—aside from the obvious difference that one opens a separate window while the other uses a rectangular region within the Patcher window—and they share many of the same attributes and messages. There are a few differences, though, so we'll use jit.window this time in order to demonstrate a couple of its unique characteristics.
You probably can't see the Display window that has been opened by the jit.window object, because it's hidden behind the Patcher window. However, if we want to, we can make the Display window be a floating window—one that always "floats" on top of every other window in Max while still letting us interact with the foreground Patcher window. To do this, we must turn on the floating attribute of jit.window with a floating 1 message. (The floating attribute is 0 by default.)
Open the Window_options subpatch and click on the toggle box labeled Display as floating window to send a floating 1 message to jit.window.Make the window "float" in front of all other windows
Note that the screen coordinates we've typed into the jit.window object for the display area—450 60 770 300—specify a display area 320 pixels wide by 240 pixels high. (For an explanation of how to specify screen coordinates for jit.window, see Tutorial 1 and/or the Note later in this chapter.)
From one jit.matrix to another
Now we will load in a picture and try some modifications.
Click on the message box importmovie sunset.jpg to load a picture into the jit.matrix object at the top of the patch. Turn on the metro labeled Display On/Off to begin sending bang messages to jit.matrix.
The bang sends the matrix (through jit.hue) to a second jit.matrix object before displaying the image with jit.window. In that second jit.matrix object we'll be able to modify attributes to change what part of the matrix we display.
The matrix goes (through jit.hue) to another jit.matrix, then to jit.window
We've saved several preset configurations for the window's user interface objects in a preset object in the middle of the patch.
In the preset object, click on preset 1.
This changes the dimensions of the lower jit.matrix object to 16x12, by sending a dim 16 12 message to it.
The dim message changes the dimensions of the matrix in jit.matrix
The matrix coming in has the dimensions 320x240, but the receiving jit.matrix has dimensions of only 16x12, so it tries its best to display the entire matrix it receives, but it necessarily has to discard much of the information. This results in a very pixelated image. (The term pixelation refers to the mosaic effect that results from using an insufficient viewing resolution—an insufficient number of pixels—to represent an image faithfully.) Even though the jit.window object is capable of displaying the full-resolution 320x240 image (because of the window dimensions typed in as arguments), the matrix it is receiving is only 16x12 now. It "expands" the 16x12 matrix to 320x240 for display purposes, duplicating pixels as it needs to.
Try dragging on the two number boxes labeled Change actual matrix dimensions to see different pixelation effects.
Interpolation
Now set the number boxes back to 16 and 12, and click on the toggle labeled Interpolate in window to smooth pixelation to send an interp 1 message to jit.window.Turn on interpolation in jit.window
Now the jit.window object—instead of simply duplicating pixels of the 16x12 matrix to make a bunch of 20x20-pixel blocks—interpolates between values in the incoming matrix as it expands it to 320x240. That is, as it expands the image , it creates a smooth gradation of colors between each cell value and and its neighboring values in the incoming matrix, so all of the transitions from cell to cell in the displayed 320x240 matrix are as gradual as possible. The interpolation causes extreme blurring because the size difference between the incoming matrix and the display is so great.
Click on the toggle again to turn off the interpolation. This sends an interp 0 message to jit.window, setting its interp attribute to 0 (off). Enter some new matrix dimensions into the number boxes labeled Change actual matrix dimensions so that the image is not quite so pixelated: say, 80 and 60. (You should see that now the pixelated blocks are each only 4x4.) Click on the toggle to turn interpolation back on. Notice that in this case the blurring is not so extreme because interpolation occurs over only 4 pixels. Click on the toggle again to turn off the interpolation.Now click on the toggle labeled Interpolate in matrix to smooth pixelation to turn on interpolation within jit.matrix (not jit.window).Interpolation doesn't do much when you're reducing the size of the matrix
Notice that this doesn't have very much effect. That's because jit.matrix still only has a 80x60 matrix to send out. Interpolation in this case (when we're reducing the size of the matrix rather than enlarging it) is pretty ineffectual.
Click on that toggle again to turn off interpolation in jit.matrix.
Isolate a Part of the Matrix
Now we'll look at ways to focus on a particular portion of a matrix.
In the preset object, click on preset 2. Now you see only a small portion of the picture.
This preset restores the dimensions of our jit.matrix object back to 320x240. But we can still isolate a particular part of the matrix , without altering the actual dimensions of the full matrix, using some different attributes: srcdimstart, srcdimend, and usesrcdim. Notice that we have sent three new messages to jit.matrix to set those three attributes: dimstart 40 150, dimend 119 209, and usesrcdim 1. These messages let us specify a subset of the full matrix coming in the inlet, and send those values out as a full-sized (in this case 320x240) matrix. This smaller subset of the incoming matrix gets "expanded" (cells are duplicated as needed) within jit.matrix itself, to fill the size of the outgoing matrix. The srcdimstart and srcdimend attributes are ignored. In the messages for setting the srcdimstart and srcdimend attributes, the words srcdimstart and srcdimend are followed by cell indices describing the starting and ending points within each dimension. With our dimstart 40 150 and dimend 119 209 messages, we have told jit.matrix to use a specific 80x60 region from cell 40 to 119 (inclusive) in the horizontal dimension and from cell 150 to 209 in the vertical dimension.
Note: In this chapter we've discussed three different ways of specifying rectangular regions! It's important to be clear what we're specifying in each case.
In jit.window we typed in screen coordinates for the display area of the window. In the computer's operating system, screen coordinates are specified in terms of the point at the upper-left corner of a pixel. The upper-left corner of the entire screen is 0,0; the point two pixels to the right of that (the upper-left corner of the third pixel from the left) is 2,0; and the point 5 pixels down from that (the upper left corner of the sixth pixel down is 2,5. To describe a rectangular area of the screen, we type in arguments for the left, top, right, and bottom limits of the rectangle's coordinates.
In the dim attribute to jit.matrix, we provided dimension sizes for the object's matrix: the number of cells in each dimension.
In the srcdimstart and srcdimend attributes, we're stating (inclusive) cell indices within the matrix. Remember that cells are given index numbers that go from 0 to one less than the number of cells in that dimension. (Planes are indexed similarly, by the way.) So for a 320x240 matrix, the indices for the cells in the first dimension go from 0 to 319, and the indices for the cells in the second dimension go from 0 to 239. To set the source dimensions for jit.matrix, we need to specify the range of cells we want to start at, using srcdimstart followed by a starting cell index for each of the matrix's dimensions, and using srcdimend followed by the cell indices for the end of the range in each dimension.
These different ways of describing regions can be confusing, but if you think carefully about exactly what it is that you're specifying, you'll be able to deduce the proper way to describe what you want.
We're using only an 80x60 pixel range of the incoming matrix as the source, but the destination matrix is 320x240. Once again, this expansion of a smaller matrix into a larger one causes a pixelation effect. This time, though, the expansion occurs inside jit.matrix (i.e. between its "source" region and its "destination" size), rather than between jit.matrix and jit.window (as we did earlier when we reduced the actual dimensions of the jit.matrix). Therefore, if we want to smooth out the pixelation by interpolating, we must do it in jit.matrix. There's no point in turning on interpolation in jit.window, since it's already receiving a 320x240 matrix from jit.matrix.
If you want to verify this, turn on the interpolate in window...toggle to send an interp 1 message into jit.window. It has absolutely no effect because we're trying to interpolate a 320x240 matrix into a 320x240 display area, so no change occurs. Turn off that same toggle to set the interp attribute of jit.window back to 0. Now use the other toggle to send an interp 1 message into jit.matrix. This time we get the smoothing effect we desire. Try entering new values into the number boxes to change the arguments of the srcdimstart and srcdimend attributes. This lets you isolate any particular region of the picture as your "source" area. Of course, the dimensions you choose for your source area will determine the distortion that the picture undergoes when it's expanded to fill a 320x240output matrix.
Flip the Image
You might assume that the arguments of the srcdimend attribute (the ending cell indices of the source region) should be greater than the index numbers for the srcdimstart attribute. But that need not necessarily be so.
In the preset object, click on preset 3. Now the picture is flipped vertically.The top and bottom have been flipped in the second dimension.
This example shows that if you specify an ending cell index in the vertical dimension that is less than the starting index, jit.matrix will still relate those indices to the starting and ending points in the vertical dimension of the destination matrix , effectively reversing the up-down orientation of the values. (This statement assumes that you have not done the same sort of flip to the orientation of the destination matrix!)
You could do the same sort of flip in the horizontal (first) dimension to flip the image horizontally. If you flip the source region in both dimensions you get the same visual effect as if you had rotated the image 180°.
In the preset object, click on preset 4.
In this example we've flipped the source region in both dimensions, reduced the size of the source area to 160x120, and smoothed out the pixelation by turning on the interp attribute.
Resize the Output Matrix
Just as we specified the source region of the matrix, we can also specify a destination for that source. This still does not change the size of the output matrix; that will still be 320x240, as determined by the dim attribute. However, this does change the region into which the specified source region will be placed. The source region of the input matrix will be placed in the destination region of the output matrix (with expansion/contraction as necessary). Cells of the output matrix that lie outside the destination region will remain unchanged.
In the preset object, click on preset 5. The entire input matrix has been squeezed into an 80x60 rectangle in the center of the output matrix.
The first thing to notice is that the usesrcdim attribute has been turned off, so that we're back to using the entire input matrix as the source. (The srcdimstart and srcdimend attributes are now being ignored.) The usedstdim attribute has been turned on, so the input will be placed in whatever part of the output matrix we specify. The dstdimstart and dstdimend attributes have been set to specify the cells in the center of the matrix as the destination: dstdimstart 120 90 and dstdimend 199 149. We've turned the interp attribute off because we're contracting the image rather than expanding it.
Notice also that we've turned on the toggle labeled Erase previous image. This sends the number 1 into the if$2 then clear object. The if part of the statement is now true, so every time the object receives a message in its left inlet it will send out the message clear. This clears the contents of the jit.matrix object immediately after displaying the image, to prepare jit.matrix for the next matrix it will receive . That ensures that the values in all the cells outside the destination region will be 0, so the unused region of the output matrix will be displayed as black.
Change some of the values in the number boxes that provide the destination dimensions, to move (and resize) the picture within the Display window.
Now turn off the toggle labeled Erase previous image, to suppress the clear messages. Change the arguments of dstdimstart and dstdimend some more, and notice what's different this time. The previous destination regions are still being drawn in the Display window because those cells in the matrix have not been cleared, and they are left unchanged if they're outside the new destination region. This gives the effect of leaving "trails" of the previous image behind. We can potentially use these artifacts for their particular visual effect.
If the matrix is not cleared, old destination areas will be left behind if they're outside the new destination region. For continuous changes, this leaves a trail of past images.
Moving the Image Data Around in the Matrix
By setting up an automated Max process that modifies the dstdimstart and dstdimend attributes, we can move the data around in the matrix, making the image seem to move around in the display.
In the preset object, click on preset 6.
This starts an automated process inside the patchermove_around subpatch that provides a continuous stream of new arguments for the dstdimstart and dstdimend attributes. (It is connected to the lower sections with hidden patchcords.) The toggle above the patcher turns on this process, and the number box gives a time, in milliseconds, for each move to a new destination.
Double-click on the patchermove_around object to see the contents of the subpatch. So far, we're only using the right half of the subpatch.The destination-moving process in the subpatch [move_around]
The "rate" value coming in the right inlet is a time interval for the metro object. The metro periodically bangs four random objects which choose new left, top, right, and bottom cell indices at random. These destination points are sent, along with the time value, to line objects. The line objects send out new values every 50 ms (the rate at which we're displaying the image) to gradually move the destination region to these new random points. Outside the subpatch, those values are used as arguments for the dstdimstart and dstdimend attributes of jit.matrix.
This subpatch contains a couple of tricks worth noting. The first trick is that we've made it so the arguments for dstdimend can potentially exceed the 320x240 range of the matrix. For example, we use a random640 object for the horizontal dimension, then subtract 160 from the result to give us an ending cell index from -160 to 479. We do this to increase the likelihood of a larger destination area so that we can see a larger view of the image as it moves around, and it also means that the image will more frequently move all the way to the edge of the window. It's noteworthy that we can specify destination boundaries that are beyond the limits of the actual cells in the matrix, and jit.matrix will place the image in that area to the best of its ability (clipping it off when it exceeds the limits of the matrix dimensions). The second trick is a trivial but useful detail: we use a sel 0 object to detect when the metro gets turned off, and we use that to trigger a stop message to each of the line objects so that they don't continue sending out values after the user has turned off the process.
Close the [move_around] subpatch window.
Changing, Resizing, and Moving the Source Image
Now we'll automate changes to the source image, as well.
In the preset object, click on preset 7.
In much the same manner as we did for the destination area, we're now continually changing the source area of the image. In effect, we're now seeing a constantly changing view of some retangular subset of the source matrix (using srcdimstart and srcdimend) while also constantly resizing that view and moving it around in the window (using dstdimstart and dstdimend). Because the source and destination rectangles are chosen randomly by the [move_around] subpatch, the image sometimes gets flipped, too. We have turned on the interp attribute in the jit.matrix object to smooth out the pixelation that would occur when the source image gets stretched.
To get a slightly clearer view of what's going on, try turning on the toggle marked Erase previous image.
One More Word About Dimensions
This tutorial has shown how to change the dimensions of a jit.matrix object, and how to specify source and destination regions within that object. For ease of discussion and visualization, we've used a two-dimensional matrix, and specified source and destination rectangles within the matrix. But we should point out that these ideas can also be employed with matrices that have any number of dimensions. (The number of arguments for srcdimstart, srcdimend, dstdimstart, and dstdimend should correspond to the number of dimensions in the jit.matrix object.) For example, if we have a three-dimensional matrix, these arguments can be used to specify a hexahedron in the virtual 3D space of the matrix.
Note: In certain Jitter objects that deal exclusively with 2D matrices, such as jit.movie, source and destination regions will always be rectangular areas. So in those objects the source and destination areas are defined in single attributes called srcrect and dstrect, which take four arguments to specify the bounding (left-top and right-bottom corner) cells of the rectangles.
Hue Rotation
Just to add a little additional color variety, we've placed a jit.hue object between the two jit.matrix objects. (jit.hue is described in detail in Jitter Tutorial 7.)
In the preset object, click on preset 8 to see jit.hue in action.Modify the hue angle
This preset turns off usedstdim, but keeps usesrcdim on, and keeps interpolation on in jit.matrix to blur the expanded image. The automated process in the patcherrotate subpatch continually rotates the hue angle of jit.hue.
Double-click on the patcherrotate object to see the contents of the subpatch.The contents of the [rotate] subpatch
The value coming in the right inlet provides a time, in milliseconds, to complete a 360° hue rotation. When a 1 comes in the left inlet, the number 360 is combined with that time value to instruct the line object to go from 0 to 360 in that amount of time, sending out a new angle value once every 50 milliseconds. Note that the first typed-in argument of the line object contains a decimal point. This instructs line to send out float values rather than ints, for greater precision (and because the hue_angle message of jit.hue expects a float argument). When line reaches 360, its right outlet sends out a bang. We use that bang to set the internal value of line back to 0, then we re-bang the pack object to start the next rotation. When a 0 comes in the left inlet, the sel 1 object passes it directly to line to stop line and reset the hue angle to 0.
Close the [rotate] subpatch window.In the preset object, click on preset 9. This combines virtually all of the automation and image -manipulation techniques of the patch. The changes of destination dimensions of jit.matrix are set to 200 ms this time, creating a more rapid rhythmic effect.
Full Screen Display
When you've got your Max patch creating just the images that you want, and you want to display your results in a somewhat more elegant way, you can instruct jit.window to fill your entire screen. jit.window has an attribute called fullscreen; when fullscreen is on, the jit.window uses the entire screen as its display area. If you uncheck the fsmenubar attribute in the jit.window inspector, the menu bar will be hidden.
There are a few things to remember about using the fullscreen capability of jit.window.
First of all, once you have filled your screen with an image (and especially if you have also hidden the menubar), you will no longer be able to use your mouse to turn fullscreen off. So you will need to program into your Max patch some method of returning the fullscreen attribute to 0.
Secondly, only one jit.window can fill any one screen at any one time. If you have more than one jit.window object vying for access to the full screen, the jit.window object that has most recently had its fullscreen attribute set to 1 will fill the screen.
Also, even when a jit.window is fullscreen, its resolution is determined by its actual dimensions (that is, by the arguments of its rect attribute). So if the rect attribute describes a 320x240 rectangle, that will be the resolution of your image, even though your screen dimensions are much greater than that.
In the Window_options subpatch, we've included the capability to turn the fullscreen attribute of jit.window on and off with the space bar of your keyboard. Note theat the jit.window object has an attribute named fsmenubar set to 0. This removes the top menu bar (in Macintosh) when the window is expanded.
Using the space bar to switch the window to full screen displayTry toggling fullscreen on and off with the space bar. For a more abstract visual effect, try importing the colorswatch.pict image into the jit.matrix at the top of the patch, then try the different presets.
In this tutorial, we've used a still image as our source material so that you could easily see the effects being demonstrated, but there's no reason that you couldn't use a video (from jit.movie or some other video source) as your basic material. (You might want to copy the contents of this patch to a new Patcher window and modify the top-left part of it to try that out.)
Summary
There are several ways to isolate and reposition certain data in a matrix. The dim attribute of jit.matrix sets the actual dimensions and size of the matrix. By turning on the usesrcdim and usedstdim attributes of jit.matrix, you can instruct it to use a particular portion of its input and output matrices, which are referred to as the source and destination regions of the matrix. You specify the cell boundaries of those regions with the srcdimstart and srcdimend attributes (to set starting and ending cells as the corners of the source region) and the dstdimstart and dstdimend attributes (for the destination region). These attributes do not change the actual size of the matrix, but they specify what part of the input matrix will be shown in what part of the output matrix when usesrcdim and usedstdim are on. If the source and destination regions are different in shape or size, jit.matrix will either expand or contract the source region to fit it in the destination region. This results in either duplication or loss of data, but can provide interesting stretching or pixelation effects. The source and destination regions can be altered dynamically with numbers provided by some other part of your Max patch for interactive or automated modification of the size, shape, and position of the image.
When the interp attribute is on, jit.matrix interpolates (provides intermediate values) between values when a dimension of the destination region is greater than that of the source region. This smooths out pixelation effects, and blurs the changes between values in adjacent cells.
The jit.window object displays whatever size matrix it receives, using whatever display rectangle has been specified for it in its rect attribute. If the size of the incoming matrix differs from the size of the display area, the image will be expanded, or contracted, or distorted by jit.window. This, too, can be used for stretching and pixelation effects. jit.window also has an interp attribute which, when turned on, smooths out the pixelation caused by this expansion and stretching.
To fill the entire screen with an image, you can turn on jit.window's fullscreen attribute, and you can hide the menu bar with an fsmenubar 0 message. (Just remember to leave yourself some way to get your Patcher window back in the foreground.)
We've demonstrated the techniques of resizing, repositioning, flipping, and interpolating matrix data to create visual effects such as stretching, distorting,blurring, and pixelation.
Rotate hueThe Jitter Matrix!Play or edit a movieDisplay data in a WindowOutput numbers in a ramp from one value to anotherCombine numbers and symbols into a listFormat items into a list and automatically trigger output.Create a subpatch within a patchStore and recall the settings of other objectsGenerate a random number
 Make the window "float" in front of all other windows
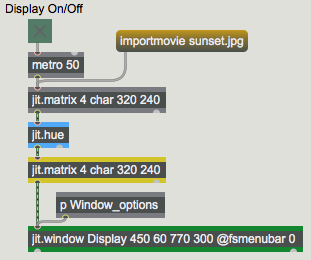 The matrix goes (through
 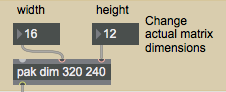 The
The 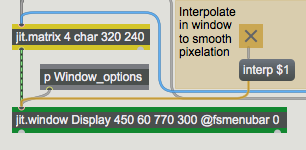 Turn on interpolation in
 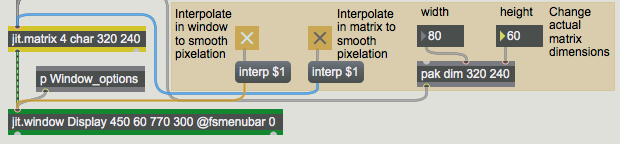 Interpolation doesn't do much when you're reducing the size of the matrix
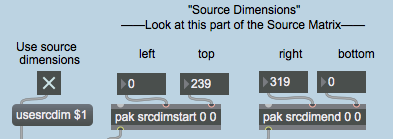 The top and bottom have been flipped in the second dimension.
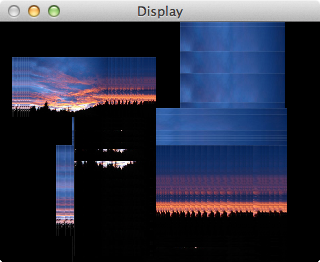 If the matrix is not cleared, old destination areas will be left behind if they're outside the new destination region. For continuous changes, this leaves a trail of past images.
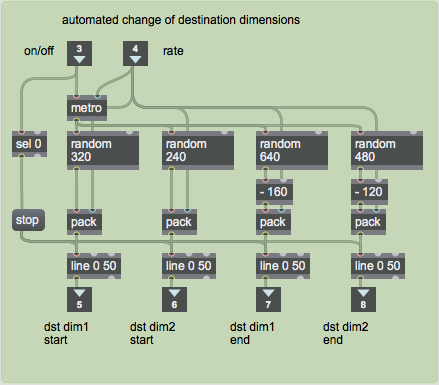 The destination-moving process in the subpatch [move_around]
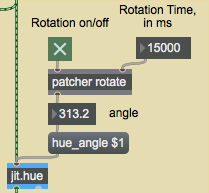 Modify the hue angle
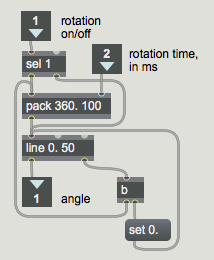 The contents of the [rotate] subpatch