Create a MatrixControlling Movie PlaybackJitter Tutorials
Tutorial 3: Math Operations on a Matrix
This tutorial shows how you can perform simple mathematical operations on the data stored in a Jitter matrix. We'll show you how to use the jit.op object to perform arithmetic scaling of matrix cells, or of individual planes within those cells.
The tutorial patch is split into three simple examples of mathematical operations you can perform with the jit.op object. The jit.op object performs mathematical operations on entire matrices of data at a time rather than individual numbers.
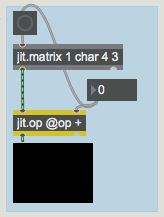
Adding a constant value to all cells in a matrix.
The first example shows a jit.matrix object hooked up to a jit.op whose output is viewable by a jit.pwindow object. Every time you change the number box hooked up to the right inlet of the jit.op object a bang will put out a new matrix from the jit.matrix object. As you can see from its arguments, the jit.matrix object is generating a 4x3 matrix of single-plane char data (i.e. data in the range 0-255). The jit.pwindow object will visualize this matrix for you as a greyscale image. Dragging the number box will change the level of grey shown in the jit.pwindow from black (0) to white (255).
It's important to realize that the jit.matrix object is putting out a Jitter matrix that has all its cells set to 0. If you were to connect the jit.matrix and jit.pwindow objects together and bypass the jit.op, you would see a black image, no matter how many times you send a bang message to the jit.matrix object. The jit.op object is adding a value (as defined by the number box) to all the cells in the Jitter matrix sent between the jit.matrix and the jit.op objects.
Operation @-Sign
We said above that the jit.op object adds a value to all the cells in its input matrix. The jit.op object adds a value (rather than, say, dividing or multiplying) because of the argument to its op attribute (written @op in the object). The argument following @op is a symbol (or a list of symbols, as we'll see in a moment) that defines what math the jit.op performs on its input matrix. In this case, we can see that the op attribute is set to the value of +, which means that it performs simple addition on any matrix that arrives in its left inlet. The integer value in the right inlet is added to all the cells in the matrix. This value is referred to as a scalar, because it adds the same value to the entire matrix (in Tutorial 9 we show how jit.op can do math using two Jitter matrices as well).
Important note: Changing the scalar value in the right inlet of the jit.op object does not output a new matrix. If you were to disconnect the patch cord between the number box and the button object, the jit.pwindow object would stop showing you anything new. The reason for this is that as with most Max objects, most Jitter objects only output data when something comes into their leftmost inlet. In the case above, each time you change the number box, the jit.op object stores the new scalar value. As soon as that happens, the button object sends a bang to the jit.matrix object, causing it to send a new Jitter matrix (with all its values set to 0) into the left inlet of the jit.op object, triggering an output matrix which you can see. If you put a break-watchpoint on the patchcord above the button and then step through the message order with the Step command (shift-cmd-T), you will see how this plays out. (See Max Tutorial 5: Message Order and Debugging for details about how to trace Max messages with the watchpoints feature.)
The scalar value can also be supplied as a constant by using the val attribute of jit.op. For example, if we always wanted to add 134 to all the cells of an incoming Jitter matrix, we could use this object and dispense with the number box:
Setting a scalar as an attribute.
Similarly, if we wanted to change the mathematical operation performed by any given jit.op object, we could send the message op followed by the relevant mathematical symbol into the object's left inlet.
Math Operations on Multiple Planes of Data
The second example shows a more complicated instance of using jit.op to add values to an incoming matrix.
Using separate scalars for each plane of a matrix
This patch is similar to the first one, with the important difference that we are now working with a 4-plane matrix. This is shown by the first argument to the jit.matrix object that generates the matrix we're using. The jit.pwindow now shows things in color, interpreting the four planes of Jitter matrix data as separate color channels of alpha, red, green, and blue. Our jit.op object in this example has a list of four symbols for its op attribute: each symbol sets the mathematical operation for one plane of the incoming matrix. In this patch we're going to pass the first (alpha) plane through unchanged, and add numbers to each of the other planes. (You can mix and match operators like this to your heart's content.)
The pak object feeding the right inlet of our jit.op object takes four integers and packs them into a list. The only difference between pak and the Max pack object is that pak will output a new list when any number is changed (unlike the pack object, which needs a new number or a bang in the left inlet to output a new list). The four numbers in the list generated by pak determine the scalars for each plane of the matrix coming into the jit.op object. In the example above, plane 0 will have nothing added to it (the first argument of the op attribute is pass). Planes 1, 2, and 3, will have 161, 26, and 254 added to them, respectively. Our jit.pwindow object will interpret the cells of the output matrix as lovely shades of magenta (even though we see only one color, there are in fact 12 different cells in the matrix, all set to the same values).
Important Note: If we decided to use only one value for the op attribute of the jit.op object above (and only used one number as a scalar), jit.op would use that mathematical operator and scalar value for all planes of the incoming matrix.
Modifying the Colors in an Image
The third example shows a use of jit.op on a matrix that already has relevant data stored in it:
Multiplying individual planes with scalarsClick the message box importmoviecolorbars.pict. The importmovie message to jit.matrix loads a single frame of an image from a picture or movie file into the Jitter matrix stored by the object. It will scale the picture on the disk to the dimensions of its own matrix (in this case, 320 by 240).
Clicking the button object shows you image calibration colorbars in the jit.pwindow on the right of the patch. In this case, our jit.op object has its arithmetic operators set to pass for the alpha plane and * (multiply) for the other planes. Since we're working with a 4-plane image, we set each of the scalars using a list of 4 floating-point numbers. Values of 1. in planes 1 through 3 will show you the image as it appears originally:
All scalars at 1.
If you set the scalars to 1., 0., and 0., you should see the following image:
The mean reds.
All of the planes (except plane 1) of the matrix containing the colorbars have been multiplied by 0. This will eliminate the alpha, green, and blue planes of the matrix, leaving only the red (plane 1) behind.
Setting intermediate values (such as 0., 0., 1. and 0.5) as the scalars for jit.op will give you an image where the colorbars look different:
Pretty, isn't it?
In this case, the alpha channel is ignored and the red channel is zeroed. The blue plane's values are all half of what they were. The green channel (plane 2) is left untouched.
Important Note: Some mathematical scalars in jit.op are expressed as floating-point numbers, and some are expressed as integers. This depends on the relevant operator (defined by the op attribute), as well as the type of the input matrix. Since all the examples in this tutorial use char matrices, it makes sense to use integers when adding to them (any floating-point numbers will be truncated, as the matrix data needs to remain as integers in the range 0-255). If we were using a float32 matrix as our input, it would make perfect sense to add floating-point numbers to it. Similarly, it's reasonable to multiply a char matrix by a floating-point scalar (240 * 0.5 = 120, an integer). However, since the matrix output by jit.op will still be a char matrix (see note below), you will still only get values in the range of 0-255.
If you experiment with the scalar values you will see that you can easily make some of the colorbars disappear or merge with neighboring bars. This is because the colorbars are all set to standard color values with similar ranges. If you show only one channel at a time (by setting all planes but one to 0), four of the seven bars along the top will show color.
We have demonstrated the + and * operators in this tutorial, but in fact the jit.op object can perform a great many other math operations. For a complete list of the possible operators, see the reference page, or double-click on the p op_list subpatch in the jit.op help file.
Sizing it Up
When you create a jit.pwindow object, it will appear in the Max Console as 80 pixels wide by 60 pixels tall. You can change its size using its grow box, just like many of the user interface objects in Max. If you want to change its size precisely, you can do so using its Inspector or by sending it the size message followed by a width and height, in pixels:
Changing the size of a jit.pwindow
If you send a jit.pwindow object of a certain size (in pixels) a matrix with a different size (in cells), the jit.pwindow object will scale the incoming matrix to show you the entire matrix. If you send a very small matrix to a very large jit.pwindow, you will see pixelation (rectangular regions in the image where the color stays exactly the same). If you send a small jit.pwindow a large matrix, varying degrees of detail may be lost in what you see.
Important Note: in the example above, our jit.matrix holding the colorbars had a size (specified by its dim list) of 320 by 240 cells, a planecount of 4, and a type of char. The jit.op object (and most Jitter objects you will encounter) recognizes that information and adapts to perform its calculation on the entire matrix and output a matrix of the same specifications. If we were to change the jit.matrix object to some different size, the jit.op object would instantly recognize the change and re-adapt. The jit.pwindow object also adapts to the incoming matrix, but in a slightly different way. If the incoming matrix is smaller than its own dimensions, it uses duplicate data to fill all of its pixels. (This results in the pixelation effect described in the previous paragraph.) If the incoming matrix is larger than its own dimensions, it will be obliged to ignore some of the data, and will only display what it can. So, even though the jit.pwindow objects in the Tutorial patch never match the size (in cells) of their matrix input, they do their best to adapt to the size of the jit.op object's matrix. The jit.pwindow in the last example shows you as much as it can of the entire matrix output by the jit.op object, but it has to ignore every other row and column in order to fit the 320x240 matrix it receives into its own 160x120 display area.
Summary
The jit.op object lets you perform mathematical operations on all the data in a Jitter matrix at once. You can perform calculations on the matrix cells in their entirety or on each plane separately. The mathematical operation that jit.op will perform is determined by its op attribute, which can be typed in as an @op[operator] attribute argument or provided by an op [operator] message in the left inlet. For multiple-plane matrices (such as color pictures and video), you can specify the operation for each plane by providing a list of operators (e.g. op pass * * *), and you can provide different scalar values for each plane. In Tutorial 9 you will see how you can use a second Jitter matrix to act in place of a simple scalar.
You can set the size of a jit.pwindow object with a size [width] [height] message. The jit.pwindow will do its best to adapt to the size of any matrix it receives. It will duplicate data if the incoming matrix is smaller than its dimensions, and it will ignore some data if the incoming matrix is larger than its own dimensions. Most Jitter objects do their best to adapt to the dimensions, type, and planecount of the matrix they receive. In the case of jit.op, it does not have specified dimensions of its own, so it adapts to characteristics of the incoming matrix.
The Jitter Matrix!Apply binary or unary operatorsFormat items into a list and automatically trigger output.
 Adding a constant value to all cells in a matrix.
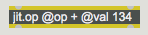 Setting a scalar as an attribute.
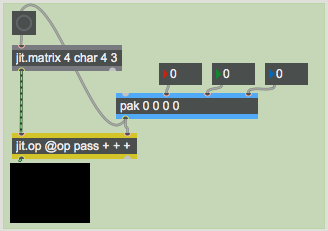 Using separate scalars for each plane of a matrix
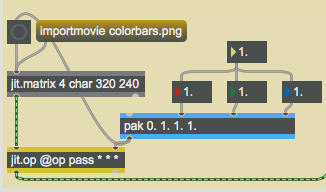 Multiplying individual planes with scalars
 All scalars at 1.
 The mean reds.
 Pretty, isn't it?
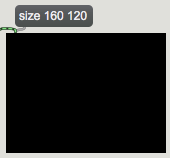 Changing the size of a jit.pwindow