Playing a MovieMath Operations on a MatrixJitter Tutorials
Tutorial 2: Create a Matrix
What's a Matrix?
This tutorial chapter demonstrates some ways to manage numerical data in a matrix.
If you are in doubt about what a matrix is, please first read the chapter titled What is a Matrix? in the Topics section. To summarize here, a matrix is a scheme for storing and modifying large sets of numerical data, by placing the values in a virtual grid. By storing data in a matrix, we can easily identify a particular value by its location in the grid, and we can modify many values at once by referring to all or part of a matrix.
In the previous tutorial chapter, we used thejit.window object to open a window and display the contents of a matrix as colored pixels. The matrix being displayed was from the jit.movie object, an object that continually fills its matrix with the current frame of a QuickTime video. The fact that jit.window was displaying a video, however, was just because that happened to be the contents of the matrix it was being told to display; but in fact any numerical values in a matrix can be visualized similarly. The example patch for this tutorial will show an even simpler example that should help strengthen your understanding of a matrix, the central idea of Jitter.
The jit.matrix object
Create a 16x12 storage space for single 8-bit values.
The jit.matrix object simply creates a matrix, a storage space in memory. We can then store and retrieve numerical values in the matrix, and we can use other objects to print the values or display them visually. The arguments for jit.matrix are an optional [name] argument (not included in this example), the [planecount] (how many values will be stored in each cell of the matrix), the [type] of data (how many bytes to use to represent each number), and then the [dim] (short for "dimensions", describing how large the matrix will be). We use the brackets [] to indicate that this is not the actual word you type in as an argument, but rather a description of the meaning of the argument. The object in this example will create a matrix with 1 plane (one number in each matrix location), using the char data type (single-byte values), with dimensions 16x12 (which equals 192 cells). From this we can deduce that the matrix is capable of holding 192 individual numerical values, with each value ranging from 0 to 255 (that's the range of a single byte).
Note: We always describe the dimensions of a two-dimensional matrix in x,y (width, height) format, meaning that we first state the extent of the horizontal dimension, then the vertical dimension. This is consistent with the way these dimensions are commonly discussed in video and computer screen layout (a 640x480 video image, for example). An alternative way to think of this is that we first state the number of (vertical) columns of data, then the number of (horizontal) rows. You might want to note, however, if you're applying matrix techniques of linear algebra in Jitter, that this format—columns, rows—is different from the way matrices are commonly described in linear algebra, which states rows first, then columns.
We've connected a button object to the inlet of jit.matrix. You'll recall that Jitter objects send out their matrix name when they receive a bang message in their left inlet, so this button will permit us to trigger jit.matrix to send out its matrix name (in the form of a jit_matrix message).
The jit.print object
Print contents of jit.matrix.
Beneath the jit.matrix object there is another new Jitter object, jit.print. This object accepts a matrix name (i.e., a jit_matrix message) in its inlet, and formats the values of the matrix—the sheer number of which can be pretty unwieldy—for printing in the Max Console. It prints the formatted values directly to the Max Console, much like Max's print object, and then passes the matrix name out its left outlet in a jit_matrix message (in the normal manner for Jitter objects).
Click on the button object marked "output". This causes the jit.matrix object to communicate its matrix name to jit.print, which formats the values and prints them in the Max Console.
In the Max Console you will now see the text left: jit_matrix [somename]. The word left shows us that this was printed by the jit.printleft object, so we can see that that is what came out of the outlet of jit.matrix. Because we didn't choose a name for that matrix (we didn't provide a name as the first typed-in argument to jit.matrix), jit.matrix assigned a name of its own choosing. It tries to generate a unique name that's not likely to be used elsewhere, so it usually chooses something strange like "u330000007". In this case we don't really care what the name is, but it does tell the jit.print object what matrix of data to format for printing.
Below that, you will see all of the values in this particular matrix, formatted neatly in 16 columns and 12 rows. Those came from jit.print. They're all 0 right now, because we haven't placed anything else in the matrix yet.
Setting and querying values in a matrix
In the previous chapter we saw how an entire matrix could be filled automatically with frames of color data from a movie. It is also possible to place numerical values in specific individual cells of the matrix, and retrieve values from specific locations. The objects immediately above jit.matrix in this example show a few messages you can use for setting and getting values in a matrix.
The messages setcell and getcell allow you to access specific values in a matrix.
You can store values in a particular matrix location with the setcell message. The syntax for doing so is: setcell [cell coordinates] val [value(s)]. For example, the message setcell 0 0 val 127 to our jit.matrix would set the value of the very first cell of the matrix (i.e., the cell in the upper-left corner) to 127. This is because we number the cell coordinates in each dimension starting with 0 and going up to 1 less than the extent of that dimension. So, in this matrix, locations in the x dimension are numbered from 0 to 15 and locations in the y dimension are numbered 0 to 11. Thus, the cell in the lower right corner would be described with the cell coordinates 15 11.
The combination of the pack0 0 0 object and the message box helps us to format a proper setcell message for jit.matrix. First we set the x and y positions where we want to store the value, then we specify a value to be stored there. With the x and y positions at 0 0, use the number box labeled "value" to send the number 127 into the left inlet of pack0 0 0. This will cause the message setcell 0 0 val 127 to be sent from the message box to the jit.matrix.The message setcell 0 0 val 127 sets the value of cell position 0, 0 to 127.
(If there were more than one plane in this matrix, we could set the values in a particular plane of a cell, or in all planes of the cell. However, this matrix has only one plane, so we'll leave that for another time.)
Just to demonstrate what we said earlier about the numbering of cell positions, try sending the message setcell 15 11 val 255 to jit.matrix. First enter the number 15 into the "x position" number box and the number 11 into the "y position", then enter the number 255 in via the "value" number box. Now click on the button marked "output" to see how the matrix has been changed. Once again the entire matrix will be printed in the Max console via jit.print. Notice that the values in cell positions 0, 0 and 15, 11 have been changed to 127 and 255.The message setcell 15 11 val 255 sets the value of cell position 15, 11 to 255.
In your Patcher window you may have noticed a change in the black rectangular region. The upper-left and lower-right corners of it have changed.
The jit.pwindow object displays numerical values as colors (or greyscale values).
This region is a user interface object called jit.pwindow. In the Add Object palette it appears like this:
The jit.pwindow icon in the object palette
When you click this object in the Add Object palette or drag it into the Patcher window, it creates a small rectangular object. (You can drag the grow bar in the lower-right corner of the object to adjust its dimensions.) This object is pretty much equivalent in function to the jit.window object, but it displays matrix data inside the Patcher window, rather than in a separate window.
So, here we see quite literally the display of numerical values (in this case, char data in the range from 0 to 255) as color. Because there is only one plane in this matrix we're displaying, the display is monochrome—that is, greyscale. The 0 values are totally black, and the other values are some level of gray, up to 255 which is totally white. Thus, the 255 value at cell 15, 11 is displayed as white, and the 127 value at 0, 0 is displayed as a 50% gray, halfway between black and white.
You might say, "That's all very well, but it will be pretty tedious to fill a large matrix this way." And you'd be right. But of course Max allows us to write another part of the program that will automate the process.
Filling a matrix algorithmically
Double-click on the patcherfillmatrix object to open the subpatcher window fillmatrix. This subpatcher generates 192 different values, one for each position in the matrix, by feeding different numbers into a mathematical expression.You can generate values algorithmically to fill the cells of a matrix.
When the uzi12 object receives a bang (from the button labeled "fill" in the main Patcher window) it quickly counts from 1 to 12 out its right outlet and sends a bang for each count out its left outlet. Those bangs trigger the uzi16 object, so that it sends out numbers from 1 to 16 each time. We subtract 1 from these numbers so that they actually go from 0 to 11 and from 0 to 15, and we use the resulting numbers as y and x positions in the matrix. For each of the 12 y positions, the uzi16 object specifies all the x positions, and then uses those numbers in a mathematical expression (in expr) to calculate the value to be stored at that position. These numbers are sent out the outlets, and are used to create well-formed setcell messages in the main patch, just as we did by hand earlier.
The mathematical expression here is relatively unimportant. It could be any formula that generates an interesting pattern of data. In this case we have chosen a formula that will produce a sinusoidal gradation of brightness in each column, and the will cause the overall brightness of the columns to increase from left to right (i.e., as x increases).
Close the fillmatrix subpatch window and click on the button labeled "fill". The matrix is filled with values (generated by the uzi objects in the subpatch) in a single tick of Max's scheduler. Now click on the button labeled "output" to view the contents of the matrix. The numerical values will be printed in the Max Console, and displayed in the jit.pwindow.
Even for a small 16x12 matrix like this, it's tough for us to perceive a trend in numerical data just by looking at a printout of numbers in the Max Console. However, the display in the jit.pwindow gives us a very clear and immediate idea of how the values vary within the matrix. This demonstrates one of the benefits of visualization of numerical data.
You can no doubt imagine other ways to fill a matrix algorithmically in Max, and in fact we'll demonstrate other ways in later tutorial chapters.
Other messages to jit.matrix
There are many other messages understood by jit.matrix, more than we can demonstrate fully here. On the right side of the Patcher we show a couple of other handy messages for filling a jit.matrix instantly with all the same values. The clear message to jit.matrix sets all its values to 0, and the setall message (the word setall followed by a value) sets every position in the matrix to that value.
We also demonstrate the getcell message. The word getcell followed by a location in the matrix (x and y positions) will cause jit.matrix to send the cell coordinates and value of that position out its right outlet.
Enter a y value and then an x value into the number boxes above the getcell $1 $2message box, and observe what is printed in the Max Console. Note that the value at that matrix position is reported out the right outlet of jit.matrix.Query the value(s) at matrix position 8, 6; reports cell 8 6 val [value(s)]
In future tutorial chapters you will see various ways to use values retrieved from a matrix.
Summary
The jit.matrix object creates a storage space for a named matrix of data, with whatever dimensions, planes, and data type you specify. This matrix can be filled with data from another Jitter object (such as jit.movie), or by messages such as setall [value] to set the value in all cells or setcell [position] val [value(s)] to set a specific cell. You can use an algorithm elsewhere in the patch to fill the matrix according to a formula or a set of rules.
To get the data in a specific cell, you can use the getcell [position] message. To see all of the numerical data printed out in the Max Console, use the jit.print object to format the matrix data and print it. To see the matrix data displayed as colors, use the jit.pwindow object. This is similar to the use of the jit.window object demonstrated in Tutorial 1.
In this tutorial we viewed numerical data that we generated ourselves, rather than digital video as in the preceding chapter. The principle of storage is the same in both cases. Whether a matrix is used to store color information for each pixel from a frame of digital video, or abstract numbers which we wish to view as color, the numbers in both chapters are stored in a two-dimensional matrix and are easily displayed in a jit.window or jit.pwindow.
Evaluate a mathematical expressionThe Jitter Matrix!Print a matrix as text in the Max ConsoleIn-Patcher Window (this had obs. screenshots!)
Combine numbers and symbols into a listPrint any message in the Max ConsoleSend a specific number of bang messages
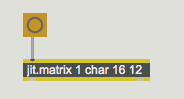 Create a 16x12 storage space for single 8-bit values.
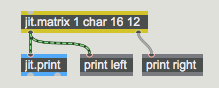 Print contents of jit.matrix.
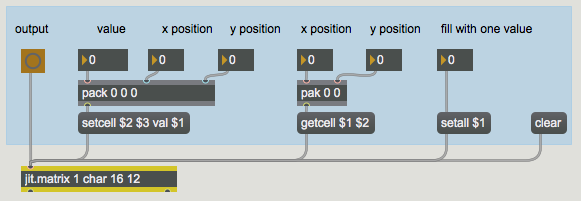 The messages
 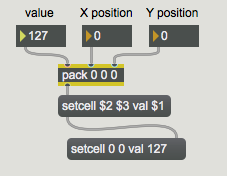 The message
 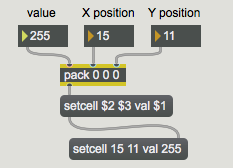 The message
  The
The  The
The 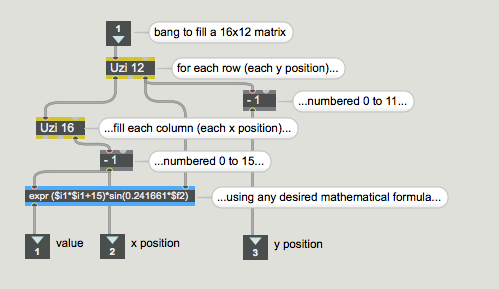 You can generate values algorithmically to fill the cells of a matrix.
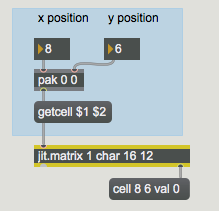 Query the value(s) at matrix position 8, 6; reports