The vst~ object can also host your favorite plug-in synthesizers. In the
previous tutorial we
saw how to load effects plugs and access their various features. To summarize, there are
four ways to load a plug-in:
Click the plug icon on the left hand toolbar to open the plug browser—this
presents a list of all plug-ins with options to refine the list by type and a full
search feature. Note that this can be done with the patcher locked or unlocked.
In path edit mode, click on the object action menu at the left of the vst~
object, hold the mouse pointer over the files option and select the desiged plug
from the list that appears.
Send the vst~ object a plug message. This may take the name of
a plug-in as an argument. If none is supplied, a file open dialogue will appear.
Add the plug-in name as an argument to the vst~ object.
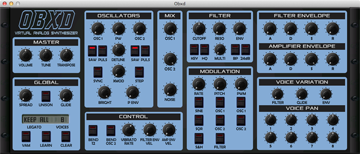
A typical soft-synth plug
Once loaded, the features of a instrument plug-in are accessible in the same manner as effects
plugs. The open message opens the instrument interface (the generic option is available),
and parameter lists and program lists are available as before. The only differenece is
instruments do not normally process audio. What is required is commands to play notes.
Since plug-in instruments were first conceived for use in MIDI sequencers, it is not
surprising that MIDI messages are used to play them.
To send a MIDI message to an instrument in vst~, we include it as arguments to a
midievent message (e.g. if we send the message midievent 144 60 127,
the instrument should begin playing note 60 (middle C) loudly. This note should
continue to play until we send the message midievent 128 60 64 or
midievent 144 60 0). Max simplifies the task of sending properly formatted midievent
messages to an instrument in vst~ by using the midiparse and midiformat objects.
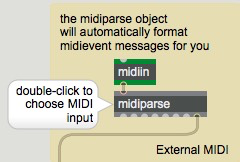
MIDI input and VST instruments
Raw MIDI input can be automatically formatted as midievent messages using the
midiparse object. The object receives raw MIDI input from a midiin
object and outputs the proper midievent messages as a list out of its rightmost
outlet. Connect that outlet to the vst~ object's left inlet, and you're ready to go.
External MIDI input
MIDI messages and VST instruments
You may not always be using MIDI input from external sources to send messages to to an instrument
in a vst~ object. The midiformat object also has the ability to format and output
midievent messages that can be sent to the vst~ object's left inlet.
Open the tutorial patch to see some methods of generating midievents.
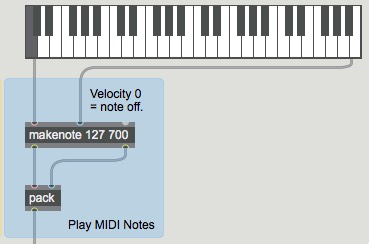
Playing MIDI notes
Formatting midievents to play notes
The blue section of the tutorial patch shows one strategy for generating notes.
Basically, anything created by makenote is easily handled by a pack and a
prepend object. The pack object creates a list composed of the MIDI note
number and a velocity value, which is sent to the leftmost inlet of the midiformat
object. This method will work with the makenote behavior of sending a 0 velocity for
note off. Any other note generation system we care to devise will also work, as long as the
result is a list of note number and velocity.
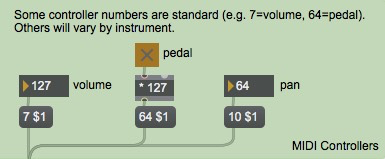
MIDI Controllers
The green section of the tutorial patch shows an example of control change messages. Control change
messages take the form of a list whose first value identifies the controller number, and whose
second value represents the controller value. Some MIDI controller numbers are standard for
all VST instruments (such as controller 64, which is a sustain pedal, or controller 7, which is
the volume control), while others will vary from instrument to instrument.
Formatting control change messages
The MIDI spec states
that switch-type controls, like pedals, should be turned off with a value of 0 and on with 127.
Some plug-in instruments will interpret any non-zero value as on, but you can't count on it,
so we multiply the toggle output by 127 to send the specified message. In addition, one set of
control numbers that is rigidly defined is the last 8, from 120 to 127. These are
the channel mode messages, which affect the instrument as a whole. The useful ones
are 120: all sound off, 121: reset controllers and 123: all notes off.
The others, which set features like polyphony and local control, don't really apply to plug-ins.
All three of these messages are sent with a value of 0.
MIDI Pitch Bend
The pink section of the tutorial patch shows an example of sending high-resolution (14-bit) pitchbend
messages. The technique involves adding the hires attribute as an argument to the
midiformat (i.e. @hires 2), and using the p bender subpatcher to send
a value to the midiformat object's pitch bend inlet.
In this example we're setting the value of the @hires attribute to a value of 2,
which corresponds to traditional 14-bit MIDI pitch bend resolution. The pink section of the
tutorial patch shows an example of this. In addition to setting the attribute value as an
argument to the midiformat object, we are using the p bender subpatcher to send
a value in the range of -8192 to 8191 (i.e. 16384 possible values) to the midiformat
object's pitch bend inlet.
Using midiformat to send pitch bends
The p bender patcher's contents show one way this can be done.
The slider object in the tutorial patch has been given a size of 16384 steps
(this is 14-bit resolution, and is typical of most synthesizers). The range we send
includes the notion of a "center" position for no pitch bend (0). The p bender
subpatch contains an additional bit of patching that will return the pitchbend control
to 0 when it are released (otherwise, any bend is left on forever). The subpatcher takes
care of this for us by detecting a mouse-up and triggering a line object to
smoothly return the control to its center. The arrangement of trigger, gate
and set message is necessary to keep line informed of the current position
of the slider so the ramp will start there.
Pitchbend control logic
Note: An alternate method of sending pitchbend information would be to set
the @hires attribute to a value of 1. When set, the midiformat
object will expect input as a floating point value in the range of -1.0 to 1.0.
You may find this to be a more intuitive way of working (and you'll have to modify the
p bender patcher accordingly).
Summary
Max can host plug-in software synthesizers in either VST or AudioUnit formats with
the vst~ object. All features of either format are available to the Max programmer.