In this tutorial, we look at the wave~ object, which allows
you to access buffer~ data as a wavetable for an oscillator.
This allows you to load samples and use them as waveforms which
are accessed based on playback frequency. You can use these wavetables
to build sample-based oscillators for more complex synthesis patches.
Use any part of a buffer~ as a wavetable: wave~
As was shown in an earlier tutorial, the cycle~ object can
samples of a buffer~ as a wavetable through which
it reads repeatedly to play a periodically repeating tone. The
wave~ object is an extension of that idea; it allows you to
use any section of a buffer~ as a wavetable with detailed control of the endpoints.
The start and end points within the buffer~ are determined
by the number or signal received in the middle and right inlets of
the wave~ object. As a signal in the wave~ object's
left inlet goes from 0. to 1., wave~ sends
out the contents of the buffer~ from the specified start
point to the end point. The phasor~ object, ramping
repeatedly from 0 to 1, is the obvious choice as an input
signal for the left inlet of wave~.
In a standard implementation of wavetable synthesis, the wavetable
(16K samples in the case of cycle~, or a section of any
length in the case of wave~) would be one single cycle of
a waveform, and the frequency of the cycle~ object
(or the phasor~ driving the wave~) would determine
the fundamental frequency of the tone. In the case of wave~,
however, the wavetable could contain virtually anything (an
entire spoken sentence, for example).
wave~ yields rather unpredictable results compared to some of
the more traditional sound generation ideas presented so far, but
with some experimentation you can find a great variety of timbres
using wave~. In this tutorial patch, you will see some ways
of reading the contents of a buffer~ with wave~.
Synthesis with a segment of sampled sound
The tutorial patch is designed to let you try three different
ways of driving wave~ (labeled 1, 2, and 3)
with two different audio samples (labeled A and B): with a
repeating ramp signal (phasor~), a sinusoid (cycle~),
or a single ramp (line~). The bottom part of the patcher is
devoted to the basic implementation of wave~, and the upper
part of the window contains the three methods of reading through the
wavetable. First, let's look at the bottom half of the window.
Turn audio on. Set the amplitude to a comfortable level. Click the message box labeled A. This will instruct the wave~ object to use the buffer~ named words and will set the length of the wavetable to the entire length of the sample. Now we are ready to read through the wavetable.
Choose ‘Read forward’ from the pop-up umenu in the middle
of the window. This will open the first signal inlet of the selector~,
allowing wave~ to be controlled by the phasor~ object in
the circuit in the upper-left (labeled 1).
Set the number box marked ‘Range’ to 1. This sets
the amplitude of the phasor~, so it effectively determines
what fraction of the wavetable will be used. Set the number box
marked ‘Frequency’ to 2. The phasor~ now goes from 0 to 1
two times per second, so you should hear wave~ reading through
the buffer~ every half second.
Try a few different sub-audio frequency values for the phasor~,
to read through the buffer~ at different speeds. You can change
the portion of the buffer~ being read, either by changing the ‘Range’
value, or by changing the start and end times of the wave~ at the
bottom of the patcher. Try audio frequencies for the phasor~ as well.
Notice that the rate of the phasor~ often has no obvious relationship
to the perceived pitch, because the contents of the wavetable do not represent
a single cycle of a waveform. Furthermore, such rapid repetition of an
arbitrarily selected segment of a complex sample has a very high likelihood
of producing frequencies well in excess of the Nyquist rate, which will be
folded back into the audible range in unpredictable ways.
Click on the message box labeled B to refer wave~
to the buffer~ object named chords.
This changes the contents of the wavetable (because wave~
now accesses a different buffer~), and sets the value of
the ‘End time’ number box equal to the length of the
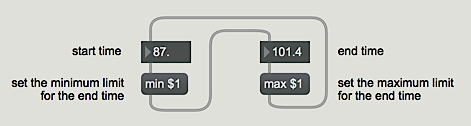
file sacre.aiff. Notice an additional little programming trick -
shown in the example below - employed to prevent the user from
entering inappropriate start and end times for wave~.
Each time the start or end time is changed, it revises the
limits of the other number box
With this new buffer~, experiment further by reading different
length segments of the buffer~ at various rates.
Using wave~ as a transfer function
Take a look at the section of patcher logic labeled 2. The buffer~
object can also be used as a lookup table that can be accessed in
different ways by other objects. In the next tutorial we'll look at this
in a more traditional manner, but with the wave~ object you can
generate interesting timbres by feeding a simple waveform into the
object as an index value. To use wave~ in this way, we must
scale and offset the incoming cycle~ so that it sends signal
values from 0 to 1.
Set the start and end times of wave~ close together, so that
only a few milliseconds of sound are being used for the wavetable.
Choose ‘Read back and forth’ from the pop-up umenu in the
middle of the window. This opens the second signal inlet of the
selector~, allowing wave~ to be controlled by the
cycle~ object.
Set the ‘Range’ number box to a very small value such
as 0.01 at first, to limit the cycle~ object's
amplitude. This way, cycle~ will use a very small segment
of the wavetable as the transfer function. Set the frequency of
cycle~ to 220 Hz. You will probably hear a rich
tone with a fundamental frequency of 220 Hz. Drag on the ‘Range’
number box to change the
amplitude of the cosine wave; the timbre will change accordingly.
You can also experiment with different wavetable lengths by changing
the start and end times of wave~. Sub-audio frequencies for the
cycle~ object will produce unusual vibrato-like effects as
it scans back and forth through the wavetable.
Play the segment as a note
Look at the third section of patcher logic at the top,
labeled 3. Because wave~ accepts any signal
input in the rage 0 to 1, you can read through the wavetable
just once by sending wave~ a ramp signal from 0 to 1
(or backward, from 1 to 0). Other objects such as play~
and groove~ are better suited for this purpose, but it
is nevertheless possible with wave~.
Choose ‘Read once’ from the pop-up umenu in the middle
of the window. This opens the third signal inlet of the selector~,
allowing wave~ to be controlled by the line~ object.
Set start and end times for your wavetable, set the ‘Duration’
number box to 1000, and click on the button
to traverse the wavetable in one second. Experiment with both
buffer~ objects, using various wavetable lengths and durations.
Changing the wavetable dynamically
The cycle~ object in the right part of the Patcher window is
used to add a sinusoidal position change to the wavetable. As the cosine
wave rises and falls, the start and end times of the wavetable increase
and decrease. As a result, the wavetable is constantly shifting its
position in the buffer~, in a sinusoidally varying manner.
Sonically this produces a unique sort of vibrato, not of fundamental
frequency but of timbre. The wavetable length and the rate at which it is
being read stay the same, but the wavetable's contents are continually changing.
Set the ‘Shift amount’ to 0.35, and set the ‘Shift rate’ to 6.
Set the start time of the wavetable to 102 and the end time to 109.
Click on the message box to refer wave~ to the buffer~chords object. Choose ‘Read forward’ from the pop-up umenu.
Set the frequency of the phasor~ to an audio rate such as 110,
and set its range to 1. You should hear a vibrato-like timbre change
at the rate of 6 Hz. Experiment with varying the shift rate and the shift
amount. When you are done, click on the toggle to turn audio off.
Summary
Any segment of the contents of a buffer~ can be used as a
wavetable for the wave~ object. You can read through the
wavetable by sending a signal to wave~ that goes from 0 to 1.
So, by connecting the output of a phasor~ object to the input
of wave~, you can read through the wavetable repeatedly at a
sub-audio or audio rate. You can also scale and offset the output of
a cycle~ object so that it is in the range 0 to 1, and use that
as input to wave~. This treats the wavetable as a transfer function,
and results in waveshaping synthesis. The position of the wavetable in
the buffer~ can be varied dynamically - by adding a sinusoidal offset
to the start and end times of wave~, for example - resulting
in unique sorts of timbre modulation.
Store audio samplesSawtooth wave generatorVariable-size wavetable