MSP Tutorials
Sampling Tutorial 1: Recording and Playback
The next group of tutorials introduce concepts for the playback within
MSP of audio samples. Samples can be recorded and played back in a variety
of ways, depending on your requirements, and can be accessed either from
computer memory or as an audio file on your hard drive.
Sound input: adc~
Just as the dac~ object exists for getting sound out of your
computer (to your headphones or speakers), an object exists for getting audio from
the real world into your computer: the analog-to-digital conversion object
called adc~. It recognizes all the same messages as the dac~
object, but instead of sending signal to the audio output jacks of the computer,
adc~ receives signal from the audio input jacks, and sends the incoming
signal out its outlets. Just as dac~ has a user interface version called
ezdac~, there is an iconic version of adc~ called ezadc~.
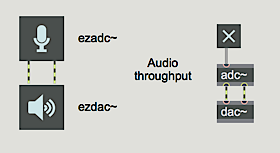 adc~ and ezadc~ get sound from the audio input jacks and send it out as a signal
To use the adc~ object, you need to send sound from some source into the computer. The sound may come from any line level source such as a media player, or from a microphone - your computer might have a built-in microphone, or you can use a standard microphone via a preamplifer. If you have a external audio interface, you can select it from the Audio Status window and use the inputs on that device as well.
Double click on the adc~ object to open the Audio Status
window. Make sure that the Input Source popup menu displays the input
device you want. Depending on your computer system, audio card and driver, you
may not have a choice of input device-this is nothing to be concerned about.
In the section of the tutorial patcher labeled 1, click on the
toggle above the adc~ object to turn audio on. If you want to hear the input
sound played directly out the output jacks, adjust the gain~ object marked
Audio thruput level. If you are using the internal microphone on your
computer, be careful for feedback when playing sound out of the built-in speakers at
the same time.
Storing audio in MSP: buffer~
In the lower part of the patch notice the object called
buffer~. Though it isn't connected to the rest of the patcher logic, the
buffer~ object provides the central functionality of this patcher - it stores
the sample data from the sound we'll be working with. In MSP, all sample playback
from computer memory takes place via buffer~ objects. The object is
created with a name as its argument, which is arbitrary. This name is
used by other objects to access the audio data in the buffer~ object.
So in our case, our buffer~ is named soundbyte; any objects in the
patcher which need to play or record into that chunk of sample memory must also
be set to use soundbyte as their buffer~ name. The second
argument to buffer~ sets the initial length of the sample in milliseconds. In
our tutorial, we'll be working with a 2-second (2000 millisecond) sample of audio.
Recording a sound: record~
A variety of objects exist to access the data in a buffer~. In
the section of the patch labeled 2 (in the upper-left), the record~
object takes an MSP signal and writes it into the buffer~ designated
by the object's argument.
When record~ receives a non-zero integer in its left inlet, it
begins recording the signal connected to its record inlet; a 0 stops the
recording. You can specify recording start and end points within the
buffer~ by sending numbers in the two right inlets of record~. If
you don't specify start and end points, recording will fill the entire buffer~.
Notice that the length of the recording is limited by the length of the
buffer~.
In the tutorial patch, record~ will stop recording after 2
seconds (2000 ms). We have included a delayed bang to turn off the
toggle after two seconds, but this is just to make the toggle
accurately display the state of record~. It is not necessary to stop
record~ explicitly, because it will stop automatically when it reaches its
end point or the end of the buffer~.
Make sure that you have sound coming into the computer, then click
on the toggle to record two seconds of the incoming sound. If you want to,
you can double-click on the buffer~ afterward to see the recorded signal.
Reading through a buffer~: index~
Once you get sound into a buffer~ object, there are several
objects that exist in MSP to read the data back out as an MSP signal. In
addition, you can save your record to an you an audio file by clicking the
write message attached to the buffer~ in the lower-right.
The simplest way to play back the contents of a buffer~ is to
use the index~ object, shown in the area of the tutorial patcher labeled
3. The index~ object receives a signal as its input,
which represents a sample number. It looks up that sample in its associated
buffer~, and sends the value of that sample out its outlet as a signal. The
count~ object just sends out a signal value that increases by one with each
sample. So, if you send the output of count~ - a steady stream of increasing
numbers - to the input of index~ - which will treat them as sample
numbers - index~ will read straight through the buffer~, playing
it back at the current sampling rate.
Turn up the gain~ slider labeled Indexed level, and
click on the button marked Play to play the sound in the
buffer~. You can change the starting sample number by sending a different
starting number into count~. Remember that these values are in
samples, not milliseconds, so depending on your audio hardware's sampling
rate different numbers will mean different things. For example, to play the sample
starting halfway into the buffer~ on regular CD-quality computer
hardware, you would use the value 44100.
Variable speed playback: play~
While the index~ object is a useful one to simply play a
sample forwards at normal speed, part of the creative fun of sampling is the ability
to manipulate sample plackback in different ways. The play~ object
(shown in the section of the patcher labeled 4 allows you to access a
buffer~ object's contents much as if it were an analogue tape, with the
signal input to play~ setting the position of the play head.
As with index~, the play~ object receives a signal in
its inlet which indicates a position which it uses to play audio out of its associated
buffer~. The play~ object differs from index~ in two
important ways, however. First, the unit of time for the play~ object is in
milliseconds, allowing for an easier understanding of where you're playing in the
sample. Second, when play~ receives a position that falls between two
samples in the buffer~ it interpolates between those two values. For this
reason, you can read through a buffer~ at any speed by sending an
increasing or decreasing signal to play~, and it will interpolate between
samples as necessary.
Because the play~ object puts out the sample value that
correlates to the time given at its signal inlet, in order to hear anything, that time
needs to be changing constantly; this is similar to the way a tape recorder works... a
constant signal sent to a play~ object is the equivalent of a tape record set
to "pause". The most obvious way to use the play~ object is to send it a
linearly increasing (or decreasing) signal from a line~ object, as shown in
the tutorial patcher.
Reading from 0 to 2000 (millisecond position in the buffer~)
in a time of 2000 ms produces normal playback. Reading from 0 to 2000 in 4000 ms
produces half-speed playback, and so on. Generating a ramp with the line~
object that runs from high to low (e.g. from 2000 ms back to 0 ms) will play the
audio backwards.
Click on the different message box objects to hear the sound
played in various speed/direction combinations. Turn audio off when you have
finished.
Although not demonstrated in this tutorial patch, it's worth noting
that you could use other signals as input to play~ in order to achieve
accelerations and decelerations, such as an exponential curve from a
curve~ object or even an appropriately scaled sinusoid from a
cycle~ object.
Summary
Sound coming into the computer enters MSP via the adc~
object. The record~ object stores the incoming sound - or any other signal
-- in a buffer~. You can record into the entire buffer~, or you can
record into any portion of it by specifying start and end buffer positions in the two
rightmost inlets of record~. For simple normal-speed playback of the
sound in a buffer~, you can use the count~ and index~
objects to read through it at the current sampling rate. Use the line~ and
play~ objects for variable-speed playback and/or for reading through the
buffer~ in both directions.
Audio input and on/off
Audio on/off; analog-to-digital converter
Store audio samples
Sample playback without interpolation
Position-based sample playback
Record sound into a buffer