Audio Control of VideoDrawing 3D textJitter Tutorials
Tutorial 29: Using the Alpha Channel
In this tutorial we'll look at how to composite two images using the alpha channel of a 4-plane char Jitter matrix as a transparency mask. We'll explore this concept as a way to superimpose subtitles generated by the jit.lcd object over a movie image.
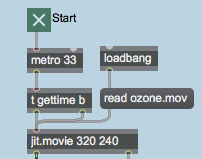
The upper-lefthand region of the tutorial patch contains a jit.movie object that reads the file ozone.mov when the patch opens. The metro object outputs a new matrix from the jit.movie object every 33 milliseconds and polls the time attribute of the object (the current playback position of the movie, in QuickTime time units) by using a trigger object:
Play back the movie, getting the current time position with each new matrixStart viewing the movie by clicking the toggle box attached to the metro. The jit.movie object will start to output matrices as well as the current playback position within the movie. You should see the movie (with subtitles!) appear in the jit.pwindow at the bottom of the patch.Nice kitty
First, we'll look at how the subtitles are being generated. Then we'll investigate how we composite them with the image from the movie using the alpha channel.
The jit.lcd object
The subtitles in our patch are generated by sending messages to the jit.lcd object (at the top of the patch). The arguments to jit.lcd specify the planecount, type, and dim of the matrix generated by the object (jit.lcd only supports 4-plane char matrices). The jit.lcd object takes messages in the form of QuickDraw commands, and draws them into an output matrix when it receives a bang. We initialize our jit.lcd object by giving it commands to set its font and textface for drawing text and its foreground (frgb) and background (brgb) color (in lists of RGB values). We then clear the jit.lcd object's internal image and send out an empty matrix with a bang:
An initialized jit.lcd object
Note: The jit.lcd object has the same complete set of QuickDraw commands and functions that are available in the Max lcd object. Though we'll be using it in this patch for the purpose of generating text images, jit.lcd can be used to generate all manner of 2-dimensional vector graphics as well. The Max tutorial Mouse Drawing — Introduction to Drawing, demonstrates some of the features of the lcd object, all of which can be applied just as easily to jit.lcd.
The jit.lcd object outputs its matrix into a jit.rgb2luma object, which converts the 4-plane image output by jit.lcd into a 1-plane grayscale image. The jit.rgb2luma object generates a matrix containing the luminosity value of each cell in the input matrix. This 1-plane matrix is then sent to a send object with the name alphamask and to a jit.pwindow object so we can view it. Note that the jit.pwindow object has its border attribute set to 1. As a result, we can see a 1-pixel black border around the white image inside.
Our jit.lcd object also receives messages from elsewhere in the patch (via the receive object named lcd attached to it). The subtitles are generated automatically by looking for certain times in the movie playback:
Parsing the time values from the jit.movie object
The jit.movie object outputs its current playback position with every tick of the metro object, thanks to the t gettime b we have between the two. The time attribute is sent out the right outlet of the jit.movie object, where we can use a route object to strip it of its message selector (time). We divide the value by 100 so that we can search for a specific time more accurately. Since the metro only queries the time every 33 milliseconds, it's entirely possible that we'll completely skip over a specific time -- dividing the time value by 100 makes it easier to find the point in the movie we want.
The time values are sent through a gate object where you can disable the subtitles if you so choose:
Control the flow of the time values with a gate objectClick the toggle box attached to the gate. The subtitles should disappear. You can resume the subtitles by clicking the toggle box again.
The subtitles are finally generated when the time values 21 and 40 make it past the gate object. The select object sends out a bang when those values arrive. This triggers commands from the message boxes to jit.lcd:
Performing the subtitling based on the time values
The clear message to jit.lcd erases the drawing canvas, filling all the pixels with white (our chosen background color). The moveto message moves the cursor of the jit.lcd object to a specific coordinate from which it will draw subsequent commands. The write message draws text into the matrix using the currently selected font and textface. Once we've written in our subtitles, we send the object a bang to make it output a new matrix. With every subtitle, we also send a bang to a delay object, which clears and resends the matrix 1000 milliseconds later, erasing the title.
Make Your Own Titles
The region of the tutorial patch to the right (with the pink background) lets you use the textedit object to generate your own subtitles. The number box labelled Offset determines the horizontal offset for the text. The trigger object allows you to send all the necessary QuickDraw commands to the jit.lcd object in the correct order.
Make your own subtitlesTurn off the automatic subtitling with the toggle box above the gate. Type some text into the textedit box and hit the return key. The text will appear superimposed over the image.The new subtitle over the image
Now that we understand how the titles are generated, lets take a look at how they get composited over the movie.
The Alpha Channel
The alpha channel of an ARGB image defines its transparency when it is composited with a second image. If a pixel has an alpha channel of 0 it is considered completely transparent when composited onto another image. If a pixel's alpha channel is set to 255 it is considered completely opaque, and will show at full opacity when composited. Intermediate values will cause the pixel to fade smoothly between the first and second image. In 4-plane char Jitter matrices, data stored in plane 0 of the matrix is considered to be the alpha channel.
Technical Detail: Color systems and software environments differ on whether the alpha channel describes the transparency or the opacity of an image. In movies (and hence in Jitter) an alpha value of 255 means that the pixel is fully opaque. You may encounter programs where the opposite is true (i.e. an alpha value of 255 denotes full transparency). The mode attribute of the jit.alphablend object lets you treat the alpha channel in either way. The default mode of 0 treats increasing alpha values as more opaque, while setting the mode attribute to 1 causes the object to treat increasing alpha values as more transparent.
The jit.alphablend object uses the values stored in the alpha channel (plane 0) of the matrix arriving in the left inlet to perform a crossfade (on a cell-by-cell basis) between the matrices arriving in its two inlets. Our patch replaces plane 0 of the jit.movie object's output matrix with the output of the jit.lcd object. We then use this new alpha channel with the jit.alphablend object to crossfade between the movie and an inverted copy of itself:
Inserting a new alpha channel with the jit.pack object
We use the jit.unpack and jit.pack objects to strip the original alpha channel from our movie. The 1-plane matrix containing the subtitle arrives at the jit.pack object from the receive object above it. Notice how the trigger object is used to force jit.pack to output new matrices even when no new matrix has arrived from the receive (jit.pack, like the Max pack object, will only output a matrix when it has received a new matrix or a bang in its leftmost inlet). The jit.op object creates a negative of the original matrix from the movie (by subtracting the matrix values from 255 using the !- operator). The jit.alphablend object then uses our new alpha channel -- white values in the subtitle matrix cause the original image to be retained, while black values bring in the inverted image from the righthand matrix.
Different techniques are often used for subtitling. The technique of superimposing white text over an image (sometimes with a black border around it) is far more common than the technique used here of filling an alpha mask with an inverted image. However, doing our subtitling this way gives us a perfect excuse to use the jit.alphablend object, and may give you more legible subtitles in situations where the background image has areas of high contrast.
The image below shows the compositing process with jit.pwindow objects showing intermediate steps:
The compositing process, showing intermediate steps
Summary
The jit.lcd object offers a complete set of QuickDraw commands to draw text and 2-dimensional graphics into a Jitter matrix. The jit.rgb2luma object converts a 4-plane ARGB matrix to a 1-plane grayscale matrix containing luminance data. You can replace the alpha channel (plane 0) of an image with a 1-plane matrix using the jit.pack object. The jit.alphablend object crossfades two images on a cell-by-cell basis based on the alpha channel of the lefthand matrix.
Pass the input out a specific outletUse the alpha channel of one image to blend two images togetherQuickDraw wrapperApply binary or unary operatorsMake a multiplane matrix out of single plane matricesIn-Patcher WindowPlay or edit a movieConverts RGB to monochrome (luminance)Make multiple single plane matrices out of a multiplane matrixFormat messages as a text file
 Play back the movie, getting the current time position with each new matrix
 Nice kitty
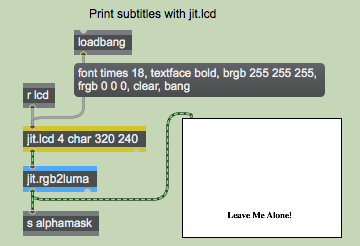 An initialized
  Parsing the time values from the
  Control the flow of the time values with a
 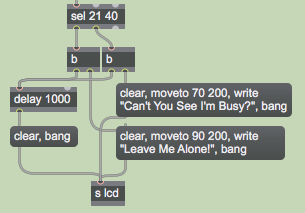 Performing the subtitling based on the time values
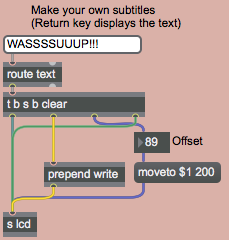 Make your own subtitles
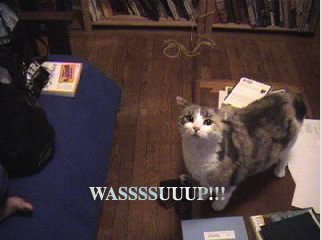 The new subtitle over the image
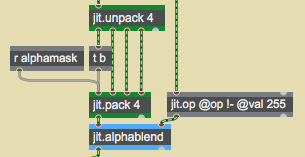 Inserting a new alpha channel with the
 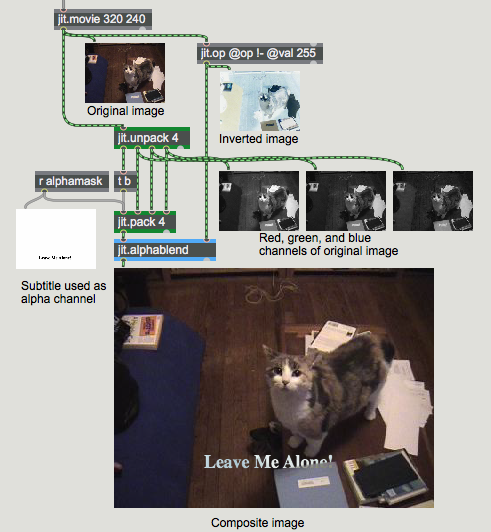 The compositing process, showing intermediate steps