Tracking the Position of a Color in a MovieUsing MSP Audio in a Jitter MatrixJitter Tutorials
Tutorial 26: MIDI Control of Video
The MIDI–Video Relationship
When Max was first developed it was mainly for the interactive control of musical instruments via MIDI. As computer processor speeds increased, it became practical to use Max for processing audio signals directly with MSP, and to process large matrices of data such as video images with Jitter. The great power of Max is that it gives you access to all of the digital information in each of these domains —MIDI, audio, and video—and helps you program interesting correlations between them. This tutorial will focus on using incoming MIDI data to control aspects of video playback in Jitter.
The two main benefits of using MIDI for controlling video are 1) the advantage of using a physical interface—a slider, wheel, etc.—rather than a mouse dragging an onscreen control, and b) the potential to make interesting relationships between music and video in realtime performance. There are many available MIDI controllers that provide useful physical interfaces for video: banks of multiple sliders on fader boxes or digital mixers, jog wheels, etc. Even most synthesizer keyboards have buttons, sliders, wheels, and foot pedals in addition to the obvious piano-like keys. For this tutorial we'll limit ourselves to the controls that are commonly available on most MIDI keyboards.
This tutorial makes the assumption that you have a 61-key MIDI synthesizer keyboard with a modulation wheel and a pitchbend wheel connected to your MIDI interface.
In this tutorial patch we'll play a movie, we'll use the notes from the MIDI keyboard to move around in the movie, and we'll use various types of MIDI messages to apply effects to the video and modify it in real time.
Mapping MIDI Data for Use as Video Control Parameters
The data in MIDI channel messages (notes, pitchbend, aftertouch, etc.) is in the range 0 to 127. For the most part, the attributes of Jitter objects expect arguments in the range 0 to 1—especially when handling 4-plane 2D matrices of char data, as with video. So one of the first tasks we need to do is map the MIDI data into the appropriate range for controlling parameters of the Jitter objects. In the tutorial patch we show some examples of how to do this.
In the yellow portion of the patch we have various MIDI input objects, for gathering the data generated by a keyboard controller attached to ctlin1 for the modulation wheel, ctlin7 for the volume pedal, bendin for the pitchbend wheel, and notein for the keyboard. (If necessary,double click on the above objects to choose a MIDI port.) The most straightforward controls for our use are continuous controllers like the mod wheel and the volume pedal. It's a simple matter to map their values into the 0 to 1 range, just by dividing by 127.0.
Map MIDI control data into a more useful 0-to-1 range
Even though both controllers have a range from 0 to 127, the mod wheel's normal resting position is at 0 (modulation off), while the volume pedal's usual resting position is at some non-zero position such as 100 or 127 (volume on). Thus, they might be useful to us in slightly different ways for controlling video effects.
The pitchbend wheel uses still another normal position. It's resting position is at 64, and it springs back to that position when released by the user. So we want it to give us a value of 0.5 when at rest. The problem is that 64 is not exactly half way between 0 and 127; if we simply divide by 127, a bend value of 64 will give us a result of about 0.504. So we have to treat the downward bend and upward bend values differently, as shown in the following example.
There are 64 pitchbend values below the central value, and 63 above the center.
For the pitch information from the keyboard, the problem is a bit more complicated. First of all, most keyboards do not have keys for all pitches 0 to 127; the normal 5-octave keyboard sends out MIDI key numbers 36 to 96. But even more importantly, we're usually concerned not only with pitch "height" (where it lies in the 0 to 127 range), but also the musical significance of the pitch class (C, C#, D, etc.). In our patch, we use both ways of viewing pitch. We map the key range 36 to 96 into the 0-to-1 parameter range, and we derive the pitch class with a %12 object. (All Cs will be 0, all C#s will be 1, etc.)
Using the note-on key value to derive pitch height and pitch class
In the above example we use a couple of other handy objects to thin out the incoming note data. The poly1 1 object allows only one note-on message to go through at a time; it turns off the preceding note (sends it out with a velocity of 0) before passing the new note through. That's because we only want to try to track one key number at a time. If the user plays with legato technique (plays a note before releasing the previous one) or plays several notes in a chord "simultaneously" (i.e., nearly simultaneously; nothing is really simultaneous in MIDI) it might be hard to tell which note our patch is actually tracking. The poly1 1 object ensures that all notes except the most recently played one will be turned off in our patch, even if the notes are still being held down on the actual MIDI keyboard. The stripnote object suppresses note-off messages, so only the note-on key numbers will get through. We don't want to track the pitches as the notes are being turned off, we only want the get the key number when the note is first played.
Note: We've set up the patch so that you don't really need a MIDI keyboard to try it out. You can play (silent) pseudo-notes by clicking on the keys of the kslider object, and you can generate other values by dragging on the number boxes labeled Mod., Vol., Bend, Key, and Vel. Needless to say, the mouse will be a bit less gratifying than a MIDI keyboard as a physical interface, but you can at least test the patch and try out the things that are explained in this chapter.
Try out your MIDI keyboard (and wheels) to verify that MIDI messages are getting into Max OK. If not, double-click on the MIDI input objects to select the proper input device.
Using send and receive
The workings of this patch may be a bit difficult to follow because we make liberal use of the send and receive objects. We do this mainly to avoid what would otherwise be a ludicrous mess of patch cords. It's particularly appropriate here because we'll be sending so many messages into and out of the jit.movie object from/to so many other places in the patch. So we use receive and send objects for the input and output of the jit.movie object, and all other objects in the patch can now communicate with it remotely.
We can communicate with jit.movie no matter where it's located.
Just in case you're not familiar with the use of a semicolon (;) in a message box, we'll take a moment to point out that you can put a semicolon, the name of a receive object, and a message in a message box, and when that message box is triggered it will function exactly as if you had sent that message into a send object. See the following example.
A semicolon in a message box is like using a send object.
So, let's trace what happens when we send a read message to jit.movie.
Click on the red message box that says ; movieA read blading.mov; movieA vol 0.
This opens the movie blading.mov. When jit.movie has completed the movie-opening operation, it sends a read message out its right outlet. If it opened the file successfully, the full message will be read blading.mov 1. (If it was unsuccessful, the last argument will not be 1.) This message gets sent to the receiveArightoutlet object in the purple region in the bottom-left corner of the patch. We use the route objects to detect all the messages we expect to get out of that outlet and route the messages to the proper places elsewhere in the patch. The arguments of the read message get sent to the r read object in the green region in the bottom-right corner of the patch. With the zlecils 1 and sel 1 objects we check to see if the last argument of the message was a 1. If so, that means that the read was successful, so we then go ahead and get the movie's attributes.
If the movie was read in successfully, get its framecount, fps, rate, and dim attributes.
The remainder of the read message will be the name of the movie file, so we put that into a message box to show the user what file is now playing. If the read was unsuccessful, the sel 1object will trigger the message failed to read movie instead. (The delay object is there to ensure that the failure message gets put into the message box after the filename.)
Using MIDI Notes to Trigger Video Clips
We have chosen to use the pitch class of the note played on the MIDI keyboard to decide where to go in the video. (There are, of course, many ways you could choose to use MIDI to navigate through a movie or select different video segments. This just happens to be the method we've picked for this tutorial. In a later tutorial chapter we demonstrate how to switch from one video to another.) So, we take the total number of frames in the movie (the framecount attribute of jit.movie) and divide that by 12. We then use each note's pitch class (key % 12) to leap to a certain twelfth of the movie.
The movie blading.mov is a 12-second long video consisting of twelve 1-second edits. So in this case each different pitch class takes us to a different scene of this short movie. (Of course, that's all very neat and convenient since we planned it that way. But by using the movie's actual framecount, we've made it so our patch will successfully divide a movie of any length into twelfths.)
The pitch class (5) of F above middle C takes us to frame 75, 5/12 into the movie.
The note-on velocity will turn on the toggle that starts the metro that bangs the jit.movie object, and the note-off velocity will stop the metro.
Click on the toggle labeled Show/Hide Display Window make the Display window visible. Play some notes on your MIDI keyboard (or click on the kslider) to leap to different points in the movie.
The jit.movie object's matrices go to a sendAleftoutlet object, and eventually get to the jit.pwindow via a receivedisplay object. Where do the jit_matrix messages go between sendAleftoutlet and receivedisplay? They actually go into a subpatch for video effects processing. But before we examine that subpatch, we'll discuss how we intend to control those effects.
Routing Control Information
Earlier in this chapter we saw the various ways that the incoming MIDI data gets mapped into the 0-to-1 range for use in controlling Jitter attributes. If you look in the yellow region of the patch, you can see that that control information goes to five send objects: s pitch, s vel, s bend, s mod, and s vol. These are five different sources of MIDI control , and we will use them to control up to eight different video effects linked in a series. The effects link is something like this:
movie -> rate control -> volume control -> brightness control -> saturation control -> edge–detection -> zoom–in control -> pixelation -> zoom–out control -> display window
For maximum versatility, we'd like to be able to control any of those effects with any of our MIDI sources. To accomplish that, we use a combination of objects designed for just such a purpose: matrixctrl and router. The router object takes messages in its various inlets and routes those messages internally to any of its outlets that you specify. The matrixctrl object (designed for controlling the MSP matrix~ object and the Max router object, not for controlling Jitter matrices per se) provides a user-interface for specifying those routings. Take a look at the matrixctrl object in the blue region of the patch.
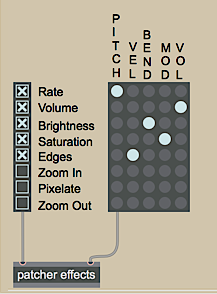
Route fifth input (VOL) to second output (Volume)
matrixctrl shows input sources on vertical grid lines and output destinations on horizontal grid lines. So, if we want to route the messages from the fifth source inlet of a router object to the second destination outlet, we need to click on the grid point where those meet. In this example, we're asking to route the vol data to control the volume effect. Clicking at that point on the matrixctrl grid sends a message to a router object that tells it to make this source–destination connection internally. (Clicking again erases the red dot and breaks the connection in router.) In our program the router object is inside the patchereffects subpatch, but if they were in the same patch, their connection would look like the following example.
router is the"patchbay" for Max messages, and matrixctrl is its user interface
Routing Around (Bypassing) Parts of the Patch
If we aren't using some of the video effects at a certain time (for example, maybe we don't want any zooming or pixelation), we need to bypass those particular effects. In the effects subpatch we'll use Ggate and gate objects to bypass some of the effects. To give the user easy control over which effects to use and which to bypass, we've set up checkboxes in the main patch, using the radiogroup object. When the user clicks on one of the checkboxes, radiogroup sends the on/off status of all of the checkboxes out its outlet, and we can use that information to switch the routing of the Ggates in the subpatch.
Zoom In, Pixelate, and Zoom Out effects are completely bypassed.Double-click on the patchereffects object to see the contents of the effects subpatch.The output of radiogroup is used to switch gate and Ggate objects in the subpatch.
In the subpatch, the receiveAleftoutlet object receives jit_matrix messages from the jit.movie in the main patch. In the example above, the Ggate object routes the jit_matrix message around the p brightness subpatch—bypassing that effect—and the next Ggate object routes the message through the p saturation subpatch. Thus, the Ggate objects serve as Insert/Bypass switches for each effect, and the checkboxes in the radiogroup provide the user interface for those switches. At the end of this chain of effects, the matrix is finally passed to a senddisplay object, which sends the matrix to the Display window.
So, in the main patch we have two separate controls for the user to set up the routing of control data and effects. With the matrixctrl object, MIDI data from a source (or more than one source) can be routed to any (or many) of the effects. With the radiogroup checkboxes, the user can elect to insert effects or bypass one or more effect entirely.
Close the [effects] subpatch window. Use the checkboxes to select which video effects you want to insert, and use the matrixctrl to assign MIDI sources to the control of those effects. Play around with different combinations to see what types of control are most intuitive (and work in the context of a keyboard performance) for each effect.
User Control of Video Effects
Each video effect in this tutorial patch is pretty simple, so we won't describe each one in detail. We'll just point out a few traits that might be instructive as you decide how you want to apply realtime user control of video effects.
Double-click on the patchereffects object once again to open the effects subpatch
window. Double-click on the p brightness object to see a typical one of these video effect subpatches.The 0 to 1 data is scaled to the range 0 to 2 for controlling the brightness.
The jit_matrix message comes in the left inlet and the control data (in the range 0 to 1) comes in the right inlet. The control data is scaled to an appropriate range, and is used to alter an attribute in a Jitter object, and the processed matrix is passed on out to the next effect in the chain. The p saturation and p zoomin subpatches work pretty similarly. The p zoomout subpatch is also similar, but uses a slightly more involved mathematical expression, shown in the following example.
The 0 to 1 data is remapped as an exponential curve from 1 to 0.125.
In the above example the incoming control data (0 to 1) is used to calculate the exponent of a power of 2. When the control data is 0, the expression will be 20=1. When the control data is 1, the expression will be 2-3=0.125. Thus, the actual control value is flipped to have reverse meaning and to describe an exponential curve instead of a linear change.
In the p edges subpatch, the object that's really creating the effect is a Sobel edge detection object called jit.sobel. What we're controlling is the mix between the original input image and the edge-detector's output. So we're really just controlling the xfade parameter of a jit.xfade object (described in detail in Tutorial 8).
The p pixelate subpatch reduces the dimensions of the image matrix (a process known as downsampling), so that some of the data must be discarded and the image will be pixelated when it's displayed in the 320x240 Display window. (This method of pixelation is detailed in Tutorial 14.) We got the dimensions of the original image by retrieving the dim attribute of jit.movie (back when we first read in the movie), so we use our control data to scale those dimensions by some factor from 1 to 0.0625, and we use those new dimensions to set the dim attribute of a jit.matrix object, as shown in the following example.
Downsampling an image causes it to be pixelated when it's upsampled to its original dimensions.
The p rate and p volume subpatches are a bit different because we're not actually processing a matrix in those subpatches, we're just changing an attribute of jit.movie in the main patch. The following example shows the contents of the p rate subpatch.
Send the result to any r rate object, and also use it so set the rate attribute of jit.movie
Summary
The physical interface afforded by MIDI controllers gives you a good way to control video in real time in Jitter, and particularly to make correlations between music and video. Each type of controller—keyboard, pitchbend wheel, modulation wheel, volume pedal, etc.—implies a different type of control mapping. All the data of MIDI channel messages falls in the range 0 to 127, but the way you map that data to control Jitter attributes varies depending on the effect you're trying to produce. In this patch, as a starting point we mapped all the pertinent MIDI data into the range 0 to 1, then we scaled that range as necessary for each video effect.
Because Jitter objects receive so many different messages, it's often necessary to use a message box to construct the desired message. If you find yourself directing many different messages to the same place(s) from different parts of the patch, you might consider using the message box's remote message-sending capability—a semicolon plus the name of a receive object—to reduce the patchcord spaghetti in your patches.
If you need to send Max messages from many different sources to many different destinations, and you need the ability to reconfigure the routing of source messages to the desired destinations, the router object functions well as a configurable patch bay for Max messages. The matrixctrl object provides a readymade user interface for configuring the internal source–destination patching within a router. in this patch, we used a matrixctrl and router to allow the user to direct any of five types of MIDI control data to any of eight different video effects. We used a radiogroup object to create a bank of checkboxes that act as Insert/Bypass switches for the video effects.
Output received MIDI pitch bend messagesOutput received MIDI control valuesThe Jitter Matrix!In-Patcher WindowPlay or edit a movieScale/rotate in 2DMultiply and add Sobel and Prewitt gradient edge detectorCrossfade between 2 matricesMatrix-style switch controlOutput received MIDI note messagesRadio button/check box user interface objectMatrix-compatible Max message routerFilter out note-off messages, pass only note-on messagesMulti-purpose list processor
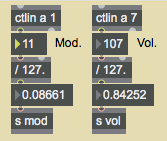 Map MIDI control data into a more useful 0-to-1 range
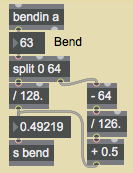 There are 64 pitchbend values below the central value, and 63 above the center.
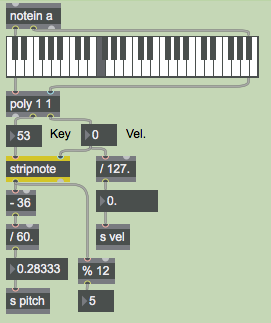 Using the note-on key value to derive pitch height and pitch class
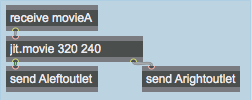 We can communicate with
 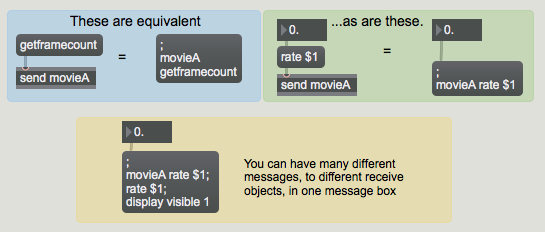 A semicolon in a
 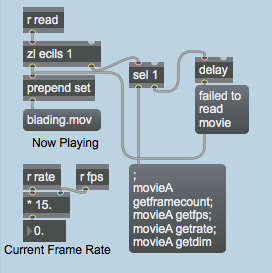 If the movie was read in successfully, get its
 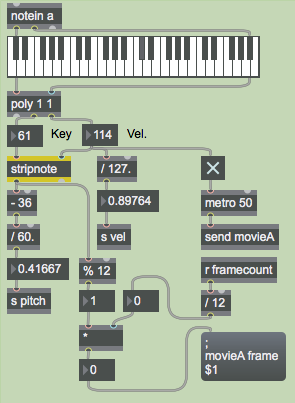 The pitch class (5) of F above middle C takes us to frame 75, 5/12 into the movie.
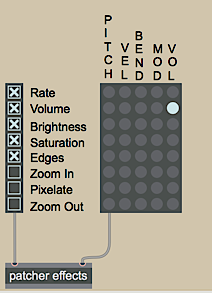 Route fifth input (VOL) to second output (Volume)
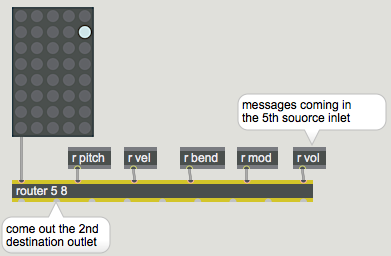
 Zoom In, Pixelate, and Zoom Out effects are completely bypassed.
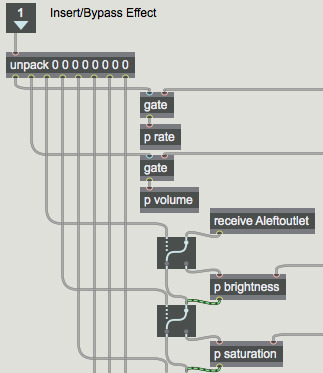 The output of
 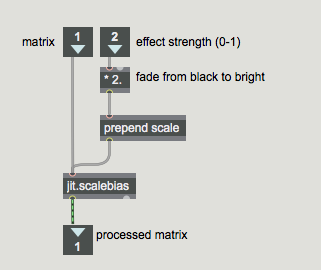 The 0 to 1 data is scaled to the range 0 to 2 for controlling the brightness.
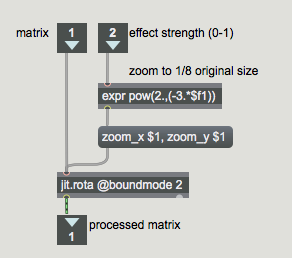 The 0 to 1 data is remapped as an exponential curve from 1 to 0.125.
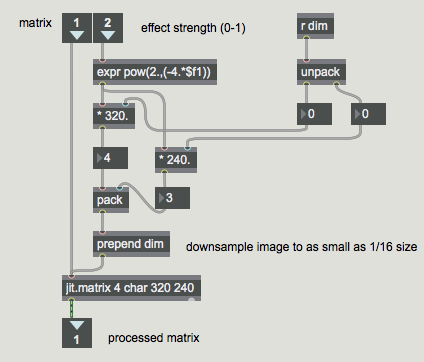 Downsampling an image causes it to be pixelated when it's upsampled to its original dimensions.
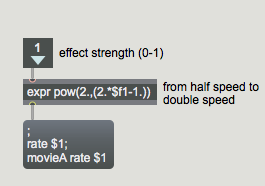 Send the result to any r