Importing and Exporting Single Matrices
Working with Video Output Components
Jitter Tutorials
Tutorial 21: Working With Live Video and Audio Input
This tutorial demonstrates how to use Jitter in conjunction with an image capture device—such as a webcam, a DV camera, or a PCI video input card—to grab video sequences and use them as matrices, or record them directly to disk. We can also use Jitter to record sound directly to disk as a movie.
The patch examples in this Tutorial assume that you have an appropriate image capture device powered on and attached to your computer.
The Basics of Sequence Grabbing
When we capture video images from an input device, we are actually working with a sequence of images. In Tutorial 20, we created a sequence of images using the export operation of the jit.movie object. This time, we'll use the jit.grab object to grab a sequence of images.
First grab
Open the tutorial patch.
 grab it like you want it
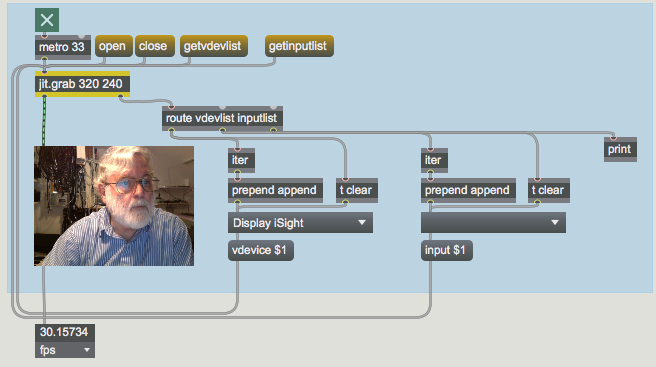
Notice that the jit.grab object takes two arguments (320 and 240) that specify the width and height of the matrix output by the object. They also represent the dimensions of the internal buffer into which any captured data will be placed. The matrix will always be a 4-plane char matrix.
Click the message box that says getvdevlist. This message causes the jit.grab object to search for available video capture devices. The jit.grab object will then send the names of any devices it finds out the right outlet in the form of a list preceded by the symbol vdevlist. In our patch, we're using iter to break the list up, and placing the device names in an umenu. Our list only has one item, Dispaly iSight, but yours may include different items.
Click on the umenu and select the device you'd like to use. This causes the message box that says vdevice $1 to send the index of the selected video capture device (which is the same as its position in the umenu) to jit.grab. If you don't explicitly choose a vdevice, jit.grab defaults to the first selection in the list (equivalent to sending a vdevice 0 message) when it opens the component connection.
Click on the message box that says open. The open message tells jit.grab to open a connection to the video capture device you've selected. Until you send the open message, jit.grab will simply output its last matrix when you send it a bang or outputmatrix message—no sequence grabbing will occur.
Click on the toggle attached to the metro object, to start sending bangs to jit.grab. You should now see your captured video signal in the jit.pwindow.
If you don't see your video signal, check the Max Console and see if jit.grab reported any errors. It may be possible that your device is in use by another application, or that it has gone to sleep (our video camera sleeps after about 3 minutes of non-use, for example). If your device supports multiple inputs, read on.
If you have multiple devices connected to your computer, you can use the vdevice attribute to switch between them, even after sending the open message to jit.grab.
To close the component connection, click on the message box that says close. Leave this patch open; we'll return to it in a moment.
Switching between inputs
The video capture device you're using may support several different inputs. For instance, a CapSure Card supports s-video and composite inputs, and an ATI Rage 128 Pro supports s-video, composite and tuner inputs. FireWire DV generally supports a single input. In this section, we'll learn how to list those inputs and switch between them.
Re-open the jit.grab object's component connection by clicking on the message box that says open.
Click on the message box that says getinputlist. This causes jit.grab to send a list of available inputs for your chosen device out the right outlet preceded by the symbol inputlist. The patch breaks this list up using the iter object and sends it to the umenu on the right of the patch.
Click on the rightmost umenu to see a list of inputs available to your device.
 setting device inputs-->
To change your input, select an item from the umenu. This causes the message box that says input $1 to send the index of the selected input (which is the same as its position in the umenu) to jit.grab, which will switch to your selection. If you don't explicitly choose an input, jit.grab defaults to the first selection in the list (equivalent to sending an input 0 message) when it opens the component connection.
You should now see your captured video signal (from your chosen input) in the jit.pwindow.
When you're done, click the message box that says close to close the component connection.
setting device inputs-->
To change your input, select an item from the umenu. This causes the message box that says input $1 to send the index of the selected input (which is the same as its position in the umenu) to jit.grab, which will switch to your selection. If you don't explicitly choose an input, jit.grab defaults to the first selection in the list (equivalent to sending an input 0 message) when it opens the component connection.
You should now see your captured video signal (from your chosen input) in the jit.pwindow.
When you're done, click the message box that says close to close the component connection.
Summary
The jit.grab object allows you to grab images from any QuickTime-compatible video input device. The object offers both Max-based and Dialog Box interfaces for listing devices and inputs, switching between them, and controlling image quality.
In-Patcher Window
Digitize video from an external source
Play or edit a movie