Color Lookup Tables
Matrix Positioning
Jitter Tutorials
Tutorial 13: Scissors and Glue
In this tutorial we'll learn how to use two simple objects to slice and combine rectangular regions of two-dimensional Jitter matrices.
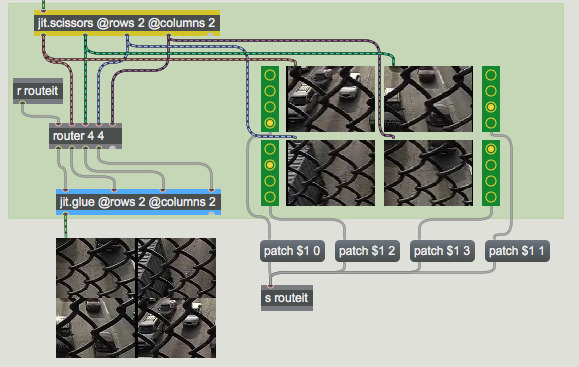
The tutorial patch shows two Jitter objects that neatly complement each other: jit.scissors, which cuts a matrix into equally sized smaller matrices, and jit.glue, which pastes multiple matrices into one matrix. We'll also take a brief look at a Max object called router, which lets you easily route Max messages from multiple sources to multiple destinations.
 Read the movie
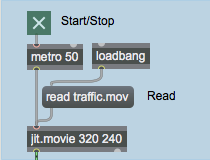
The top left of the patch is straightforward enough. The loadbang object automatically sends the read traffic.mov message to the jit.movie object, which then loads our movie of traffic footage.
Start the metro by clicking the toggle box at the top of the patch. You will see the traffic appear in the large jit.pwindow at the bottom of the patch. More interestingly, you will see the traffic image cut into quadrants, each of which appears in a separate jit.pwindow object off to the right side.
Cut it Up
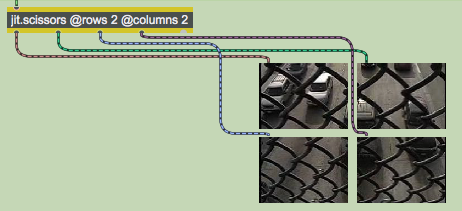
The jit.scissors object is responsible for splitting the Jitter matrix containing the traffic footage into four smaller matrices:
 The jit.scissors object
The jit.scissors object cuts a Jitter matrix of any size, type, or planecount into smaller Jitter matrices that are then sent out independent outlets of the object. The rows and columns attributes specify how many smaller matrices are created each time the object receives a new matrix in its inlet. In our tutorial patch, the jit.scissors object is splitting the image into four smaller matrices (2 columns and 2 rows). These separate matrices come out individual outlets of the object in column-major order (i.e. the object assigns outlets to the smaller matrices from left-to-right and then from top-to-bottom).
Two very important things you should know about jit.scissors:
1) The number of outlets that jit.scissors has is determined at object creation. Therefore the rows and columns attributes will only create outlets when they are specified in the object box. For example, typing jit.scissors @rows 10 @columns 2 will create an instance of jit.scissors with 20 matrix outlets (plus the usual right outet for attribute queries), but simply making a jit.scissors object with no arguments will only give you one matrix outlet. You can change the rows and columns attributes with Max messages to the object, but you won't be able to add outlets beyond what those initially created by the object.
2) The size (dim) of the matrices put out by jit.scissors is equal to the size of the slices of the matrix, not the entire original matrix. For example, the four smaller matrices in our tutorial patch are each 160x120 cells, not 320x240.
Routing the Matrices
The four smaller matrices output by jit.scissors in our patch are each sent to two different places: to jit.pwindow objects so we can see what's going on, and to a Max object in the middle of the patch called router. The colored patchcords illustrate where each smaller matrix is sent.
 The Max router object
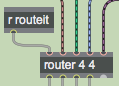
The router object is a combination of the Max gate and switch objects. It takes two arguments (the number of routeable inlets and the number of routable outlets) and is controlled by messages sent to the leftmost inlet. Most of the messages that router understands are identical to the MSP object matrix~. As a result you can use router with the matrixctrl object with ease.
The four inlets to the right of the router object take their input from the four matrix outlets of our jit.scissors object. A receive object assigned to the symbol routeit gets messages from the lower-right of the tutorial patch, which controls our router object. The four leftmost outlets of the router object are connected to a jit.glue object, which we'll talk about in a moment.
 Controlling the router
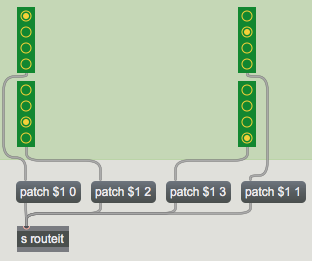
Sending the message patch followed by an inlet number and an outlet number to a router object will make a virtual connection between that inlet and that outlet in the object. Any message arriving at that inlet will be instantly forwarded to the relevant outlet. If an inlet was previously connected to that outlet, a patch message will sever that connection in favor of the new one.
The radiogroup objects in this patch control which outlets of the router our four small Jitter matrices (arriving at the inlets) are sent to. The inlets and outlets number up from 0, so the message patch 2 1 makes a connection between the third routeable inlet and the second outlet of the router object.
Click on some of the radiogroup controls, and watch how the output image in the lower jit.pwindow changes. Notice how with the router object you can make the matrices cut from the traffic image appear in any of the four quadrants of the composite image at the bottom.
The Glue That Keeps It Together
The jit.glue object at the bottom of the patch does the effective opposite of jit.scissors. The rows and columns attributes specify inlets, not outlets, and a composite matrix is output which is made up of the incoming matrices laid out in a grid.
 Sending the same matrix to all four inlets of jit.glue
Important Note: As with jit.scissors, jit.glue can only create new inlets and outlets when the object is created, so the rows and columns attributes present in the object box will determine how many inlets the object has. Also, the size (dim) of the output matrix generated by jit.glue will be equal to the size of all the smaller matrices put together (e.g. our four 160x120 matrices in this patch will yield one 320x240 matrix).
One final point worth making about jit.glue is that its default behavior is to only output a composite matrix when a new matrix arrives it its leftmost inlet. If we were to disconnect the leftmost inlet of our jit.glue object, we would no longer get any new output matrices from the object. The syncinlet attribute lets you make jit.glue sent its output in response to a different inlet. A syncinlet value of -1 will cause jit.glue to output new composite matrices when it gets new matrices at any inlet. While this sounds like a good idea in theory, it can quickly bog down the frame rate of your Jitter processes with lots of redundant work.
Summary
The jit.scissors object cuts a matrix into smaller, equal-sized rectangular matrices. The jit.glue object takes equal-sized rectangular matrices and pastes them back together into a composite matrix. The rows and columns attributes of both objects determine their number of outlets or inlets, respectively, when given at object creation, as well as the way in which the matrix is sliced up or composited. The router object lets you arbitrarily connect Max messages from multiple inlets to multiple outlets in a similar fashion to the MSP matrix~ object.
Glue many matrices into one
In-Patcher Window
Play or edit a movie
Cut up a matrix into evenly spaced sub matrices
send bangs at regular intervals
Radio button/check box user interface object
Matrix-compatible Max message router
Switch between on and off (1 and 0)