This tutorial shows how to use Max lists anf the jit.fill object to fill all or part of a matrix , and how to retrieve all or part of a matrix's contents as a list with jit.spill. We will also demonstrate the use of matrix names to access the contents of a matrix remotely, a concept that will be demonstrated further in Tutorials 12, 16, and 17.
Matrix Names
At the left of the patch, you'll see a blue jit.matrix object. The first argument gives the matrix a specific name, smallbox. The remaining arguments say that the matrix will have 1 plane of char data, and that the matrix will have only one dimension with 12 cells.
This matrix has a unique name: smallbox.
In Tutorial 2 we explained that every matrix has a name. If we don't give a matrix a name explicitly, Jitter will choose a name arbitrarily (usually something strange like "u040000114", so that the name will be unique). The name is used to refer to the place in the computer's memory where the matrix's contents are stored. So, why give a name of our own to a matrix? That way we'll know the name, and we can easily tell other objects how to find the matrix's contents. By referring to the name of a matrix, objects can share the same data, and can access the matrix's contents remotely, without actually receiving a jit_matrix message.
Jitter's use of the matrix name to refer to its memory location is analogous to the way Max's value object works. You can have many value objects with the same name, and you can store a numeric value in any one of them and retrieve the same value from any other one of them. But there is really only one memory location for that name, so they are all sharing the same data. In a like manner, you can have more than one jit.matrix object with the same name, and they will all share the same data. Some other objects, such as jit.fill, can access the contents of that matrix just by knowing its name.
jit.fill
In Tutorial 2 we showed how to place a numeric value in a particular matrix location using the setcell message, and how to retrieve the contents of a location with the getcell message. Now we will show how to use the jit.fill object to place a whole list of values in a matrix. (Later in this chapter we'll also show how to retrieve many values at once from a matrix.)
In the upper left corner of the patch there is a message box containing a list of twelve numeric values. It's attached to a jit.fillsmallbox object. The smallbox argument refers to a matrix name.
jit.fill puts a list of values in the named matrix Click on the message box to send the list of values to the jit.fillsmallbox object. The jit.fillsmallbox object places those values in the matrix named "smallbox". To verify that this is true, click on the button above the jit.matrixsmallbox object to display the contents of the "smallbox" matrix. The values are printed in the Max Console by jit.print, and displayed as levels of gray in a narrow jit.pwindow.
In this example, the list was exactly the right length to fill the entire matrix. That need not be the case, however. We can place a list of any length in any contiguous portion of a 1D or 2D matrix.
The offset attribute
Open the random_lists subpatch by double-clicking it.
By default, jit.fill places the list of values at the very beginning of the matrix. You can direct the list to any location in the matrix, though, by setting jit.fill's offset attribute. The random_lists subpatch demonstrates the use of the offset feature.
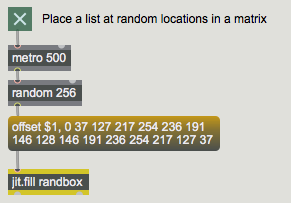
First specify the offset, then provide the list
This example chooses a cell index at random, uses that random number as the argument to an offset message to the jit.fillrandbox object, then sends a 16-element list to be stored starting at that index in the randbox matrix.
Click on the toggle to start the metro. Every half-second, the 16-element list will be written to a new location in the randbox matrix.The list has been written to four locations in the "graybox" matrixYou can use the clear message to zero the contents of the randbox matrix, then watch it as the metro writes the list into new random locations. Note that the metro is also banging the randboxjit.matrix to send its contents to the jit.pwindow for dispaly. When you're done, turn off the metro.
Using multiSlider
Open the draw_list subpatch.
So far we've shown how to put a predetermined list of values into a matrix. When you want to generate such a list of numbers interactively in Max and place them in a matrix in real time, you'll need to use a Max object designed for building lists. We'll look at two such objects: multislider, and zl.
The multislider object displays a set of individual sliders, and it sends out the position of all of its sliders at once as a list of values. (The sliders can be as small as one pixel wide, which can make it look more like a graph than a set of individual controls.) It sends out the whole list when you click in the window to move any of the sliders, and it sends the list again when you release the mouse button. In the draw_list subpatch, we've set up a multislider to contain 256 sliders that send values from 0 to 255, so it's just right for sending a list of 256 char values to the jit.fillgraybox object.
Use the mouse to draw in the multislider, setting its 256 sliders. When you release the mouse button, the list of 256 values is sent out to the jit.fillgraybox object. Notice how the brightness of the matrix cells corresponds to the height of the sliders.
As soon as jit.fill receives a list in its inlet, it writes the values into the named matrix (at the position specified by the offset attribute). As soon as this is done, jit.fill sends a bang out its left outlet. You can use that bang to trigger another action, such as displaying the matrix.
In the first two examples we deliberately avoided using the bang from the left outlet of jit.fill, in order to make it quite clear that jit.fill writes into the named matrix remotely without being physically connected to the jit.matrix object. The bang out of jit.fill's left outlet is convenient, though, for triggering the output of the matrix as soon as it has been filled.
Using zl
Open the collect_values subpatch
In some situations you might want to use a matrix to store numeric messages that have occurred somewhere in the patch: MIDI messages, numbers from a user interface object, etc. The setcell and getcell messages to jit.matrix are useful for that, but another way to do it is to collect the messages into a list and then place them in the matrix all at once with jit.fill.
The zl object is a versatile list-processing object with many possible modes of behavior, depending on its first argument. When its first argument is group, it collects the messages received in its left inlet until it has amassed a certain number of them, then sends the numbers out as a single list. (The values are grouped in the order in which they were received.) So, in the collect_values subpatch, we have placed a zlgroup 256 object that will collect 256 values in its left inlet, and when it has received 256 of them it will send them out its left outlet as a list (and clear its own memory).
Move the slider up and down to generate 256 input values for the zl object. When zl has received 256 numbers, it sends them as a list to jit.fillmidibox —which writes them into the midibox matrix—then bangs the jit.matrixmidibox 1 char 256 object to display the matrix.zl sends a 256-element list into the midibox matrix, then bangs jit.matrix to display the resultIf you have a MIDI keyboard controller attached to your computer, you can use the modulation wheel of the MIDI keyboard to move the slider. (The interaction between MIDI and Jitter is explored in detail in later tutorial chapters.)Values are doubled to occupy the range 0-254, making them useful as char data for the matrix
You can change the length of the list that zl collects, by sending a new list length in the right inlet from the List Lengthnumber box. And you can say where in the matrix you want to put it, by sending an offset message to jit.fill from the Locationnumber box. By varying the list length and location, you can put any number of values into any contiguous region of the matrix.
Try changing the List Length of zl (to, say, 100) and setting the Location of jit.fill's offset attribute (to, say 50), then move the slider some more to put a list of values into that particular location in the matrix.
jit.fill with Multiple-plane Matrices
Open the fill_separate_panes subpatch
jit.fill works fine with multiple-plane matrices, but it can only fill one plane at a time. The plane that jit.fill will access is specified in its plane attribute. In the fill_separate_panes subpatch, we've created another matrix, with four planes of char data this time, named colorbox. We've set up three multisliders and three jit.fill objects, each one addressing a different color plane of the colorbox matrix.
Filling each plane independentlyDrag on the three colored multislider objects to fill each of the three color planes.
This is a convenient way to generate different curves of intensity in the RGB planes of a matrix. The jit.pwindow that's showing the matrix is actually 256 pixels wide, so each of the 64 cells of the matrix is displayed as a 4-pixel-wide band. If you turn on the interp attribute of the jit.pwindow, the differences between adjacent bands will be smoothed by interpolation.
Click on the toggle above the interp $1message box to send the message interp 1 to jit.pwindow. (Note that this also sends a bang to jit.matrix to re-display its contents.The same as the previous example, but with interpolation turned on in jit.pwindow
jit.fill with 2D Matrices
So far, all of our examples have involved one-dimensional matrices. What happens when you use a list (which is a one-dimensional array) to fill a two-dimensional matrix via jit.fill? The jit.fill object will use the list to fill as far as it can in the first dimension (i.e. it will go as far as it can the specified row), then it will wrap around to the next row and continue at the beginning of that row. We've made it possible for you to see this wrapping effect in action.
Click on the button labeled 2D. This will change the jit.matrixcolorbox object to contain a two-dimensional 8x8 matrix, and will also resize the jit.pwindow to a more appropriate shape. Whenever you change the dimensions of a matrix, it loses its contents, so you will need to click in the three multisliders again to fill the matrix anew. You are still sending a 64-element list to each of the jit.fill objects, and they fill each of the eight rows of the matrix with eight elements.Important: Although we don't demonstrate the use of the offset attribute with a 2D matrix in this patch, it's worth mentioning that when the name attribute of jit.fill names a 2D matrix, the offset attribute requires two arguments: one for the x offset and one for the y offset.jit.fillonly works for 1D and 2D matrices.The same example, with each list wrapped around in an 8x8 matrix (shown uninterpolated)The same example, displayed with interpolation
jit.spill
The complementary object to jit.fill is jit.spill. It takes a jit_matrix message in its inlet, and sends the matrix values out its left outlet as a Max list. You may have noticed that while you were using the red multislider the jit.spill object below was sending the values of plane 1 (red) out its left outlet and setting the contents of a message box.
The contents of plane 1 of the "colorbox" matrix, displayed as a Max listAlthough not demonstrated in the patch, jit.spill also has listlength and offset attributes that let you specify exactly how many values you want to list, and from exactly what location in the matrix.
If you need to have the values as an immediate series of individual number messages rather than as a single list message, you can send the list to the Max iter object.
Get a few values from the matrix and make them into separate messages
jit.iter
Open the individual_values subpatch.
For times when you need to retrieve every value in a matrix, there is an object called jit.iter. When it receives a jit_matrix message in its inlet, it sends out an as-fast-as-possible sequence of messages: the cell index (out its middle outlet) followed by the value(s) in that cell (out its left outlet) for every cell of the matrix in order. For a large matrix, this can be an awful lot of Max messages to try to send out in a single tick of Max's scheduler, so when it's done reporting all of the values in a matrix jit.iter sends a done message out its right outlet.
In the individual_values subpatch there is a jit.iter object which receives the matrix information from the jit.matrix readbox 1 char 256 object. We use a swap object to switch the order of the cell index (coming out the middle outlet of jit.iter) and the cell value (coming out the left outlet of jit.iter). We then use the value of that cell as the y-value we want to store in a table object, and we use the cell index as the x-axis index for the table .
Click on the multislider object to send its contents to jit.fill (which will in turn bang the jit.matrix object and communicate its contents to jit.iter. Then double-click the table object to open its graphic window and see that it contains the same values as the readbox matrix.
Note that this technique of using jit.iter to fill a table works well with a modest-sized one-dimensional one-plane matrix because a table is a one-dimensional array. However, the matrix of a jit.movie object, for example, has two dimensions and four planes, so in that case the output of jit.iter's middle (cell index) outlet would be a two-element list, and the output of the left (value) outlet would be a four-element list.
What are ya gonna do with all those numbers?
Still, for one-dimensional matrices, or small 2D matrices, or even for searching for a particular value or pattern in a larger matrix, jit.iter is useful for scanning an entire matrix.
Summary
For placing individual values in a matrix, or retrieving individual values from a matrix, you can use the setcell and getcell messages to jit.matrix (as was demonstrated in Jitter Tutorial 2). For placing a whole list of values in a matrix, or retrieving a list of values from a matrix, use the objects jit.fill and jit.spill. These objects work well for addressing any plane of a 1D or 2D matrix, and they allow you to address any list length at any starting cell location in the matrix.
The multislider and zl objects are useful for building Max list messages in real time. With multislider you can draw a list by dragging on the sliders with the mouse. With zlgroup you can collect many individual numeric values into a single list, then send them all to jit.fill at one time.
You specify the starting cell location in the matrix by setting the offset attribute of jit.fill (or jit.spill). The jit.fill object requires that you set its name attribute (either by sending it a name [name] message or by typing in a [name] argument), specifying the name of the matrix it will fill. It accesses the matrix using this name, and sends a bang out its outlet whenever it has written a list into the matrix. You can use that bang to trigger other actions. In Tutorials 12, 16, and 17 we show some practical uses of accessing a matrix by its name.
To output every value in an entire matrix, you can send the matrix to jit.iter.
Output received MIDI control valuesFill a matrix with a listIterate a matrix as a series of Max lists/valuesThe Jitter Matrix!Print a matrix as text in the Max ConsoleIn-Patcher WindowPlay or edit a movieUnroll a matrix into a listsend bangs at regular intervalsMultiple slider and scrolling displayPlace one message at the beginning of anotherGenerate a random numberOutput numbers by moving a slider onscreenMulti-purpose list processor
 This matrix has a unique name:
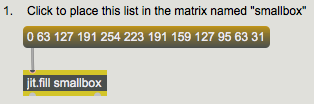
 First specify the offset, then provide the list
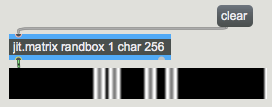 The list has been written to four locations in the "graybox" matrix
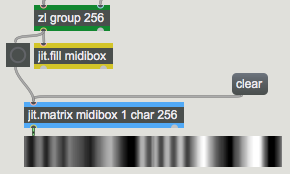
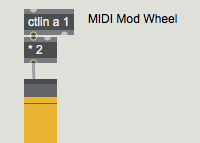 Values are doubled to occupy the range 0-254, making them useful as char data for the matrix
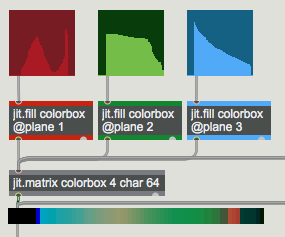 Filling each plane independently
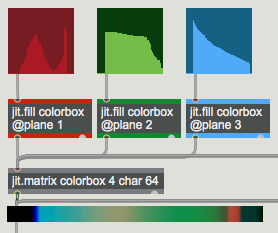 The same as the previous example, but with interpolation turned on in
 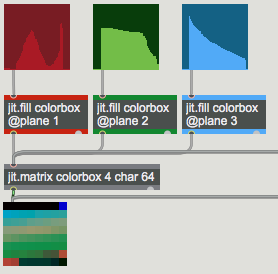 The same example, with each list wrapped around in an 8x8 matrix (shown uninterpolated)
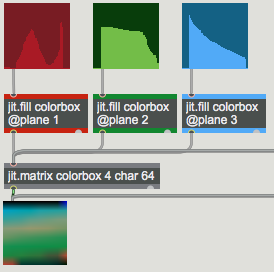 The same example, displayed with interpolation
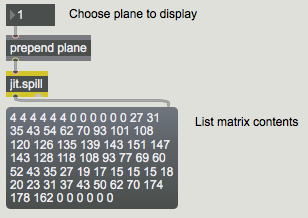 The contents of plane 1 of the "colorbox" matrix, displayed as a Max list
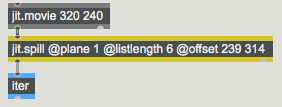 Get a few values from the matrix and make them into separate messages
 What are ya gonna do with all those numbers?